Do you have a question about the Klein Tools 93PLL and is the answer not in the manual?
Specifies the maximum operational altitude for the laser level.
Details the acceptable non-condensing relative humidity range.
Defines the temperature range for safe instrument operation.
Outlines the recommended temperature range for storing the instrument.
Lists laser wavelength and power output per beam.
States the precision of the laser lines over a given distance.
Identifies the battery type and its estimated operational duration.
Provides the physical size and weight of the instrument.
Covers calibration period and compliance with industry standards.
Details the instrument's resistance to dust and water ingress.
Specifies suitable electromagnetic environments for use.
Critical warning about direct laser beam exposure and its dangers.
Important safety instructions for operating the laser instrument.
Interpretation of the various symbols found on the instrument.
Diagrams and labels identifying all parts and features of the laser level.
Procedure for activating and deactivating the X, Y, and Z plane laser lines.
How to use the pendulum lock for self-leveling and tilt indication.
Instructions for using the magnetic bracket for mounting the instrument.
Detailed steps for charging the instrument's rechargeable battery.
Guidelines for cleaning the instrument safely and effectively.
Recommendations for battery recharging when in regular use.
Proper procedures for storing the instrument for extended periods.
Information regarding the product warranty and where to find details.
Instructions for environmentally responsible disposal of the equipment.
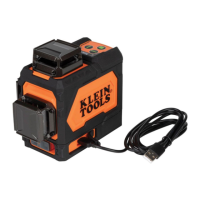
The Klein Tools 93PLL is a rechargeable self-leveling green planar laser level designed for alignment tasks, capable of projecting three orthogonal 360° planar lines in the X, Y, and Z planes. This instrument is a Class 2 Laser Product, emitting beams with a wavelength of 510-530 nm and a maximum output of ≤1mW per beam.
The 93PLL features independent ON/OFF buttons for the X-Plane, Y-Plane, and Z-Plane laser lines (1, 2, and 3 respectively). These buttons are active only when the Power/Pendulum Lock/Unlock Slider Switch (10) is in the "Unlocked" position. If the slider switch is moved to the "Locked" position while lasers are active, they will automatically turn OFF.
The laser assemblies are mounted on a pendulum, allowing the instrument to self-level. For self-leveling to function, the Pendulum Slider Switch (10) must be in the "Unlocked" position. If the instrument is tilted more than 4° from the horizontal plane, it will not self-level. In this scenario, active laser beams will flash, and the Excessive Tilt Indicator (4) will blink, signaling that the instrument is not level. The instrument must be repositioned on a more level surface for proper self-leveling. It's crucial not to use the instrument for laying out level or plumb lines if it indicates it is not level. After use, all active laser beams must be turned OFF, and the Pendulum Slider Switch must be placed in the "Locked" position for storage.
A plumb spot can be identified by simultaneously projecting both Y-Plane and Z-Plane laser lines and locating their top and bottom intersections. The bottom intersection helps locate a specific point on a floor layout, while the top intersection projects that same point to the ceiling.
The device includes a magnetic mounting bracket (14) that attaches to the instrument via a 1/4" threaded screw (15). This bracket can be magnetically secured to ferrous structures (e.g., steel studs, ducts, beams, doors) or mounted to non-ferrous structures using a screw or nail through its keyhole. Once mounted, the instrument can be rotated 360° on the bracket to direct the laser beams.
The 93PLL is powered by a removable Li-Ion battery. When the Red LED on the Battery Level Indicator (5) blinks, the battery needs recharging. The battery can be charged via the 93PLL's USB-C Port (6) or directly through the battery pack's Charge-In Port (16). To charge via the 93PLL, connect the supplied USB-C charging cable (13) to the USB-C port (6) and a 5V DC, Min 2.0A charging source. The Battery Level Indicator (5) will illuminate to show charging status. A full charge can take up to 8.5 hours. To charge the battery pack directly, ensure the 93PLL is off and locked, remove the battery from the battery door (12), and connect the charging cable (13) to the battery's Charge-In Port (16) and a charging source. The Battery Charge Indicator LED (17) on the battery pack will blink red while charging and turn solid green when fully charged.
Regularly inspect the ports and charging cable for debris, dirt, damage, and corrosion. Do not attempt to repair the device or cable; replace them as needed.
For cleaning, ensure the instrument is turned off and disconnected from all power sources. Wipe it with a clean, dry, lint-free cloth. Do not use abrasive cleaners or solvents.
Recharge the battery as needed. There are no pre-designated intervals for recharging as long as the unit is used regularly. Avoid completely discharging the battery on a regular basis, as this can impact its overall life.
For storage longer than one month, fully charge the battery before storing and recharge it approximately every three months to prevent full discharge. Store the instrument in cool temperatures, mild humidity, and away from direct sunlight. Leaving the device in a vehicle or other confined spaces with extreme hot temperatures can decrease service life, cause overheating, or fire. Extreme cold temperatures can also harm performance. Keep the device away from corrosive chemicals and gases. After storage, visually inspect the device and all accessories for satisfactory condition. Allow the unit to return to ambient conditions before recharging.
The instrument is IP54 dust and water resistant. If it comes into contact with water, thoroughly dry it with a dry, lint-free cloth. There are no user-serviceable parts inside the instrument.
| Brand | Klein Tools |
|---|---|
| Model | 93PLL |
| Category | Laser Level |
| Language | English |