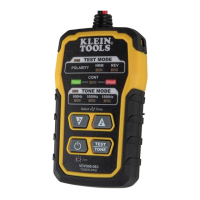
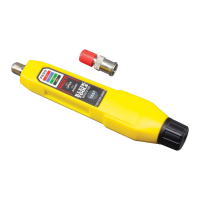
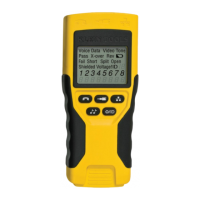
The Klein Tools VDV500-063 Toner-Pro is a professional-series tone generator designed for comprehensive wire identification, tracing, and pair identification in various cabling systems. This device is engineered to simplify the process of locating and verifying wires, making it an essential tool for electricians, network technicians, and anyone working with low-voltage wiring.
Function Description
The Toner-Pro's primary function is to generate distinct tones that can be detected by a compatible probe (such as the VDV500-123 Probe-Pro, sold separately). This allows users to:
- Trace Individual or Paired Wires: By connecting the Toner-Pro to a specific wire or pair of wires, a unique tone is transmitted, which can then be followed along the cable run using the probe. This is particularly useful for identifying a single wire within a bundle or locating a specific pair in a multi-pair cable.
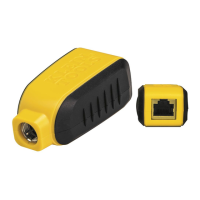
- Test RJ11, RJ12, and RJ45 Jacks: The device includes an RJ11 test plug that can be inserted directly into these common jacks. This feature allows for quick and easy testing of telephone and network connections, ensuring proper wiring and functionality.
- Detect Continuity and Polarity: The Toner-Pro can perform a continuity test to determine if a conductive path exists between two points and to check for short circuits. Additionally, it can identify the polarity of voltage present in a circuit, which is crucial for troubleshooting and ensuring correct connections in various low-voltage applications.
- Generate 5 Distinct Tones: To aid in identification, the Toner-Pro offers a selection of five distinct tones: three constant tones (800Hz, 1000Hz, 1500Hz) and two alternating tones (800Hz/1000Hz, 1000Hz/1500Hz). This variety allows users to choose a tone that is most easily distinguishable in different environments or to differentiate between multiple toned lines.
- Easy-to-Understand Status LEDs: The device is equipped with intuitive LED indicators that provide clear feedback on its operational status, continuity, and polarity, making it simple for users to interpret results at a glance.
Usage Features
The Toner-Pro is designed for ease of use and efficiency in the field.
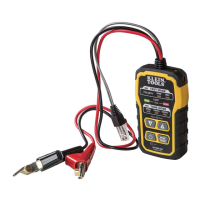
- Tracing Paired Wires: To trace paired wires, connect the red ABN Test Clip to one wire of the pair and the black ABN Test Clip to the other. Power on the Toner-Pro and check the "CONT" Indicator; if it illuminates green, proceed. Select a preferred tone setting using the Tone Mode Up/Down selector buttons. Turn on the Probe-Pro (sold separately) and, at the far end of the cable, spread the wires apart if possible. Slowly scan the cable's wire pairs with the Probe-Pro's tip. The Probe-Pro's volume will increase as it approaches the toned pair, indicating the location of the wires being traced. A high volume over the first wire, low in the middle, and high over the second wire confirms the location of the toned pair. The Probe-Pro's volume can be adjusted as needed.
- Tracing Non-Paired Wires: For non-paired wires, connect the red ABN Test Clip to the wire to be traced and the black ABN Test Clip to another wire in the cable, ideally not in the same pair or to ground. For shielded cables, connect the red clip to the outer shield and the black clip to the center conductor or ground. Power on the Toner-Pro and ensure the "CONT" Indicator is green. Select your desired tone. With the Probe-Pro on, scan the cable's wire pairs at the far end. The Probe-Pro's volume will increase as it nears the toned wire.
- RJ11/RJ12/RJ45 Testing: The integrated RJ11 Test Plug allows for direct connection to RJ11, RJ12, or RJ45 jacks. This plug utilizes the center conductors of the inserted plug (pins 2 and 3 for RJ11, pins 3 and 4 for RJ12, and pins 4 and 5 for RJ45) to transmit the tone, replacing the need for ABN clips in these applications. The Probe-Pro is then used to locate the toned wires at the far end.
- Polarity and Voltage Presence Testing: To test polarity and voltage, power on the Toner-Pro and press the TEST/TONE Select button to activate 'TEST MODE'. Connect the ABN Test Clips or insert the RJ11 Test Plug. The "CONT" Indicator should be green. The 'NRM' (Normal) Polarity Indicator will illuminate if the red ABN Test Clip is connected to the POTS (Plain Ol' Telephone Service) in the correct orientation, or if the black ABN Test Clip detects higher voltage. The 'REV' (Reverse) Polarity Indicator will illuminate if the wires are reversed or if the red ABN Test Clip detects higher voltage. If AC voltage is present, both 'NRM' and 'REV' indicators will illuminate. When using the RJ11 Test Plug, the 'NRM' indicator will illuminate for a correctly wired and powered POTS phone jack. It's important to note that the POTS color code convention (black/positive, red/negative) is opposite to the multimeter color code convention (red/positive, black/negative).
- Tone Frequency Selection: The Toner-Pro defaults to 800Hz when powered on. Users can cycle through the available tone frequencies (800Hz, 1000Hz, 1500Hz constant, and 800Hz/1000Hz, 1000Hz/1500Hz alternating) using the Tone Mode Up and Tone Mode Down selector buttons. The Tone Frequency Indicators will show the currently transmitted frequency, with blinking indicators for alternating tones.
- Auto-Power Off: To conserve battery life, the device automatically powers off after 60 minutes of inactivity.
- Safety Precautions: The Toner-Pro and Probe-Pro are designed for use on extra-low voltage cabling systems (less than 60 volts) when NOT energized. The maximum voltage across the ABN Test Clips is 60 volts in Test mode and 20 volts in Continuity mode. Connecting the Probe-Pro to live mains AC power can damage the device and pose a safety hazard. Users should never operate the instruments if they are wet or damaged, and should always turn them off and disconnect all ABN Test Clips before replacing batteries. The battery door must be securely in place during operation.
Maintenance Features
Proper maintenance ensures the longevity and reliable performance of the Toner-Pro.
- Battery Replacement: When the Low Battery Indicator blinks, it's time to replace the batteries. To do so, first turn off the instrument. Loosen the screw on the battery cover and remove it. Properly dispose of the four 1.5V AAA batteries and install new ones, ensuring correct polarity. Finally, replace the battery cover and fasten it securely with the screw. It is crucial not to operate the device while the battery door is removed to avoid the risk of electric shock.
- Cleaning: To clean the equipment, ensure it is turned off and wipe it with a clean, dry, lint-free cloth. Abrasive cleaners or solvents should not be used, as they may damage the device.
- Storage: For prolonged periods of non-use, remove the batteries from the equipment. Avoid exposing the device to high temperatures or humidity. If the equipment has been stored in extreme conditions outside the specified limits, allow it to return to normal operating conditions before use.
- Disposal/Recycle: Equipment and its accessories should not be disposed of in regular trash. They must be properly disposed of in accordance with local regulations. Resources like www.epa.gov or www.erecycle.org can provide additional information on proper recycling.