6 7
PRODUCT OVERVIEW
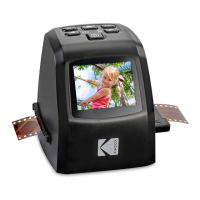
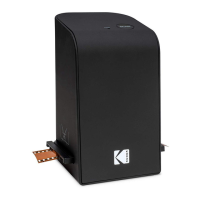
1 Power (PWR) LED
2 SCAN button
3 Micro USB port
4 Slot for either negative tray (5) or slide tray (6/7)
5 Negative tray adapter
6 Slide tray adapter
7 Slide adapter (1.93.0mm)
8 Cleaning brush
9 USB-to-micro-USB cable
CONNECTING THE SCANNER
• Insert the micro USB end of the USB-to-micro-USB cable 9 into the micro USB port 3.
• Connect the USB plug on the USB cable to a corresponding USB 2.0 port on a
powered-on computer. The computer should recognize the new hardware and
begin to install the drivers automatically. This process usually takes approximately
12 minutes to complete. As soon as the scanner is properly connected, the PWR
LED 1 will light up.
INSTALLING THE SOFTWARE WINDOWS®
CAUTION: Important iles may be changed or overwritten during the installation of the
software. Before installing this software, make sure to create a backup of your original
iles to ensure that you can access them later in case problems occur during installation.
1. Insert the provided installation CD into the CD drive of your computer. The
installation menu should start automatically.
NOTE: If the autostart function is deactivated and your installation does not start
automatically, you can start the installation manually by double clicking the ile
named “WinSetup.exe” in the main directory of the CD.
2. Click on the “Installation” button to start the installation process.
3. Follow the on-screen instructions to install the software.
4. After the software has successfully installed, you can leave the menu by clicking the
“Exit” button.
INSTALLING THE SOFTWARE MAC® OS
CAUTION: Important iles may be changed or overwritten during the installation of the
software. Before installing this software, make sure to create a backup of your original
iles to ensure that you can access them later in case problems occur during installation.
1. Insert the provided installation CD into the CD drive of your Mac® computer.
2. Open the main directory of the program CD.
3. Switch to the “Mac” directory.
 Loading...