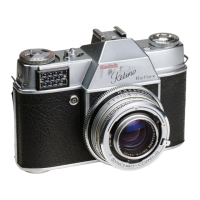
Unloading
1. Depress the reversing button.
2. Rewind the film. On the early Retina Reflex pull up the rewind knob to its first stop for rewinding.
3. Open the camera back.
4. Remove the cassette.
5. Close the camera back or reload with a new film.
Shooting
1. Work the film transport.
2. Retina Reflex S: Set the exposure before taking a reading with the coupled meter. The shutter speed
ring bears two sets of figures separated by the letter B. The figures to the right of B denote fractions of a
second (e.g. 30=1/30 sec.). Turn the ring until the required speed is opposite the arrow head; usually 1/
60 sec. is a convenient starting-point. Then point the camera at the subject and turn the exposure setting
wheel below the lens barrel until the yellow pointer covers the white indicator needle of the meter. That
sets the correct aperture for the pre-selected shutter speed.
The white lines visible in the two corners of the meter window indicate the limits of the meter readings. If
the white meter needle is outside these marks, the light conditions are too strong or too weak for the
measuring range of the meter.
A resistance while you turn the setting wheel indicates that you have reached the limits of the aperture
scale. If you turn on, you then also change the shutter speed to obtain a correct exposure setting.
3. Retina Reflex: Set the exposure value. The shutter rim carries a range of numbers engraved in red
from 2-18 which represent exposure values for correct exposure. Each exposure value covers a range of
shutter speed-aperture combinations as by a single setting. The built-in exposure meter of the Retina
Reflex (see below) is calibrated in exposure values, the reading can thus be transferred directly to the
shutter. To set the exposure value, slightly depress the serrated lever on the left of the shutter front and
move the red dot beside it to the appropriate exposure value on the scale. Intermediate exposure values,
e.g. 10½, 11½, etc., can also be set.
4. Select the aperture-speed combination. If you want to change the shutter speed or aperture on the
Retina Reflex S, turn the shutter speed ring by its two black finger holds, until the appropriate
combination is opposite the arrow head. Aperture and shutter speed rings move in opposite directions, and
only the figures actually opposite the arrow head indicate the correct combination.
On the Retina Reflex, change the combination by turning the milled shutter ring. Aperture and speed
scales here move together. The figures opposite each other represent alternative combinations
corresponding to the exposure value set. Again only the aperture and speed actually opposite the double
arrow head are the ones in use.
To set apertures and speeds separately with both models (e.g. for flash shots) adjust first the shutter
speed and then the aperture by turning the exposure setting wheel of the Reflex S, or by depressing the
exposure value lever and turning the aperture ring on the Reflex.
5. Focus. Look through the viewfinder and turn the front lens mount of the Retina Reflex S, or the large
serrated ring on the back of the shutter rim of earlier Reflex models, until the image appears sharp in the
finder.
6. Release the shutter by gently pressing down the release button.
The Exposure Meter of the Retina Reflex
1. Set the film speed as described for loading.
2. Point the camera at the subject, taking care not to obscure the honey-comb meter window by a
finger.
3. Turn the meter setting ring to line up the yellow pointer with the white meter needle. The white
needle moves in the cut-out window (between body release and exposure meter wheel). Turn the
meter setting ring (the outer milled ring of the exposure meter knob) until the yellow pointer lies
exactly over the top of the white needle.
4. Read off the exposure value opposite the red triangle on the inner disc of the exposure meter
knob. If the triangle points to a position between two numbers, set the intermediate light value. For
example, if the triangle points between 8 and 9, use 8.5 for greatest accuracy.
Special Controls
FOR TIME EXPOSURES turn the shutter setting ring until B (=brief time) is opposite the index mark. On
releasing, the shutter will remain open as long as the release button is pressed down and closes as soon
as the pressure on the release is removed.
On the Retina Reflex S the green figures on the exposure scale are for calculating time exposures. With
the shutter speed ring set to B, the green figures indicate the time in seconds required at smaller
apertures and low lighting levels. If, for example, an exposure setting gives 1 sec. at f2.8, any of the
following combinations may be used: 4 sec. at f5.6; 8 sec. at f8; 15 sec. at f11; or 30 sec. at f16.
Incidentally, there is no green number 2. Its place is taken up by B. When reading off full seconds, read 2
seconds for the B position. In the example above, if you want to use f4, you would require 2 seconds.
THE DELAYED-ACTION RELEASE for self-portraits built into the Synchro-Compur MXV shutter is brought
into action by moving the lever on the left of the shutter (right on the Reflex S) to "V". This can only be
done after the film has been advanced. To move the lever first depress the small projecting stud at the
rear of the shutter ring (on the earlier Reflex the stud in the depth of field ring near the base of the
camera). On pressing the release button with the lever set to "V", the shutter goes off after a delay of

 Loading...