1. The shutter closes;
2. The lens iris closes down to it's pre-selected stop;
3. The mirror swings up out of the way;
4. The capping plate also swings out of the way to open the way to the film;
5. The shutter opens again and closes to expose the film.
This complete sequence takes a little over 1/50 second.
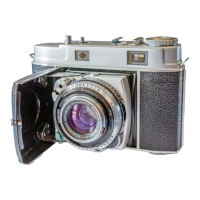
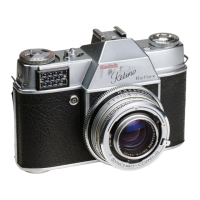
Retina Reflex Evolution
The Retina Reflex camera was first introduced in 1957. The original model has a built-in photoelectric meter
with exposure values, the lens front is interchangeable to accept tele and wide-angle front elements.
In 1959 the Retina Reflex S appeared with the photoelectric exposure meter coupled to the aperture-shutter
speed setting and interchangeable lens mount to accept telephoto and wide-angle lenses.
The Retina Reflex III of 1961 has the exposure meter indicator visible in the reflex finder and extra large
viewfinder eyepiece and a release key on the camera front with safety lock.
The Retina Reflex IV of 1964 has, in addition to the exposure meter indicator in the reflex finder of the Model
III, aperture and shutter speed values shown in a window in the finder, a red warning signal when taking
pictures in extreme lighting conditions and a fresnel screen for greater brightness. The split image rangefinder is
placed diagonally. The standard lens focuses down to 23½ in. (60 cm.). In addition to the flash socket there is
also a direct flash connection in the accessory shoe. The rewind knob is fitted with a fold-over crank. The film
counter is automatically reset on opening the camera back.
HANDLING THE RETINA REFLEX
In order to simplify the description and handling of the Retina Reflex camera without being confused by different
features of individual models, this guide has been divided into a general section which applies to all Retina
Reflex models while the requirements and consequently different handling of each model are found on the green
pages.
For convenience, a symbolic reference system is also used in the general section. Wherever the sign
appears,
further details will be found in the camera pages of the green section for each camera (e.g. III, Standard and S,
etc.). The sign
refers to lens details in the green section, and to accessories. The appropriate pages are
marked accordingly in the bottom left- or right-hand corner
Holding
It is obvious that the camera should be held as steady as possible, as the slightest shake, even if not seen in
the negative, will become visible in an enlargement. Always stand with your legs apart.
FOR HORIZONTAL PHOTOGRAPHS grip the camera with your right hand with the index finger on the release and
the thumb against the camera back. Thumb and index finger of the left hand move the focusing mount while the
camera body rests on the middle finger and ball of the left hand for additional support. Keep the elbows pressed
against the body. Either the right or the left eye may be used for the finder.
FOR VERTICAL PHOTOGRAPHS turn the camera through 90° so that in the same basic holding position as for
horizontal photographs -- your right hand grips the top.
You can vary this standard hold, of course, to suit your own convenience. By some experimenting, you will find
the grip which suits you best, and enables you to hold the camera really steady.
To release the shutter, press the release with the ball of the finger. Use finger pressure only, and keep the hand
and its grip on the camera steady. The actual pressing down will have to be done slowly and smoothly. The
slower the exposure time, the smoother must be the release.
For slow exposures in the hand it is advisable to rest the elbows, or at least to lean the body, against some
support in order to avoid shake. In this way 1/15, 1/8 and 1/4 and even 1/2 sec. can be risked without incurring
camera shake.
Such a support is also desirable for faster exposures, as several movements take place inside the camera after
pressing the release button. A slightly unsteady hold may thus easily lead to blurred pictures. For the same
reason, keep the camera steady for a moment after pressing the button; do not jerk it away from the eye
straight away, as the shutter opens about 1/50 sec. after pressing.
The use of a tripod is necessary when taking time exposures and it is also recommended for speeds from 1/15 to
1 sec. For upright photographs from the tripod use a ball and socket head to allow changing from the horizontal
to the vertical position.
Carrying
 Loading...