Do you have a question about the Kompernass WK 5 A2 and is the answer not in the manual?
The device is a game/surveillance camera, model WK 5 A2, designed for recording digital photos and videos, specifically for observing wildlife. It is an information technology device and is not intended for commercial or industrial use. The camera is protected from dust and water spray, complying with protection class IP54, making it suitable for use in various weather conditions, provided it is correctly closed and all seals are intact and clean. However, splash water protection is limited when an external mains adapter is used.
Before use, check the device for visible external damage. Do not operate a damaged or dropped device. If cables or connections are damaged, have them replaced by an authorized specialist. Children and individuals with limited physical, intellectual, or motor abilities should only use the device under supervision. Do not attach the camera to free-standing or extremely tall trees due to lightning strike risk. Packaging materials are not toys and pose a risk of suffocation. All repairs must be carried out by authorized specialists; improper repairs can create hazards and invalidate the warranty. Defective components must be replaced with original parts. Do not place objects on the device or operate it near open flames. If unusual noises, smoke, or other unclear situations occur, remove batteries or disconnect the mains adapter and contact customer service.
Batteries should be kept out of reach of children, as they may be swallowed. If a battery is swallowed, seek immediate medical assistance. Do not throw batteries into fire or expose them to high temperatures, as there is a risk of explosion. Only rechargeable batteries explicitly labeled as such should be recharged. Do not open or short-circuit batteries. Do not mix different types of batteries. Empty batteries should be removed due to increased leakage risk, and batteries should also be removed if the device is not used for long periods. Battery acid leakage can cause skin irritation; in case of contact, rinse with plenty of water. If liquid gets into the eyes, rinse thoroughly and consult a doctor immediately.
Children must be supervised to ensure they do not play with the memory card. If a memory card is accidentally swallowed, seek immediate medical help. To avoid malfunctions, keep the memory card away from moisture, strong vibration, dust, heat sources, and direct sunlight. Insert the memory card as indicated by the icon on the slot; never force or bend the card. After transport, allow the memory card to reach ambient temperature before use to prevent condensation and electrical short-circuits. Store the memory card in the provided storage box.
When using the game camera, be aware of copyright protection: images of people may only be published without their consent if they appear as incidental features. Inform individuals about the camera's presence if identifiable persons might be recorded. Protect privacy by not pointing the camera at private areas like gardens or entrances of neighboring residences. Avoid personal identifiability in recordings, which can occur through features like vehicle registration plates. Surveillance cameras at workplaces are subject to strict regulations in Germany; employers should avoid them if legal infringements are possible. For road traffic surveillance, configure the camera to prevent identification of road users via license plates or vehicle logos. If personal identification is unavoidable, a warning notice about the camera must be clearly visible at all access routes to the recording area, informing pedestrians that entering the area implies consent to being filmed.
The camera operates on 6 V DC, with a maximum current consumption of 1.5 A, powered by 4 or 8 x 1.5 V AA/Mignon batteries. It supports microSDHC cards from 2 GB to 32 GB, with a recommended speed class of 4 or higher to prevent picture errors during recording. The display is a 2.4" TFT color LC display (approx. 6.1 cm screen diagonal). The standby time is up to 6 months with 8 batteries.
The camera offers several photo resolutions:
Video resolutions include:
The detection angle is approximately 100° from corner to corner, and the recording field for photos and videos is approximately 89°. The camera's protection class is IP54. It operates in temperatures ranging from -15 to +60°C and can be stored in temperatures from -25 to +70°C. Humidity should be between 5% and 75% (non-condensing). The dimensions are approximately 13.7 × 9.5 x 8.1 cm, and it weighs approximately 360 g.
The camera features:
Upon receiving the device, check the package contents against the list provided in the manual. Remove all parts and the operating instructions from the box, and remove all packaging materials and protective film from the device. If the delivery is incomplete or damaged, contact the service hotline.
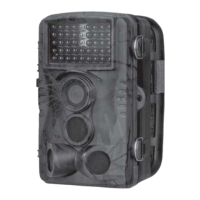
The control buttons, connections, and battery compartment are located inside the camera. To open, undo the two side locking clamps (12). To close, hook the metal bars of the clamps into the brackets and press the plastic latch downwards. A locking eyelet (5) between the clamps allows for secure closure with a padlock.
Open the camera to insert batteries (35). Press the latch on the upper side of the battery compartment cover down and lift the cover off. Insert 4 or 8 x 1.5 V AA/mignon batteries into the battery compartment (11), ensuring correct polarity. If using only 4 batteries, they must all be inserted in either the upper or lower part of the compartment. Close the battery compartment, ensuring the cover clicks firmly into place. If using a mains adapter (not supplied), open the rubber seal on the bottom and insert the adapter cable plug into the DC socket (20). The mains adapter must supply 6 V DC with at least 1.5 A, using a barrel jack with positive internal polarity. The camera can operate with both batteries and a mains adapter; if one power source fails, the other will maintain operation.
The camera can transfer video and audio to an external monitor or TV. Connect a suitable monitor using the supplied TV cable (28) to the camera's AV socket (16). When the mini jack plug is connected, the built-in screen (10) is deactivated, and the image is displayed via the AV socket.
The camera requires a microSDHC memory card (34) to function, as it has no built-in memory. It supports cards up to 32 GB. Use a microSDHC card with a speed rating of 4 or higher; lower speed ratings may cause picture errors. Insert the microSDHC card into the slot (15) until it clicks, with the contact surfaces facing the front of the camera. To remove, gently press the protruding edge of the card until it pops out, then remove it.
The microSDHC memory card (34) comes with an adapter card (microSD to SD) (33) for use with devices that have an SD card slot. Insert the microSD card into the adapter card as shown in the manual. The adapter card has a write-protect lock; slide the switch to "LOCK" to protect the microSDHC card from write access. This protection is only active while the card is in the adapter.
To adjust settings, slide the mode selector switch (18) to "TEST." Use the control panel buttons (14) to navigate menus.
Select photo size from 1 MP, 3 MP, 5 MP (default), 8 MP, or 12 MP. Higher resolutions provide more detail but fill the memory card faster.
In photo mode, choose to take 1 photo (single shot), "2 photos in series," or "3 photos in series" when triggered.
Select video resolution from 1920x1080P, 1280x720P, 720x480P, 640x480P, or 320x240P. Higher resolutions offer more detail but consume memory faster.
Set video recording length between 3-59 seconds or 1-10 minutes. Longer recordings reduce battery life. The default is 5 seconds.
Enable "On" to record sound during video capture.
Set the minimum pause time (5-59 seconds or 1-60 minutes) before the camera reacts to subsequent triggers after an initial detection. This prevents excessive recordings of the same event.
The two side motion sensors (7) can be switched "On" or "Off." If moving branches cause false triggers, set them to "Off" and confirm with "OK." The default setting is "On."
Adjust the sensitivity of the front motion sensor (6) to "High" for indoor use or low interference environments, "Medium" (default) for normal outdoor interference, and "Low" for high interference environments or cold temperatures. "High" increases false triggers, "Low" may miss small animals.
Select "On" to activate the camera only during a specific time period. This setting also applies to time-lapse recordings. Set the start and end hours and minutes using the up/down buttons and confirm with "OK." These settings apply daily, and no recordings are made outside the active phase.
Enable this function to automatically take pictures at adjustable intervals (hours, minutes, seconds). This is useful for observing slow processes like plant blooming. When time-lapse is active, motion sensors are deactivated.
Choose from English, German, Danish, Finnish, Swedish, Spanish, French, Italian, Dutch, or Portuguese for the menu language.
Set the time, date, time format (12/24 hr), and date format (DD/MM/YYYY, YYYY/MM/DD, or MM/DD/YYYY). Use the navigation buttons to adjust values and confirm with "OK."
Choose whether photos are saved with a time and date stamp (default) or just the date.
Enable "On" to protect the camera with a 4-digit password. Enter the combination using the navigation buttons and confirm with "OK." If the password is forgotten, download the camera software from www.kompernass.com, unzip, and copy "ISP_SD.bin" and "Rom_CodeWK5A2.bin" to a blank memory card. Insert the card while the mode selector (18) is "OFF." Hold the up arrow button while moving the selector to "TEST" until "Firmware upgrading... Keep Table" appears on screen (10). After about 25 seconds, the camera switches off. Turn it back on by moving the selector to "OFF" then "TEST." This resets settings and removes the password.
Enable or disable an audible signal when buttons are pressed (default is on).
Formatting the microSDHC card (34) permanently deletes all data. New or previously used cards should be formatted before use. Select "Yes" and confirm with "OK." "Please wait" will appear during formatting.
Selecting "Yes" and confirming with "OK" will delete all settings, including any password, and restore factory defaults. Ensure no needed files are on the memory card before proceeding.
View the camera software version in this menu item.
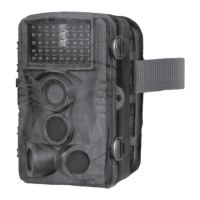
Use the supplied securing strap (30) to fasten the camera to a tree or other object. Guide the strap through the tree bracket (8) and the strap latch (31). Hang the camera, press the strap latch clip downwards, pull the strap tight, and release the clip. To remove, press the clip and pull the strap out.
Mount the camera permanently on a wall or ceiling using the supplied wall bracket. Ensure all screws are tight before mounting.
In "TEST" mode, determine the optimal detection angle and range of motion sensors (6, 7). Consider if side motion sensors are useful; they can be activated/deactivated in the menu.
Live mode is the standard operating mode, where recordings are triggered by motion sensors (6, 7). Set the mode selector switch (18) to "ON." After 15 seconds, the red standby indicator (2) turns off, and the camera enters standby. When wildlife or people enter the central sensor zone, the camera starts recording photos/videos. If motion is detected by side sensors (7), they activate the camera. If motion continues in front of the front sensor (6), recordings continue. When motion leaves the side sensor range, the camera switches off and returns to standby.
Infrared LEDs (1) provide light for night recordings. They emit light over a wide angle, allowing recordings from 3 m to 20 m without overexposure. Reflective objects may cause overexposure. Night exposures are in black and white.
Slide the mode selector switch to "TEST" to see the live view. Press the "REPLAY" button to enter playback mode. The screen (10) will show recording details (video/photo display, resolution, write protection status, current/total recording number, battery level, date, time, video length). Use the up/down buttons to scroll through recordings.
In the playback menu, select "Delete" and press "OK" to delete the currently displayed recording.
In the playback menu, select "Delete all files" and press "OK" to delete all recordings from the memory card.
This function automatically plays stored photos for about 2 seconds each. Press "OK" to stop the slide show and display the current image permanently.
This function protects individual or all saved recordings from accidental deletion.
Move the mode selector switch (18) to "TEST." Connect the mini jack plug of the TV cable (28) to the camera's AV socket (16) and the cinch plugs to the audio/video inputs of a TV or other device. The built-in screen (10) is deactivated, and the image is displayed via the AV socket.
Connect the mini USB connector of the USB cable (29) to the camera's mini USB port (17). Connect the USB connector to a free USB 2.0 port on a powered-on computer. The computer will recognize the device as a "Removable Disk" and install necessary drivers. Use a file explorer to view the contents of the microSDHC memory card (34) and perform desired file operations.
If the device will not be used for a long time, remove the batteries and store it in a clean, dry place away from direct sunlight.
| Brand | Kompernass |
|---|---|
| Model | WK 5 A2 |
| Category | Security Camera |
| Language | English |