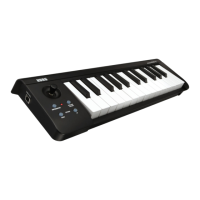
microKEY Air/microKEY Controls
6
7
8
6
7
microKEY
microKEYAir
1. Keyboard
The microKEY Air and microKEY are equipped with velocity-sensitive mini-keys.
2. Power Indicator
RED : (microKEY Air/microKEY)
Connected using the USB port and receiving power via USB.
BLUE : (microKEY Air)
Waiting to connect (Blinking) or connected (Steady) via a wireless connection.
PURPLE : (microKEY Air)
Indicatesthebaerylevelislowwhenconnectedviaawirelessconnection.
3. Octave DOWN and UP buttons
By transposing the keyboard up or down in one-octave steps, the Octave but-
tonsprovideaccesstotheentirenoterange.PresseitherOctavebuonrepeat-
edly to select the desired note range.
Octave shift status ±0 +1/-1 +2/-2 +3/-3 +4/-4(37 key only)
Octave LED color Unlit Green Orange Red Blinking red
TIP SimultaneouslypressingtheOctaveUPandDOWNbuonswillresetthe
Octave shift back to ±0.
4. PITCH Bend wheel
Use this wheel to send pitch bend messages and add expression to your per-
formance. The spring-loaded center-zero design allows you to bend the pitch
up or down.
5. MOD wheel
Use this wheel to send modulation messages. The factory default control
change number is set to CC#1 (Modulation).
6. ASSIGNABLE SWITCH jack (Pedal Input)
This standard 1/4” input jack can accept a PS-1 footswitch or DS-1H damper
pedal (sold separately). The factory default control change number is set to
CC#64 (Damper).
When the microKEY Air/microKEY is turned on, the polarity of the connected
foot switch is automatically detected. When using the foot switch, connect it
before turning on the microKEY Air/microKEY. Do not touch the pedal while
turning the microKEY Air/microKEY on.
7. USB Port
Use this USB-B port to connect the microKEY Air/microKEY to your computer
using a USB cable. Connecting the USB Cable will turn the microKEY On. If
the Mode Switch (microKEY Air) is set to USB (see below), connecting the
USB cable will turn the microKEY Air On.
8. Mode Switch (microKEY Air only)
The microKEY Air can connect to your computer via USB or Bluetooth Wireless.
WIRELESS : ThemicroKEYAirconnectstothecomputerviaBluetooth;power
isprovidedbytheinternalbaeries.
USB : ThemicroKEYAirconnectstoyourcomputerusingtheUSBcable;pow-
er is provided from the computer via USB.
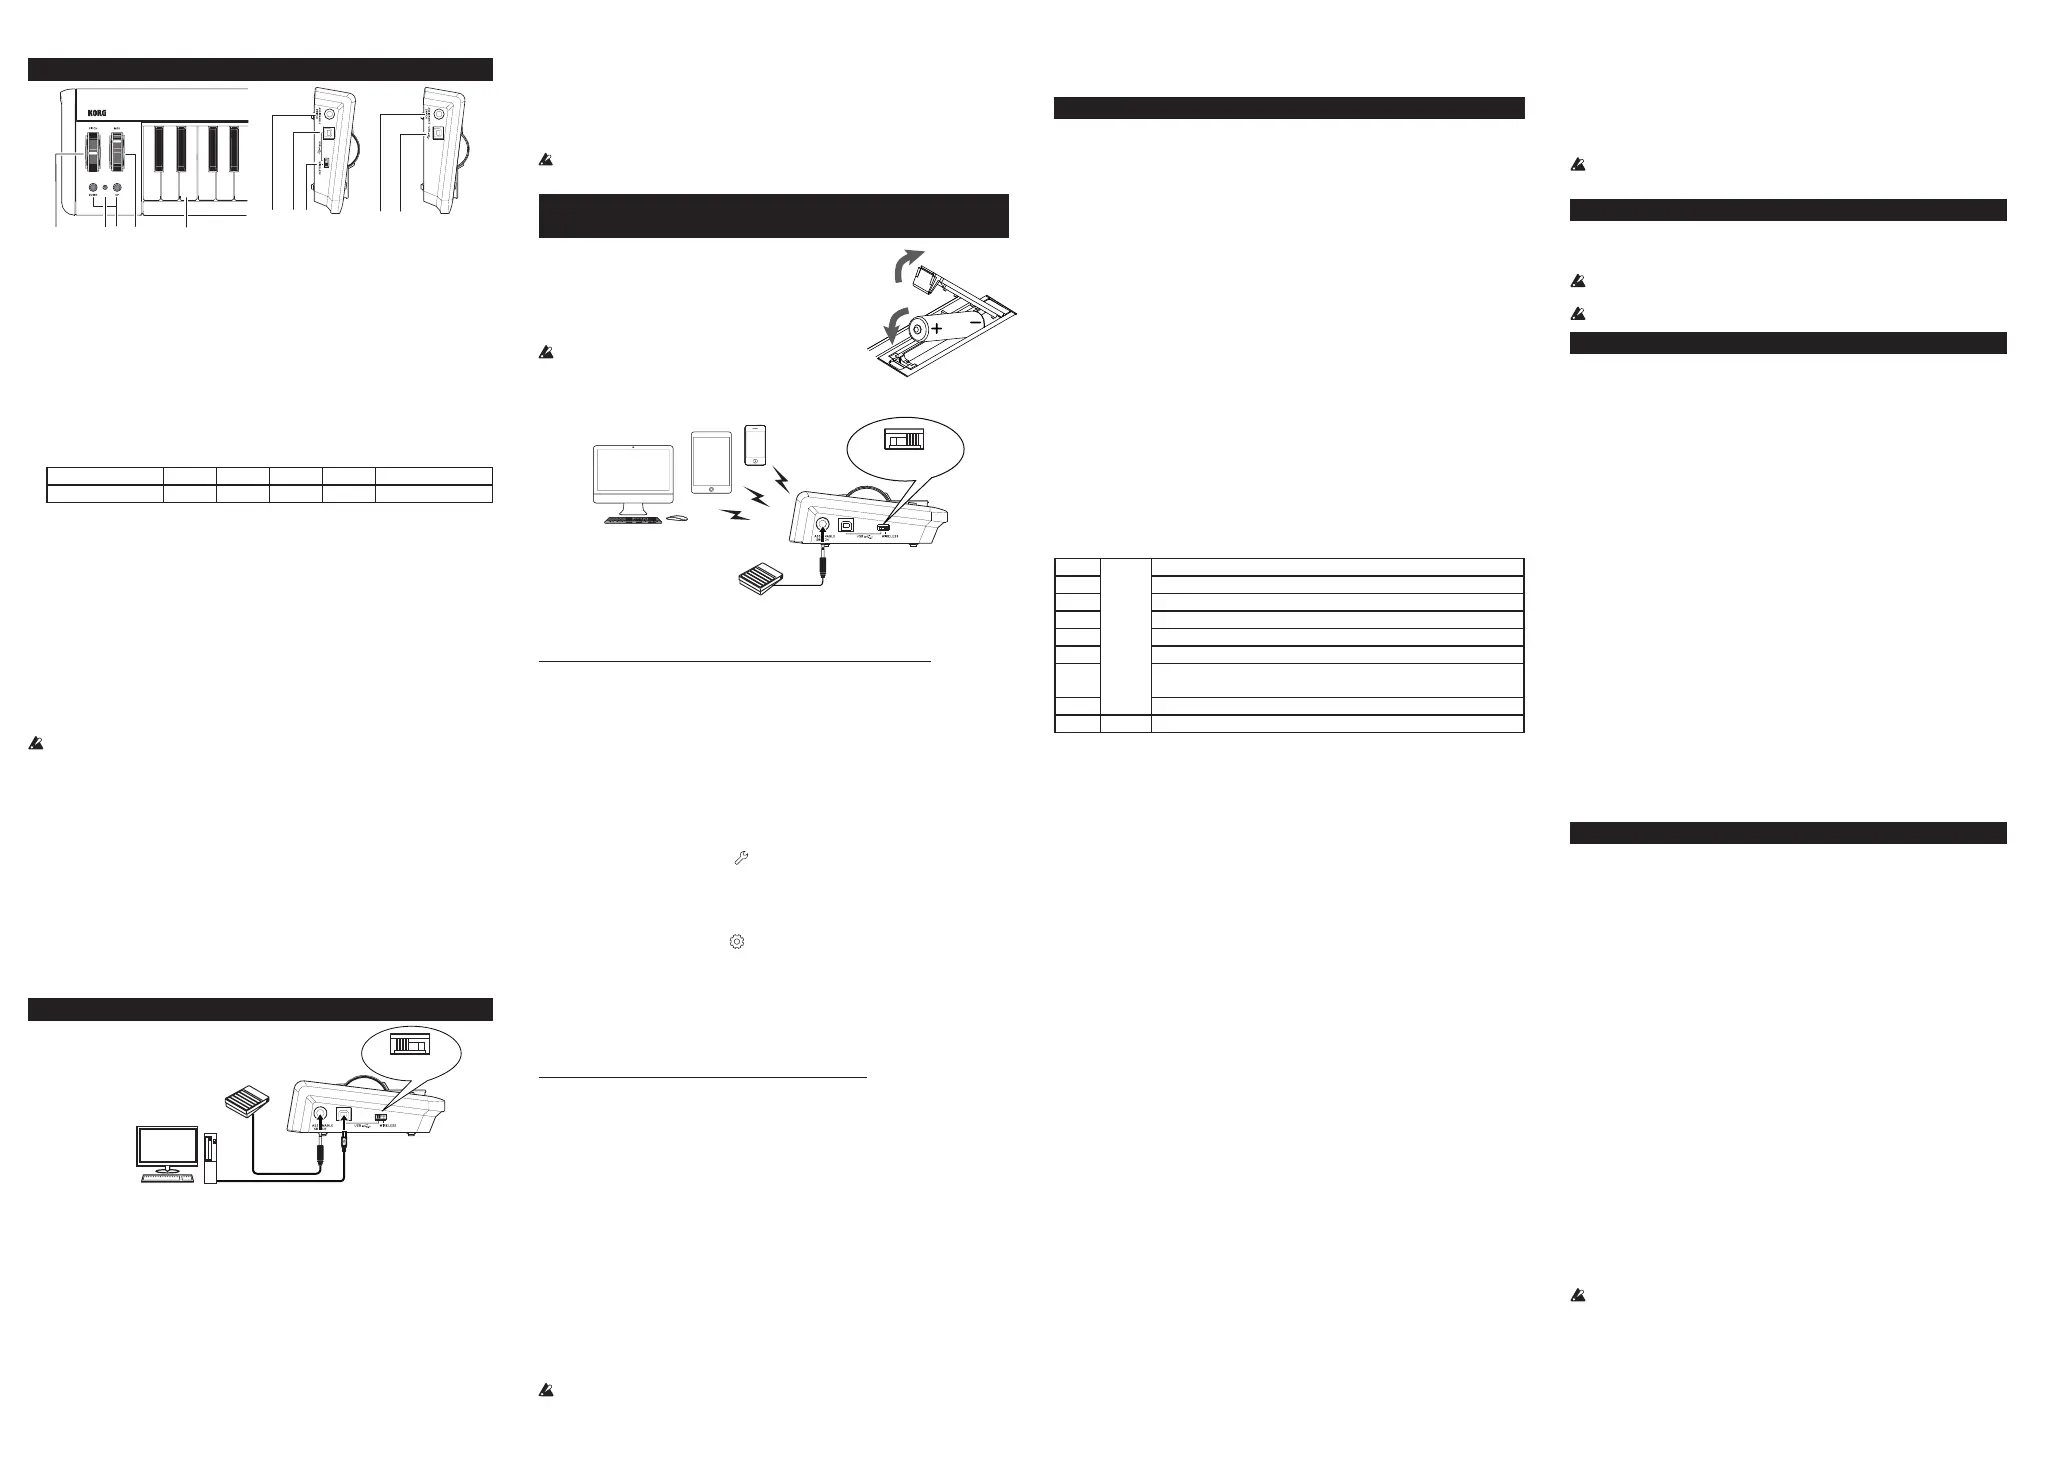
Getting Connected (Connecting via USB)
Connections and power
microKEY Air
microKEY
USB
Pedalswitch
(PS-1pedalswitch,
DS-1Hdamperpedal,etc.)
Computer
1. Mode Switch (microKEY Air Only)
Set the Mode Switch to USB and continue to Step 2. For the microKEY, skip to Step 2.
2. Connect the USB Cable
ConnectoneendoftheUSBcabletoyourcomputer;connecttheotherend
to the USB-B port on the microKEY or microKEY Air. Use only the USB cable
provided.Once connected to the computer, the microKEY Air/microKEY will
turnOn;thePowerIndicatorLEDwillglowred.
TIP Windows Users :
WhenthemicroKEYAir/microKEYisrstconnectedtoyourWindowscom-
puter, the USB-MIDI driver pre-installed with the operating system will be
used automatically. This pre-installed USB-MIDI driver will not allow the mi-
croKEY Air or microKEY to access multiple programs or applications at the
same time. To remedy this situation, simply download the KORG USB-MIDI
driver at www.korg.com and install the driver as instructed with the support-
ing documentation.
Turning o the Power
1. Disconnect the USB Cable
Disconnect the USB cable from the microKEY Air or microKEY. Once discon-
nected the Power Indicator will go dark (unlit).
microKEY Air users : Set the Mode Switch set to USB before disconnecting the
USB cable.
Getting Connected (Connecting via Bluetooth)
(microKEY Air only)
Installing the Batteries
Be sure the USB cable is disconnected from the mi-
croKEYAirbeforeproceeding.Openthebaerycover
ontherearpanelandinstalltwoAAbaeries.Besure
toobservethecorrectpolarity.Finally,closethebaery
cover.
If the microKEY Air encounters an operational error
that connot be cleared or resolved by turning the
powerOnandO,tryremovingandre-installingthebaeries.
Connections and power
WIRELESS
microKEY Air
Pedalswitch
(PS-1pedalswitch,
DS-1Hdamperpedal,etc.)
Using Bluetooth technology, the microKEY Air can create a wireless link to your
Mac or iOS device.
Connecting the microKEY Air to your iPhone/iPad
TIP To create a wireless connection with an iPhone/iPad, it must operating under
iOS 8 or later, and be compatible with Bluetooth 4.0.
1. Set the Mode Switch to WIRELESS
The microKEY Air will turn on, and the power LED will blink in blue to indi-
cate the connection standby mode.
2. Set the Bluetooth Connection
On the iPhone/iPad, start an iOS app compatible with Apple Bluetooth Low
Energy MIDI, and then set up the Bluetooth connection in the app. For the
procedureonseinguptheconnection,refertothemanualforyourapp.An
example using an Apple product and one using our product are shown below.
Example: Apple Inc. GarageBand
Open the song seings with at the top-right corner of the GarageBand
screen,andthenselect“BluetoothMIDIDevices”.IntheBluetoothMIDIDe-
vicesscreen,select“microKEY2-xxAir”,andthenturnontheconnection.Oth-
erwise, check that it has been connected.
Example: KORG Module for iPad/KORG Gadget for iPad
OpentheSeingsscreenwith at the top-left or top-right corner of the KORG
Module/KORGGadgetscreen,andthentap“Scan”for“BluetoothMIDI”.In
theBluetoothMIDIDevicesscreen,select“microKEY2-xxAir”,andthenturn
on the connection. Otherwise, check that it has been connected.
3. Observe the Power indicator
Once the connection has been established, the Power Indicator LED will
change from a blinking to a steady blue light.
Connecting the microKEY Air to your Mac
TIP To create a wireless connection to your Mac, it must operating under OS X
10.10 Yosemite or later, and be compatible with Bluetooth 4.0.
1. Set the Mode Switch to WIRELESS.
The microKEY Air will turn on, and the power LED will blink in blue to indi-
cate the connection standby mode.
2. Open the MAC Utilities.
OntheMac,open“Applications”→“Utilities”,start“AudioMIDISetup”,and
thenopenthe“MIDIStudio”windowbyselecting“ShowMIDIStudio”from
the“Window”menu.
3. Set the Bluetooth Connection.
Double-clickthe“Bluetooth”icontoopentheBluetoothCongurationwin-
dow,andthenclicktheConnectbuonfor “microKEY2-xxAir”.Whencon-
nected, the power LED changes from blinking to lit in blue.
Turning o the power
1. Set the Mode Switch to USB.
Thiswillturno the wireless link and will turnthemicroKEYAiro;the
Power Indicator will go dark (unlit).
microKEY Air users : If your microKEY Air is connected to the computer via
USB, placing the switch in the USB position will active the USB connection,
andtheunitwillnotturno.Inthiscase,youmustalsoremovetheUSBcable
from the microKEY Air.
Customizing the MIDI Settings
Easy to use and simple in design, the Korg microKEY Air and microKEY also allow
you to access a variety of performance features and operational parameters using the
Korg Kontrol Editor software. The Korg Kontrol Editor is available as a download
directly from hp://www.korg.com/corporate/distributors/ or from hp://www.korg.com/
MIDI Channel
The MIDI channel microKEY Air/microKEY should be set to match the MIDI
channel of the software or application being used.
• MIDIChannel[1...16]
This species which MIDI channel the microKEY Air/microKEY will use to
transmit note messages, pitch bend messages, and other MIDI messages that are
sent when you use the MOD wheel, damper pedal, etc.
Keyboard
InadditiontousingtheOctaveUP/DOWNbuonsonthefrontpanel,youcan
also transpose the microKEY Air and microKEY to play in any musical key. In
addition, the touch response of the keyboard (Velocity Curve) can be adjusted to
matchyourplayingstyleortocreateadierenteect.
• Transpose[-12...+12]
The Transpose parameter can transpose the pitch of the keyboard up or down in
semitone steps. The range is -12 to +12.
• VelocityCurve[VelocityCurve1...8/ConstVelocity]
Adjustthevelocitycurvetodeterminehowkeyboarddynamicswillaectthe
outputlevel.ThereareeightVelocityCurvestochoosefrom;youcanalsoselect
anyxedvelocity—idealforreplicatingorgans,harpsichords,andotherinstru-
ments that lack keyboard dynamics.
1 Heavy Requiresastrongstriketoproducethemaximumeect.
2
|
A curve that's closer to normal than 1.
3 A curve that's closer to normal than 2.
4 Normal A normal curve.
5
|
Allowsevensoftstrikestoproduceaneect.
6
Acurvethatallowsevensofterstrikesthan5toproduceaneect.
7
Allows medium-strength strikes to produce a constant but less
dynamiceect.
8
Light
Acurvethatisaerthan7.
Const – The velocity value will always be constant.
• ConstVelocityValue[1...127]
If Const (Constant Velocity) is selected as the Velocity Curve, then this parame-
ter will be available to set the Constant Velocity Value. Every note will play with
the same MIDI value selected here.
Mod Wheel
By default, the MOD wheel is set to MIDI CC#1 (Modulation Amount). These param-
eters allow you to change this CC#, plus you can set upper and lower values for the
Modulation. In addition, the Function of the MOD wheel can be completely disabled.
• WheelEnable[Disable/Enable]
When set to Disable, the wheel will not transmit any MIDI messages.
• ControlChangeNumber[0...127]
You can select any MIDI CC#, allowing the MOD wheel to control nearly any
MIDI parameter.
• UpperValue[0...127]
ThisparameterspeciesthevalueoftheCCmessagethatistransmiedwhen
the wheel is pushed all the way up.
• LowerValue[0...127]
ThisparameterspeciesthevalueoftheCCmessagethatistransmiedwhen
the wheel is pulled all the way down.
Assignable Switch
By default, the ASSIGNABLE SWITCH jack is set to MIDI CC#64 (Damper). These
parameters allow you to change this CC#, plus you can set the polarity of the pedal,
or allow the microKEY Air/microKEY to detect the polarity automatically.
• ControlChangeNumber[0...127]
YoucanselectanyMIDICC#,allowinganaachedpedalswitch(soldseparate-
ly) to control nearly any MIDI parameter.
• Polarity[Auto/-/+]
AUTO : When the microKEY Air/microKEY is turned on, the polarity of the foot
switch is automatically detected.
-, + : Choose one of these values to specify the polarity manually.
Wireless (microKEY Air only)
• AutoPowerO[Disable/Enable]
WhenAutoPowerOissettoEnable,themicroKEYAirwillautomaticallyturn
oifnooperationsareperformedafter4hours.ToturnthemicroKEYAirback
onaftertheAutoPowerOfunctionhasturnedito,settheModeSwitchto
USB, and then return it to the WIRELESS position.
• BatteryType[Ni-MH/Alkaline]
SetthisparametertomatchthetypeofbaeriesinstalledinthemicroKEYAir.
Select“Ni-MH”whenusingnickel-metalhydridebaeries,or“Alkaline”
whenusingalkalinebaeries.
• DeviceName
This parameter allows you to specify the name (up to 25 alpha-numeric
characters)thatwillappearontheBluetoothenableddevicewhenseing
up a wireless link.
These seingswill be appliedthe nexttimethat themicroKEYAiris
turnedo,thenonagain.
Restoring the Factory Settings
During a USB connection, to restore all of the microKEY Air/microKEY pa-
rameters back to their original factory values, hold down both the Octave
UPandOctaveDOWNbuonswhileturningthepoweron.
Theprocessofrestoringthefactoryseingswilltakeseveralsecondsafter
youturnonthepower.Youmustnotturnothepowerduringthistime.
Thefactoryseingscannotberestoredduringawirelessconnection.
Troubleshooting
Here is a quick guide to resolving some common issues.
microKEY Air/microKEY will not turn on
•When used in the wireless mode, the microKEY Air is powered by two AA
baeries.Besurethebaerieshavebeeninstalledcorrectly.
•The microKEY may not receive enough power from a non-powered (pas-
sive) USB hub. In this case, switch to a powered (active) USB hub, or sim-
ply connect the microKEY directly to the computer.
The microKEY Air cannot establish a wireless link (mi-
croKEY Air only)
•In order to establish a wireless link with the microKEY Air, verify that
your devices are operating under Mac OS X 10.10 Yosemite or later, or iOS
8 or later. In addition, any device must be compatible with Bluetooth 4.0.
Software programs do not respond
•Conrm thatthemicroKEYAir/microKEYisselected in the MIDI port
seingsoftheapplicationthatyou’reusing.
•Incertaincases,theselectedapplicationmaynotsupportaspecicfunc-
tion.Pleasechecktheowner’smanualofyourhostapplication.
The pedal operation is reversed
•The polarity of the connected footswitch is automatically detected when
the power is turned on. Be sure the pedal is connected BEFORE the power
is turned on, and do not touch the pedal while turning the microKEY Air/
microKEY on.
The keyboard does not respond to keyboard dynamics
•Verify that the Keyboard Velocity Curve is not set to Const. (Constant Value).
Specications
Wireless method (microKEY Air): Bluetooth Low Energy
Connectors: USB-B connector (for computer connection)
ASSIGNABLE SWITCH jack
Power supply: USB bus power mode (for a USB connection)
TwoAAbaeries(forawirelessconnection)(microKEYAir)
Baeryservicelife(microKEYAir):
Approximately20hours(alkalineornickel-metalhydridebaeries)
Current consumption: 100 mA or less
Dimensions(W×D×H):
33.46×5.47×2.13 inches / 850×139×54 mm
(MICROKEY2-61AIR / MICROKEY2-61)
27.91×5.47×2.13 inches / 709×139×54 mm
(MICROKEY2-49AIR / MICROKEY2-49)
22.24×5.47×2.13 inches / 565×139×54 mm
(MICROKEY2-37AIR / MICROKEY2-37)
Weight: 3.75 lbs. / 1.7 kg (MICROKEY2-61AIR / MICROKEY2-61)
3.09 lbs. / 1.4 kg (MICROKEY2-49AIR / MICROKEY2-49)
2.20 lbs. / 1.0 kg (MICROKEY2-37AIR / MICROKEY2-37)
Includeditems: USBcable,Owner’smanual
Operating requirements (USB connection)
Windows : Microsoft Windows 7 SP1 or later (32bit/64bit).
Mac : OS X 10.8 Mountain Lion or later.
Operationg requirements (WIRELESS connection)(microKEY Air)
Mac : Mac installed with OS X 10.10 Yosemite or later and compatible with
Bluetooth 4.0
iOS :
iPhone/iPad installed with iOS 8 or later and compatible with Bluetooth 4.0
Keyboard functionality is not guaranteed with all computers that satisfy
these system requirements.
* Specicationsandappearancearesubjecttochangewithoutnoticeforim-
provement.
 Loading...