minilogue Key Features
• 4-voice polyphonic synthesizer with onboard delay & sequencer.
• All-new ground up redesign of analogue synth circuitry.
• Instant recall of 100 factory presets plus 100 additional user programs.
• 8 Voice Modes (mono, poly, unison, para, etc.) oer maximum exibility.
• 41 dedicated panel controls deliver immediate parameter access.
• Real-time oscilloscope provides visual feedback of parameter changes.
• The 16-step polyphonic sequencer can be used to record and play back four parameter operations.
• Sync In and Sync Out jacks allow you to expand your session setup.
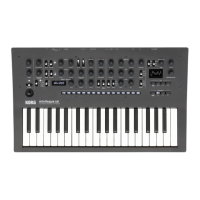
Functions of each section
Front panel
1.
MASTER controls
The Master controls aect the entire operation of the minilogue, including the VOLUME level (Output and
Headphones), TEMPO seings, and the OCTAVE (Pitch Range) seing.
2.
VCO1/VCO2/VCO2 MODULATION section
Each of the two VCOs (Voltage Controlled Oscillators) provides individual WAVE (Waveform) and SHAPE
controls, as well as independent PITCH and OCTAVE parameters. This section also provides access to the
powerful Oscillator 2 SYNC, CROSS MOD, and RING MOD parameters.
3.
MIXER section
The MIXER allows you to set the relative volumes of VCO1, VCO2 and the NOISE generator.
4.
FILTER section
The multi-mode (4-pole/2-pole) low-pass VCF (Voltage Controlled Filter) provides manual CUTOFF and
RESONANCE controls to allow precise timbre-shaping. KEY TRACK, VELOCITY, and the EG can also be
used to aect the CUTOFF frequency.
5.
AMP EG/EG/LFO section
Two Envelope Generators (EGs) can create changes in the Volume (AMP EG), the Filter CUTOFF (EG) and/
or another parameter (EG) that vary over time. Repeating, cyclic changes are created using the LFO (Low
Frequency Oscillator).
6.
DELAY section
This section provides a delay eect with a high-pass lter in the feedback loop.
You can choose whether the high-pass lter is applied to the original sound (dry sound). You can also
bypass the entire eect. For details, refer to the block diagram and the Owner’s Manual ( www.korg.com/ ).
7.
EDIT and SEQUENCER section
Here you can select or save programs and edit detailed parameters. Buons 1–8 are also used to select
parameters and control the step sequencer.
8.
VOICE MODE section
The minilogue has a four-voice synth section, and provides a Voice Mode function that lets you combine
the four analog synth voices in various ways.
By pushing buons 1-8, you can switch Voice Modes. In addition to the standard POLY, modes such as
UNISON and CHORD are also provided. A variety of performance possibilities are oered by the VOICE
MODE DEPTH control. For details, refer to the Owner’s Manual ( www.korg.com/ ).
Getting started
Connections
Use this guide to make the correct connections as appropriate for your system.
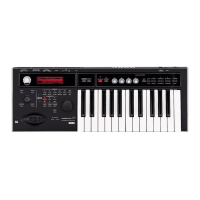
9.
Cable hook
Loop the DC Plug end of the AC Adapter cable around this hook to prevent the power cord from being
accidentally pulled out.
10.
DC9V jack
First, connect the DC end of the AC adapter to the minilogue; next connect the adapter to a suitable AC outlet.
11.
Power switch
Hold this switch in to turn the minilogue On or O.
12.
USB B connector
This connector allows the minilogue to exchange MIDI messages with your computer.
13.
MIDI IN and OUT connectors
Connect these to an external MIDI device so that MIDI data can be transmied or received.
14.
SYNC IN and OUT jacks
The minilogue steps can be synchronized with other devices using these jacks. A pulse sent from the audio
output of another device or DAW can be used by connecting it to the SYNC IN jack. Use an 1/8" cable (mini-
phone plug) to sync with KORG volca products.
15.
AUDIO IN jack
This standard 1/4" TS jack accepts a mono audio signal from another synthesizer, instrument, or external
sound source.
16.
OUTPUT jack
This standard 1/4" TS jack sends the sound of the minilogue to your powered monitoring system, mixer,
recording setup, or external amplier. The level is controlled by the MASTER VOLUME knob.
17.
Headphones jack
Connect your headphones here. This jack outputs the same sound as the OUTPUT jack.
Turning the minilogue ON
Turn o the power of your powered monitor speakers or other external output device before you turn
on the minilogue.
1.
Turn the minilogue MASTER knob all the way to the left to minimize unwanted audio artifacts during
startup.
2.
Hold down the minilogue power switch; when the instrument turns on, release the power switch.
3.
Lower the volume controls of your powered monitors or external output system, and then turn them on.
4.
Raise the volume controls of your powered monitors or external output system to an appropriate level,
and adjust the minilogue MASTER knob.
Turning the minilogue OFF
1.
Lower the volume of your powered monitors or external output system, and turn them off.
2.
Hold down the minilogue power switch; when the display goes dark, release the power switch.
Using the AUTO POWER OFF feature
The minilogue can be set to automatically turn o after approximately four hours have elapsed without any
operation of the knobs, switches, or keyboard, and without any external input.Once this occurs, you will
need to turn the minilogue on again manually.
Tip With the factory settings, the auto power-off function is enabled.
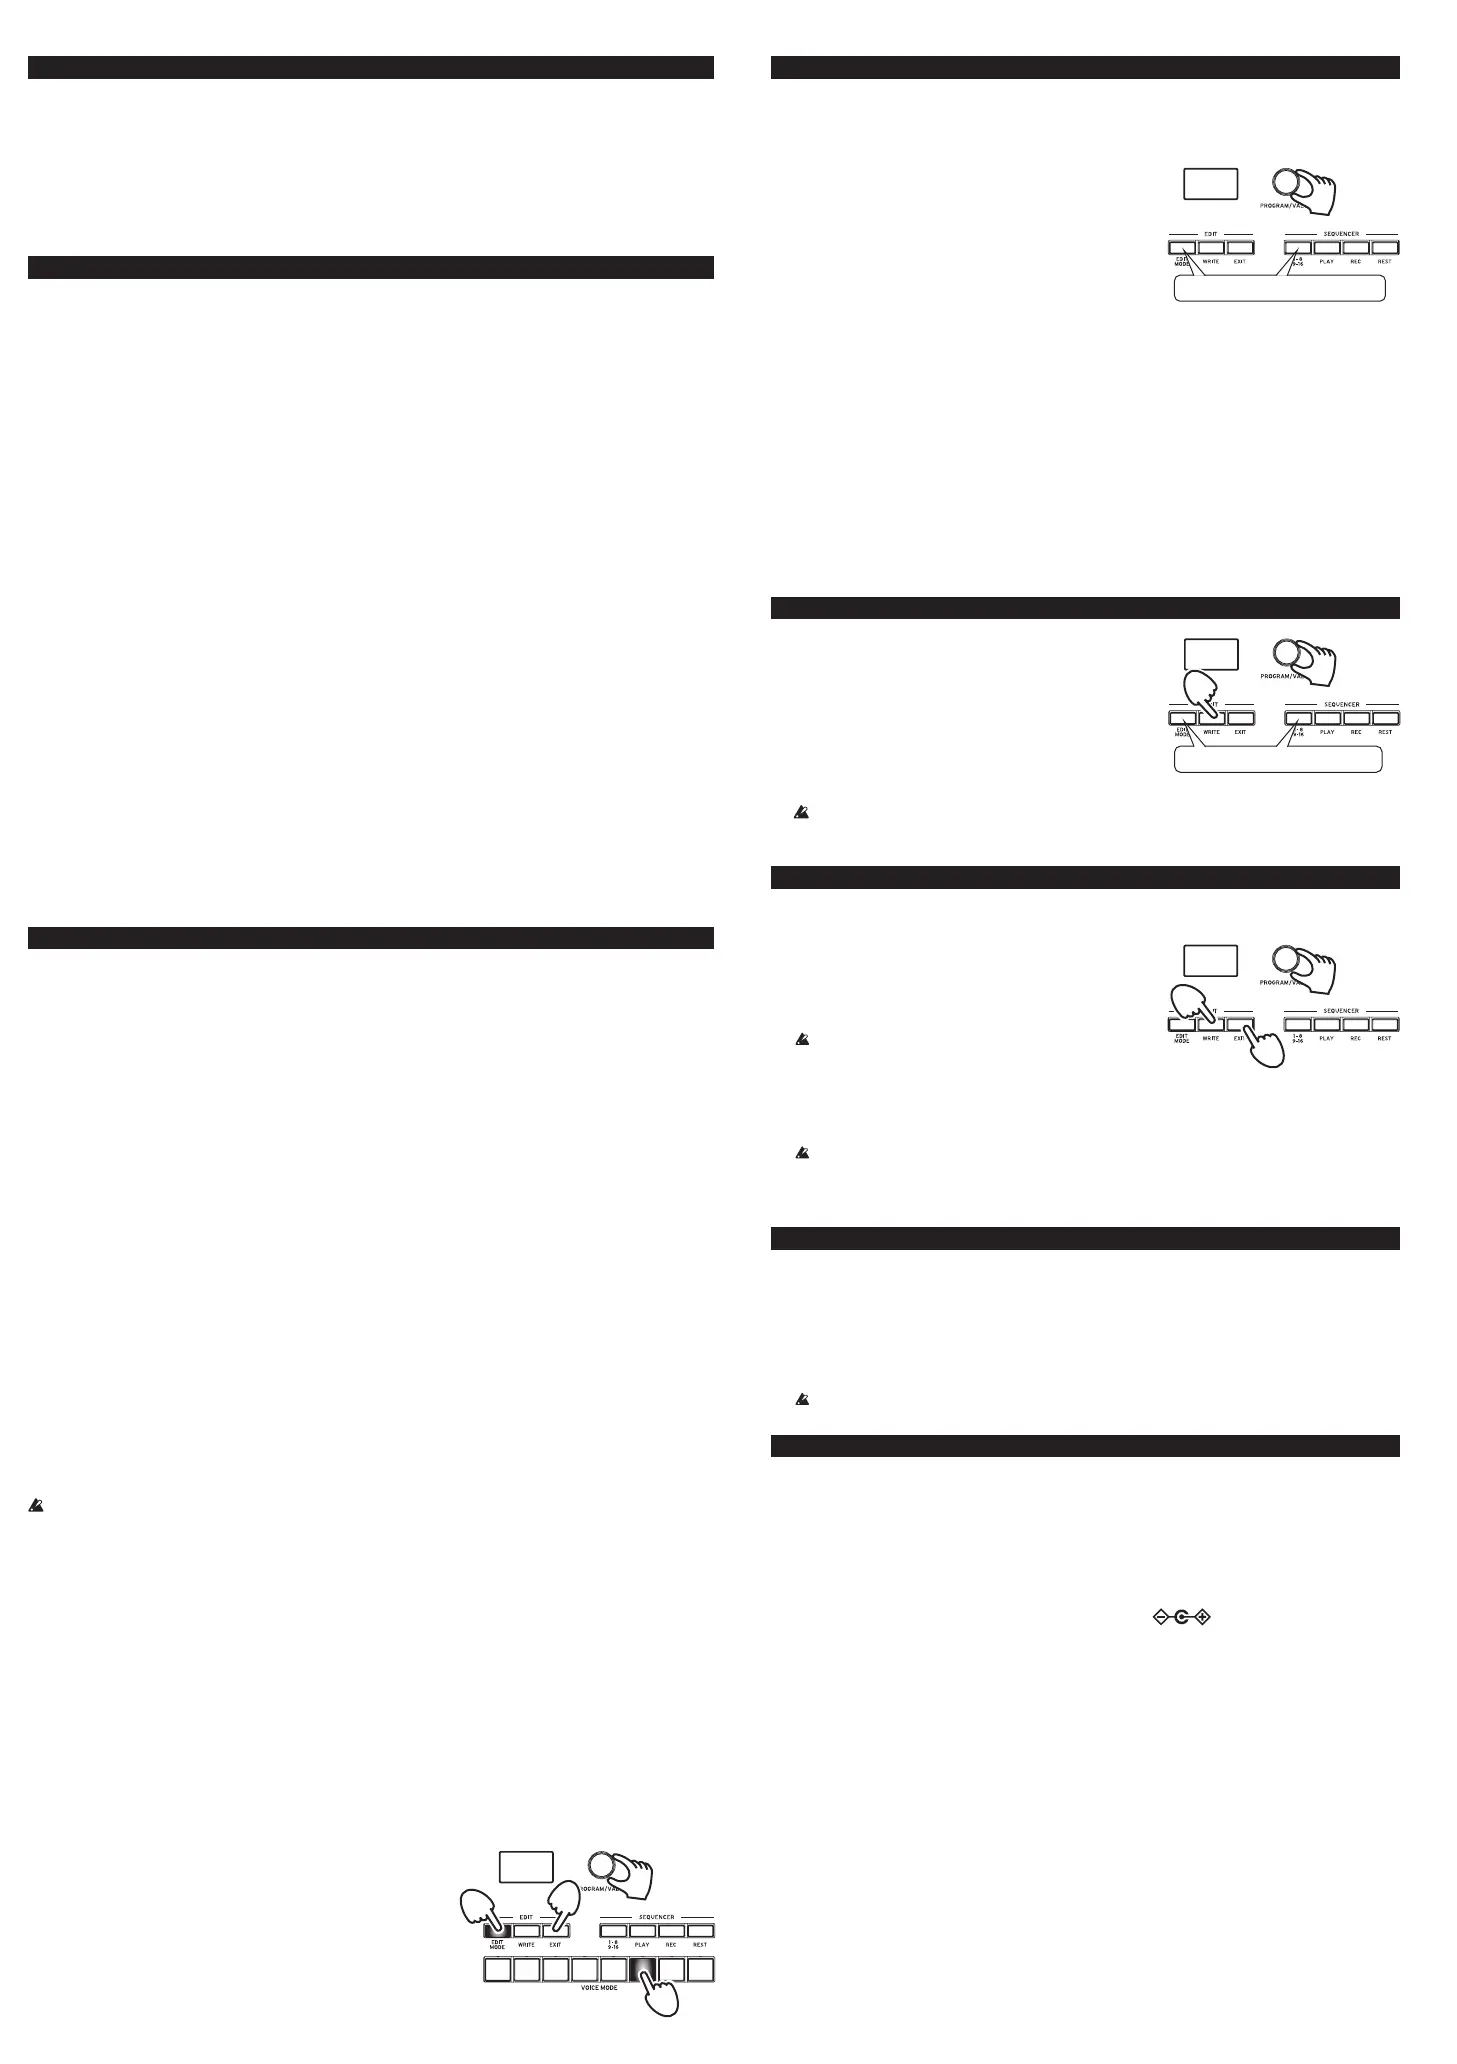
1.
Press the EDIT MODE button.
2.
Use the PROGRAM/VALUE knob to select “GLOBAL EDIT.”
3.
Press button 6 several times to access the AUTO POWER
OFF setting screen.
4.
Use the PROGRAM/VALUE knob to select “ON” or
“OFF.”
5.
Press the EXIT button to return to the previous screen.
Tip Settings in GLOBAL EDIT are saved automatically.
Playing Programs & Sequences
Playing a Program
The minilogue contains 200 Program locations—100 Presets and 100 user locations. The Preset
programs are assigned to program numbers 1–100 and are organized into sound categories for
easy selection.
Tip When the unit is shipped from the factory, program numbers
101--200 contain the Init. Program.
1.
Verify that the EDIT MODE button and the 1–8/9–16
button are unlit.
2.
Use the PROGRAM/VALUE knob to select a program.
Playing the Sequencer
The polyphonic sequencer in the minilogue can record up to 16 steps. In addition to note data, it
can automate up to four parameters. Sequence data is saved with each program.
1.
Press the PLAY button.
The sequence data recorded for the selected program will play.
2.
Press the PLAY button once again to stop.
Tip Of course, you can also record your own sequence data. For details on using the
sequencer, refer to the Owner’s Manual, available at ( www.korg.com/ ).
Load Panel function
This function loads the current state of the panel knobs and switches, and applies those seings to
the current program.
1.
Hold down the SHIFT button and press the PLAY button.
The display indicates “Load Panel.”
Saving a program
1.
Verify that the EDIT MODE button and the 1–8/9–16
button are unlit.
2.
Press the WRITE button.
Once the WRITE buon blinks; the minilogue is
ready to save a Program.
3.
Use the PROGRAM/VALUE knob to select the location
where you would like to save the Program.
4.
Press the WRITE button to save the program.
To cancel, press the EXIT buon.
Never turn o the power of the minilogue while a program is being wrien. Doing so
might damage the internal data.
Restoring the factory settings
At any time, the minilogue can be reset to the default factory seings.
1.
While holding down the WRITE button and EXIT button, press the minilogue power switch.
The minilogue is now in FACTORY RESET
mode.
2.
Use the PROGRAM/VALUE knob to choose the
settings you wish to reset. (PRESET, GLOBAL,
ALL)
If you select “ALL” and execute, all user
programs will be erased.
3.
Press the WRITE button, and then use the
PROGRAM/VALUE knob to select “YES.”
4.
Press the WRITE button.
When the factory seings have been restored, normal operation resumes.
Never turn o the power while the factory seings are being restored. Doing so might
damage the internal data.
Tip To cancel, press the EXIT button or select “NO” and then press the WRITE button.
Analog Circuitry and Tuning
Tuning Operation
As with all analog instruments, the minilogue’s circuitry can drift over time during performance
due to changes in environment and temperature. The minilogue provides an auto-tuning function
that automatically tunes the instrument’s analog circuits on demand, to correct for any analog
drift.
1.
Hold down the SHIFT button and press the REC button.
Auto-tuning begins.
During tuning, you will temporarily be unable to play the instrument.
Specications
Keyboard: 37 keys (slim keyboard, velocity sensitive)
Maximum Polyphony: 4 voices
Sound generating system: 2 VCO (square wave, triangle wave, sawtooth wave), 1 VCF
(4-pole, 2-pole), 2 EG, 1 VCA, 1 LFO, DELAY
Input/output jacks: Headphones jack, OUTPUT jack, AUDIO IN jack, SYNC IN
and OUT jacks, MIDI IN and OUT connectors, USB B
connector
Power supply: AC adapter jack (DC 9V )
Power consumption: 8W
Dimensions (W x D x H): 500 x 300 x 85 mm / 19.69" x 11.81" x 3.35"
Weight: 2.8kg / 6.17 lbs
Included items: AC adapter, Quick Start Guide, Precautions
* Specications and appearance are subject to change without notice for improvement.
* All product names and company names are the trademarks or registered trademarks of
their respective owners.
1
3
2, 4
5
Make sure they are unlit
2
3
2, 4
Make sure they are unlit
2, 3
1, 3, 4
1
 Loading...