Contents
1 Introduction 1
2 Getting Started 2
2.1 Achieving the Best Performance 2
2.2 Safety Instructions 2
2.3 Recycling Kramer Products 3
3 Overview 4
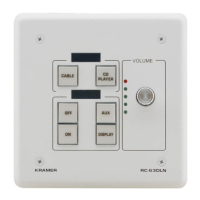
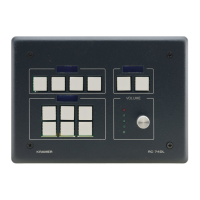
3.1 The RC-63DLN Room Controller Front Panel 5
3.2 The RC-63DLN Room Controller Rear Panel 6
4 Connecting the RC-63DLN Room Controller 10
4.1 Connecting RS-232 Devices 11
4.2 Connecting the K-NET Port 11
4.3 Grounding the RC-63DLN 11
5 Operating the RC-63DLN 13
5.1 Reset to Default Settings 13
6 Front Panel Button Caps and Labels 14
6.1 Installing the Front Panel Button Caps and Labels 17
7 Technical Specifications 19
Figures
Figure 1: RC-63DLN Front Panel 5
Figure 2: RC-63DLN Rear Panel for the USA 6
Figure 3: RC-63DLN Rear Panel for Europe 7
Figure 4: RC-63DLN European Version, Reset to Default Button 8
Figure 5: Connecting the RC-63DLN 10
Figure 6: K-NET PINOUT Connection 11
Figure 7: Grounding Connection Components 11
Figure 8: Sample Button Label Sheet 16
Figure 9: Button Cap Orientation without/with Label for USA version 17
Figure 10: Placing the Button Cap (Left – EU version, Right – US version) 17