PAGE 2
302803
DPF-MRK-003 REV D 7/24/19
PRISM+ PRO KIT WITH CONTROLLER 2803
866 277 9598 | INFO@KURYAKYN.COM
454 COUNTY ROAD VV SOMERSET, WI 54025
KURYAKYN.COM
INSTALLATION INSTRUCTIONS
-CONTINUED-
ENSURE PROPER ADHESION OF THIS PRODUCT. REMOVE ALL
GREASE, OIL, BUGS, DIRT, AND OTHER DEBRIS (INCLUDING
WAX AND POLISH) FROM THE INSTALLATION AREA. KURYAKYN
WILL NOT PROVIDE WARRANTY COVERAGE ON PRODUCTS
OR COMPONENTS LOST OR DAMAGED DUE TO IMPROPER
INSTALLATION.
DO NOT ATTEMPT THIS INSTALLATION IN TEMPERATURES
BELOW 50°F (10°C). PROPER ADHESIVE BONDING ONLY OCCURS
ABOVE 50°F (10°C).
STEP 2
Using warm soapy water and a clean rag, remove all dirt
and debris from the installation areas for the lights; allow the
area to dry completely. Wipe the installation areas with the
included alcohol pads to remove any wax or polish; allow
the area to dry completely. DO NOT INSTALL PARTS AT THIS
TIME!
LF
1
RF
2
LR
3
RR
4
STEP 3
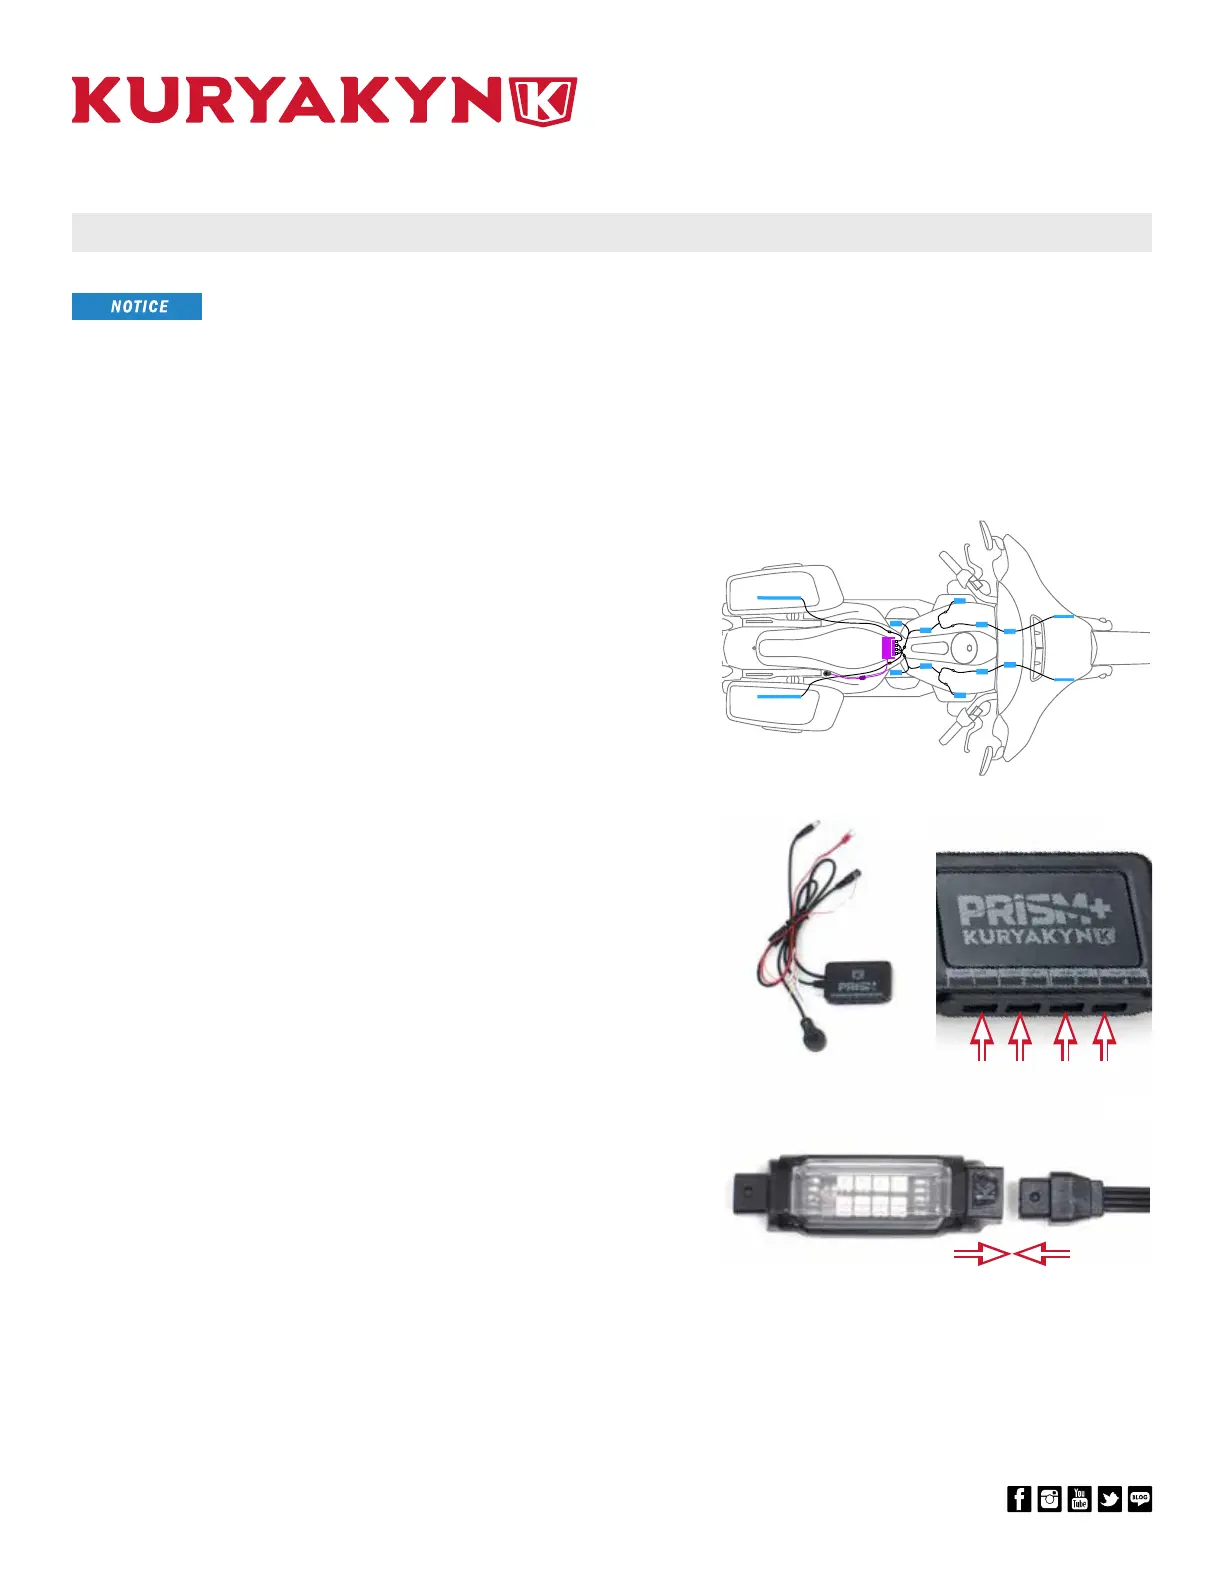
Refer to FIG 1. Determine areas of the bike you wish to
apply lights to. Test t the lights and mark the desired
locations with masking tape. Determine which provided
cords and connectors will be suitable for your desired
locations. Make adjustments to placement where needed.
Note: The diagram shows suggestions, not requirements, of where to
install Prism+ lights. Get creative and have fun!
STEP 4
Refer to PIC 2 and 3. Locate provided Bluetooth Controller.
Gain access to your motorcycle’s battery for installation of
the Bluetooth Controller.
Note: Battery location and access will vary. Refer to your motorcycle’s
service manual for assistance.
STEP 5
Fasten the controller’s two positive hook terminals (red
wires with hook terminals) to the positive post on the
battery, and the negative hook terminal (black wire with
hook terminal) to the negative post on the battery. Fully
secure hooks in place. Do NOT connect pigtail wires labeled
“brake”, “left”, “right” at this time.
STEP 6
Refer to PIC 3. Connect cords and lights to the controller,
being aware of the four dierent channels on the controller:
front left, front right, rear left, and rear right. Turn on the
Bluetooth Controller switch, open the Kuryakyn Prism+ App
on your phone, and pair the two devices. Test for proper
function of the lights before fully installing them on your
bike.
Note: Refer to PIC 4. Make note of the raised dot and the Kuryakyn
K-shield logo on opposite ends on each part. When connecting cords
to cords, cords to lights, or lights to lights be sure that the raised dot
and K-shield logo are both visible when connecting. When parts are
connected, the K-shield logos of those parts should be visible on the
same side. If within your chain of cords and lights a shield is facing in the
opposite direction, it is connected incorrectly.
TOP VIEW OF BIKE DIAGRAM
PIC 2
FIG 1
PIC 3
RAISED
DOT
K-SHIELD
LOGO
PIC 4
K-SHIELD
LOGO
RAISED
DOT
 Loading...