EasyManua.ls Logo

Kuvings AUTO10 - User Manual

Kuvings AUTO10
12 pages
Print Icon
To Next Page IconTo Next Page
Loading...
10EN231024B
Do not place parts in a dishwasher, dish dryer,
microwaver, or under extremely hot water.
AUTO10
MANUAL
Kuvings Hands-Free Slow Juicer
PRODUCT INFORMATION
Question and Answer IconNeed help?

Do you have a question about the Kuvings AUTO10 and is the answer not in the manual?

Summary

Important Safeguards

Read All Instructions

Follow all safety and operating instructions provided in the manual.

Prevent Electrical Shock

Avoid immersing the motor or base unit in water or other liquids to prevent electrical shock.

Keep Away From Children

Ensure the appliance is kept out of reach of children during use and storage.

Unplug When Not in Use

Always unplug the appliance from the outlet when not in use or before cleaning.

Avoid Moving Parts Contact

Do not touch moving parts and avoid tampering with safety interlock mechanisms.

Use With Damaged Cord;Plug

Do not operate the appliance if it has a damaged cord or plug, or after malfunction.

Use Recommended Attachments

Only use attachments recommended or sold by the manufacturer to prevent hazards.

Do Not Use Outdoors

This appliance is designed for indoor use only; avoid using it outdoors.

Cord Safety

Prevent the power cord from hanging over the edge of tables or counters.

Proper Unplugging

Grasp the plug to unplug; never pull the power cord itself.

Pre-Operation Check

Ensure the plug is attached and the control is OFF before plugging into the wall outlet.

Ensure Proper Assembly

Confirm the juicer is fully assembled before turning on the motor.

Post-Operation Safety

Turn the switch to OFF and ensure the motor stops completely before disassembling.

Prevent Insertion of Objects

Do not insert fingers or objects into the juicer opening during operation.

Appliance Condition

Do not use if rotation wiper is damaged or cups are not in place.

Do Not Alter Appliance

Do not alter the appliance in any way or use it for purposes other than intended.

Recommended Use Time

Use the appliance only for the recommended duration; do not use if supervision is inadequate.

Avoid Heat Sources

Do not use or store the appliance near heated ovens or stoves.

Safety Warnings

Household Use Only

This appliance is for household use only; follow manual instructions carefully.

Save Manual for Reference

Keep the instruction manual for future reference and include it if gifting the product.

Alternative Format Availability

Instructions are available in alternative formats, such as on the Kuvings website.

Warning and Caution Guidelines

Prohibited Actions

Actions that are forbidden due to risk of severe injury or death.

Required Actions

Actions that must be taken to ensure safe operation.

Prohibited Disassembly

Do not disassemble or modify the appliance.

Follow Instruction

Always adhere to the provided instructions for safe usage.

Multiple Power Cords

Do not plug multiple power cords into a single outlet during operation; it may cause fire.

Wet Hands and Power Cord

Avoid touching the power cord with wet hands, as it may cause electrical shock.

Unattended Operation

Do not leave the appliance unattended; unplug it when not in use.

Cleaning Power Cord

Use a dry towel to clean the power cord; do not use liquids or sprays.

Dropping Appliance

Do not drop the appliance or apply strong force to avoid damage or breakage.

Pulling Power Cord

Do not unplug by pulling the power cord cable, as it can cause damage or shock.

Inserting Objects into Feeding Tube

Do not insert fingers or other objects into the feeding tube while the juicer is in operation.

Dishwasher;Hot Water

Do not place parts in a dishwasher or hot water above 40°C, as they may wear faster.

Repair or Customization

Do not repair, disassemble, or customize the appliance, as it may cause malfunction or injury.

Uneven Surface Operation

Do not use the appliance on an uneven surface to prevent it from tipping over.

Keep Away From Children (Caution)

Keep the appliance away from children and store it in a safe place to prevent injury.

Avoid Heating Appliances

Do not store or operate the appliance near any heating appliance to prevent discoloration or deformation.

Hazardous Chemicals

Do not use hazardous chemicals or flammable sprays for cleaning, as it may cause damage or fire.

Power Cord Protection

Protect the power cord from bending or heavy objects to prevent short circuits or fire.

Operating Without Ingredients

Operating the juicer without ingredients can damage the screw.

Cleaning Food Contact Parts

Follow instructions on pages 15-17 for cleaning parts that come into contact with food.

Juicer Parts Identification

Auto Hopper Components

Identifies parts like Auto Hopper Lid, Locking Tab, and Auto Hopper Handle.

Drum Set Components

Details parts of the Drum Set including Smart Cap and Juice Spout.

Base Components

Shows the Base with its switch and pulp spout.

Basic Juicer Parts

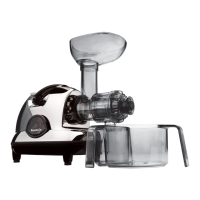
Lists fundamental parts like Juicing Bowl, Rotation Wiper, Juicing Screw, Juice Cup, Pulp Cup, Pusher, and Brush.

Optional Accessories

Displays optional items like Coarse Strainer, Smoothie Strainer, Blank Strainer, Rotating Brush, Citrus Maker, Round Brush, and Pulp Mesh.

How to Assemble Juicer

Assemble Drum Set

Step-by-step guide for inserting the juicing strainer, rotation wiper, and screw into the drum.

Assemble Drum Set and Auto Hopper

Instructions for placing and locking the auto hopper onto the juicing bowl.

Assemble Base and Top Set

Steps for placing the assembled top set onto the base clamp and ensuring pulp outlet lock is secured.

Prepare Cups and Mesh

Guidance on placing the juice cup, pulp cup, and optional pulp mesh correctly.

How to Operate Juicer

Operation Modes

Explanation of FORWARD (FWD), STOP (O), and REVERSE (REV) switch functions.

Loading Ingredients

Instructions for opening the auto hopper lid and inserting ingredients.

Closing Auto Hopper Lid

Steps to press the locking tab and completely close the auto hopper lid.

Starting Juicing

Press the FWD switch to start operation, keeping the juice cap open.

Adding Ingredients During Operation

Add ingredients through the auto hopper hole while the machine is ON.

Running Until Empty

Run the product until the pulp is completely drained.

Stopping Operation

Set the switch to STOP (O) and stop the operation.

Ingredients Preparation Guide

General Preparation Notes

Do not exceed maximum capacity; juicing soft & hard ingredients together increases efficiency.

Fruit and Vegetable Cutting

Cut ingredients to fit auto hopper; remove hard seeds before extraction.

Leaf;Stem Vegetable Cutting

Cut fibrous vegetables into 2-3 inches or less before feeding.

Root Vegetable Preparation

Peel and cut root vegetables to fit auto hopper; cut long ingredients vertically.

Thick-Skinned Fruit Preparation

Peel and cut thick-skinned fruits, removing hard seeds before juicing.

Special Ingredient Handling

Guidelines for pomegranate, grapes, ginger, kohlrabi, nuts, and beans.

Ingredient Hardness Guide

Categorizes ingredients by hardness: Hard, Semi-Hard, Soft, and Leafy.

Forbidden Ingredients

Do not insert ingredients with vegetable/animal oil, fibrous, or dry ingredients, or ice.

Juicer Disassembly and Cleaning

How to Disassemble

Steps to disassemble the auto hopper & base, and the drum set & base.

How to Clean Juicing Bowl

Pull the pulp outlet lock down for cleaning the juicing bowl.

How to Clean Juicing Screw

Remove foreign substances from the juicing screw groove with the cleaning brush.

How to Clean Rotating Brush

Steps for cleaning the rotating brush using the dual cleaning tool.

Cleaning the Base

Wipe the base with a soft cloth containing a little moisture; do not wash with water.

Cleaning Silicone Parts

Silicone Parts Care

Silicone parts can be separated, washed, dried, and stored; ensure proper insertion.

Cleaning Silicone Brush

Pull the silicone brush from the rotary wiper and wash it.

Cleaning Smart Cap Silicone

Remove the smart cap silicone from the smart cap and wash it.

Cleaning Silicone Ring

Remove the silicone ring from the juicing bowl to clean, then push it back in.

Cleaning Pulp Outlet Silicone

Pull the pulp outlet silicone from the drum and wash it; ensure it's fully inserted.

Quick Rinsing Method

Rinse the top set by running water through the auto hopper for 30 seconds.

Using Special Attachments

How to Use Citrus Maker

Assemble and operate the citrus maker by cutting fruit in half and pressing it on the cone.

How to Use Optional Strainers

Check silicone parts, remove seeds/skins from ingredients, and cut into small pieces.

Coarse Strainer Usage

For fruits like strawberry, blueberry, pineapple, and mango.

Smoothie Strainer Usage

For frozen fruits and liquids; thaw frozen items and use a 1:1 ratio with liquid.

Blank Strainer Usage

Exclusively for frozen ingredients; thaw slightly and use with smart cap open.

Troubleshooting Common Issues

No Power

Check power cord connection and if parts are properly assembled.

Low Juice Yield

Address factors like ingredient freshness, soaking, and small seeds.

Too Much Pulp in Juice

Reduce pulp by cleaning top-set frequently and cutting fibrous foods smaller.

Auto Hopper Will Not Close

Ensure the juicing screw is fully pushed into the strainer for proper closure.

Noise From Juicer

Check assembly, avoid running without ingredients, and ensure proper surface.

Extracted Pulp is Very Moist

Normal at the beginning; clean parts to remove pulp buildup.

Drum Shakes During Operation

Normal vibration from screw/strainer; may be stronger with fibrous ingredients.

Motor Stopped During Juicing

Check power, assembly, overload protection, and use reverse function.

Layer Separation of Juice

May occur due to ingredient density differences, not oxidation.

Auto Hopper Stuck

Run for 30 seconds, check for pulp buildup, or rinse with water.

Juice Dripping Down Body

Ensure silicone parts on the pulp outlet are correctly plugged in.

Juicing Ingredients With Tough Fiber

Cut fibrous ingredients into smaller pieces and alternate with other ingredients.

Plastic Parts Discoloration

Clean promptly; carotenoid-rich ingredients may dye parts; use vegetable oil for cleaning.

Juicer Usage for Different Purposes

For fruits, vegetables, nuts, soybeans; not for oils or butters.

Product Specifications

Product Model and Voltage

Details the juicer model, applicable voltage, and frequency.

Power Consumption and Use Time

Specifies the power consumption and maximum recommended continuous use time.

Physical Dimensions and Weight

Provides the weight and overall dimensions of the juicer.

Manufacturer and Origin

Identifies the manufacturer and the country of origin.

Overview

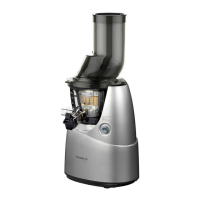
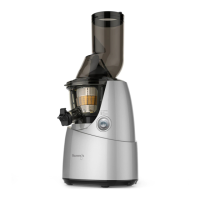
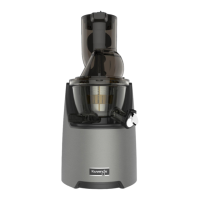
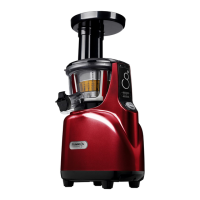
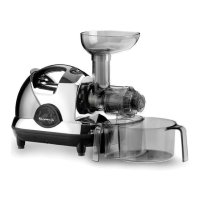
The Kuvings AUTO10 is a hands-free slow juicer designed for household use, emphasizing ease of operation, efficient juice extraction, and straightforward maintenance. This manual provides comprehensive instructions for assembling, operating, and cleaning the device, along with important safety precautions and troubleshooting tips.

Function Description

The primary function of the Kuvings AUTO10 is to extract juice from various fruits, vegetables, and leafy greens using a low-speed compression method. Unlike high-speed juicers, this slow juicer is designed to minimize oxidation, preserving more nutrients and enzymes in the juice. It features a large-capacity auto hopper, allowing users to insert ingredients in larger quantities and even whole, reducing the need for extensive pre-cutting. The juicer is capable of processing both soft and hard ingredients, and with optional strainers, it can also be used to make smoothies or sorbets. The device operates with a simple forward (FWD) and reverse (REV) switch, enabling users to control the juicing process and clear any lodged ingredients.

Usage Features

The Kuvings AUTO10 is designed for user convenience, starting with its hands-free operation.

  • Assembly: The juicer consists of a base, drum set, and auto hopper. Assembly involves inserting the juicing strainer into the rotation wiper, placing the strainer into the drum, and gently pressing the juicing screw into the center. The auto hopper then locks onto the juicing bowl, and the entire top set is placed onto the base. Proper alignment of red dots and lock marks ensures correct assembly and operation.
  • Ingredient Preparation: While the large auto hopper can accommodate whole ingredients, cutting them into appropriate sizes can optimize juice extraction, especially for fibrous or hard items. Hard seeds should be removed from fruits like apples and peaches. Leafy greens should be cut into 2-3 inch pieces. Root vegetables and thick-skinned fruits require peeling and cutting. The manual provides specific guidance for ingredients like pomegranate (kernels only), grapes (no stems), ginger, kohlrabi (cut small and mixed with moist ingredients), and soaked nuts/beans. It's crucial not to overfill the auto hopper beyond the maximum capacity line. For mixed ingredients, it's recommended to juice soft and stringy ingredients first, followed by harder ones.
  • Operation: To start, open the auto hopper lid, insert ingredients, and then close the lid completely, ensuring the locking tab is pressed down. Place the juice cup and pulp cup under their respective spouts. Press the FWD switch to begin juicing. The smart cap on the juice spout should be kept open during extraction to prevent juice from flowing backward. If the juicer stops due to too many ingredients, use the STOP(O) switch, then press and hold the REVERSE(REV) switch for 2-3 seconds to dislodge ingredients, and then switch back to FWD. The juicer should run until the pulp is completely drained. After use, turn the switch to STOP(O) and wait for the motor to stop completely before disassembling.
  • Optional Attachments: The manual details the use of optional strainers and a citrus maker.
    • Citrus Maker: This attachment is used for juicing citrus fruits cut in half. It involves assembling a cone and strainer into a citrus maker drum, placing it on the base, and pressing the FWD button. Fruits are then gently pressed onto the rotating cone to extract juice.
    • Coarse Strainer: Ideal for fruits like strawberry, blueberry, pineapple, and mango.
    • Smoothie Strainer: Used for frozen fruits (strawberry, mango, etc.) and liquids (milk, water, etc.). Frozen items should thaw for 5-20 minutes. The smart cap should be closed, and liquid added first, followed by small amounts of frozen ingredients through the auto hopper hole. A 1:1 ratio of frozen ingredients to liquid is recommended.
    • Blank Strainer: Specifically for frozen ingredients (strawberry, pineapple, mango, etc.) to make sorbets. Frozen items should thaw for 5-10 minutes, and small amounts should be inserted through the auto hopper hole. The smart cap should always remain open when using the blank strainer.

Maintenance Features

Regular cleaning is essential for maintaining the juicer's performance and longevity.

  • Disassembly: To disassemble, press the handle switch, turn the auto hopper counterclockwise while pressing the handle switch to open it, then lift the auto hopper and drum set from the base. Separate the juicing strainer, rotation wiper, and screw from the drum set.
  • Cleaning Parts: All parts, except the base, can be washed thoroughly under running water. It is crucial not to place any parts in a dishwasher, dish dryer, microwaver, or expose them to extremely hot water (above 40°C), as this can cause parts to wear faster.
    • Juicing Bowl: Pull the pulp outlet lock down to unlock for cleaning.
    • Juicing Screw: Use the tip of the cleaning brush to remove any foreign substances (seeds, grains) stuck in the screw groove. Ensure the groove is completely clean to prevent damage to the screw.
    • Rotating Brush: The manual illustrates a dual cleaning tool. Push the slide lock to release it, insert the fastening bar into the silicon ring groove of the strainer, lower the handle, and then push the slide rock at the bottom to tighten. Wash the strainer by rotating the dual cleaning tool and strainer in opposite directions.
    • Silicone Parts: Silicone parts (silicone brush, smart cap silicone, silicone ring, pulp outlet silicone) can be separated for thorough cleaning. After washing, ensure they are properly reinserted. For the silicone brush, insert it with the tail facing down through the wide part of the wiper. For the smart cap silicone, insert it into the smart cap before use. For the silicone ring, push it in with the smaller surface down. For the pulp outlet silicone, ensure it is completely inserted into the groove. Improper insertion of silicone parts can lead to reduced juice yield or leakage.
  • Quick Rinsing: For juicing different ingredients consecutively, a quick rinse can be performed. Close the smart cap, pour water through the auto hopper hole, and operate for 30 seconds. Then, open the smart cap to let the water run out. After all juicing is completed, a full disassembly and wash is required.
  • Base Cleaning: The base cannot be washed with water. It should be wiped with a soft cloth containing a little moisture.
  • Discoloration: If plastic parts become discolored by ingredients like carrots or spinach, rub vegetable oil or lemon juice into the affected areas and clean with mild detergent. Avoid using vegetable oil on the juicing screw or strainer, as this can affect performance and cause damage.

Safety Warnings

The manual highlights several critical safety warnings:

  • Always read all instructions before use.
  • Do not immerse the motor or base in water or other liquids.
  • Keep away from children.
  • Unplug the appliance when not in use, before adding/removing parts, or before cleaning.
  • Avoid contact with moving parts and do not attempt to alter safety interlock mechanisms.
  • Do not operate with a damaged cord, plug, or after malfunction/damage.
  • Use only manufacturer-recommended attachments.
  • Do not use outdoors.
  • Do not let the cord hang over edges.
  • Pull the plug, not the cord, to unplug.
  • Ensure the juicer is properly assembled and the control is OFF before plugging in.
  • Do not remove the drum lid or parts while the juicer is operating.
  • Turn off the switch and wait for the motor to stop completely before disassembling.
  • Do not insert fingers or other objects into the juicer opening during operation. Use a food pusher if food becomes lodged.
  • Do not use if the rotation wiper is damaged.
  • Ensure juice and pulp cups are in place during operation.
  • Do not alter the appliance.
  • Use only for its intended purpose as described.
  • Adhere to recommended use time.
  • Supervise children and individuals with reduced capabilities. Children should not play with or clean the appliance.
  • Do not store or use near heated ovens or stoves.
  • Avoid plugging multiple power cords into a single outlet.
  • Do not touch the power cord with wet hands.
  • Do not leave unattended.
  • Clean the power cord with a dry towel if dirty or wet.
  • Do not drop or inflict strong force on the appliance.
  • Do not unplug by pulling the power cord cable.
  • Do not use hazardous chemicals or flammable sprays.
  • Do not aggressively bend or place heavy objects on the power cord.
  • Operating the juicer without ingredients can damage the screw.
  • The appliance is for household use only; commercial use voids the warranty.
  • Store in a safe place away from children.
  • Do not operate on an uneven surface.

Kuvings AUTO10 Specifications

General IconGeneral
ProductJuicer
ModelAUTO10, KSP-2529CE, KSP-2559CE, KSP-2529CB, KSP-2559CB, KHS-2520CE, KHS-2510CE, KHS-2520CB, KHS-2510CB
ManufacturerNUC Electronics Co., Ltd.
TypeLow speed compression
OriginMade in Korea
VoltageAC220-240V, 50/60Hz
Power Consumption200W
Maximum UseLess than 30 min
Weight and Dimensions IconWeight and Dimensions
Weight7.2kg
Dimension210x253x472 mm

Related product manuals