Do you have a question about the Kyosho SuperTen GP FW-04 4WD and is the answer not in the manual?
| Brand | Kyosho |
|---|---|
| Model | SuperTen GP FW-04 4WD |
| Category | Motorized Toy Car |
| Language | English |
Crucial safety advice emphasizing the model is not a toy and requires careful handling by adults.
Details the necessary 2-channel radio, servos, and battery box for model operation.
Lists essential items for engine starting, including glow fuel, plug heater, and fuel pump.
Required paints, brushes, and masking tapes for customizing the model's body shell.
Lists all tools required for building the model, including those provided and recommended.
Step-by-step guide for connecting and powering the transmitter, receiver, and servos.
Guide on reading the manual, interpreting symbols, and identifying parts.
How to check parts against the manual and report any missing or defective items.
Visual guide to screws and hardware with true-to-scale diagrams for correct selection.
Diagram showing the arrangement of plastic parts on their runners for easy identification.
Detailed steps for assembling the initial steering linkages and servo connections.
Continues steering assembly, connecting components to the chassis and servo saver.
Instructions for assembling the front and rear gear differentials.
Steps for building the main gearbox housing and its internal gears.
Assembling the left and right front suspension arms and related components.
Continues front suspension assembly, including shock mounts and ride height adjustments.
Further steps for assembling the front suspension and connecting it to the chassis.
Connecting the steering servo and linkages to the front chassis assembly.
Detailed steps for assembling the center gearbox and its internal components.
Continues center gearbox assembly, focusing on specific gear placements and brake piston.
Instructions for assembling the left and right rear suspension arms.
Continues rear suspension assembly, including shock mounts and ride height adjustments.
Further steps for assembling the rear suspension and attaching it to the chassis.
Final steps for the rear suspension, ensuring proper movement and fit.
Detailed instructions for assembling the shock absorber bodies and shafts.
Steps for filling shocks with oil, bleeding air, and completing the assembly.
Mounting the front shock absorbers onto the chassis assembly.
Attaching the rear shock absorbers and the front bumper to the car.
Attaching side bumpers and connecting the fuel tank and lines.
Cutting silicone tubes to specific lengths for the fuel tank setup.
Installing the engine, including connection of fuel tank and muffler.
Ensuring proper clearance between the fuel tank and muffler for correct operation.
Mounting the steering and throttle servos, and the radio box to the chassis.
Connecting servos to the receiver and installing the radio system components.
Connecting the receiver battery box and chassis components.
Adjusting the servo rod for precise steering control based on specific measurements.
Adjusting throttle linkage and servo horn positions for optimal neutral and brake settings.
Detailed steps for adjusting the throttle stop screw and brake linkage for smooth operation.
Instructions for fitting tires onto wheels and securing them with glue.
Attaching the body mounts to the chassis, noting specific part orientations.
Final installation of body mounts, ensuring correct alignment for the shell.
Attaching the main body shell to the chassis, including drilling holes for mounting points.
Steps for cleaning and painting the body, including color scheme guidance.
Applying masking tape to windows and removing protective film after painting.
Detailed placement instructions for all decals, referencing numbers for symmetry.
Mounting the body shell and reviewing operational safety precautions.
Installing optional shock spacers and the fuel filter for improved performance.
Guide for installing the optional cooling fan set to aid engine cooling.
Installing the Futaba SRN-31F control block unit as per instructions.
Setting up the linkage for engines with slide-type carburetors for precise control.
Adjusting ride height and steering characteristics using shock collars, springs, and oil.
Modifying caster angle by changing spacer positions to alter cornering behavior.
Fine-tuning camber angle by adjusting pillow balls for optimal tire contact and grip.
Warnings against operating in unsafe locations and checking for proper model behavior.
Critical safety advice for handling glow fuel, emphasizing its flammability and proper storage.
List of spare parts for engine, chassis, suspension, and steering components.
Spare parts for drivetrain components like differentials, gearboxes, and drive shafts.
Optional upgrades for improved performance, including springs, shocks, and engine parts.
Optional parts for maintenance and tuning, such as lubricants, filters, and spare clutches.
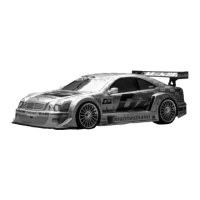
Catalog of available wheels, tires, and full body sets for customization and replacement.
Comprehensive list of all screws, nuts, and hardware with sizes and quantities.
A detailed visual representation of all parts and their assembly order with key numbers.