Do you have a question about the La Crosse Technology 617-148v2 and is the answer not in the manual?
Identify and understand the function of each button on the clock.
Understand the different indicators and segments on the clock's display.
Adjust backlight intensity and configure auto-dim settings.
Locate and identify the power and USB charging ports on the clock.
Set and manage alarm times and snooze duration.
Learn how to charge your phone wirelessly using the built-in pad.
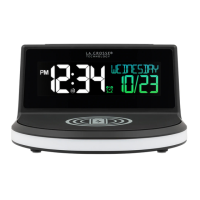
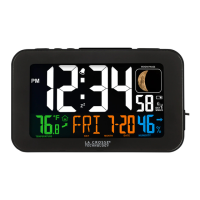
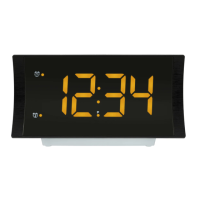
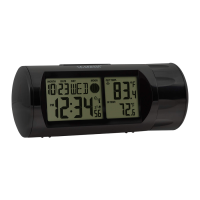
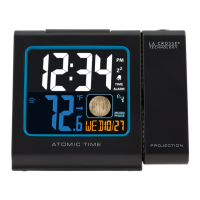
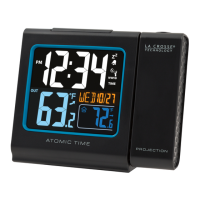
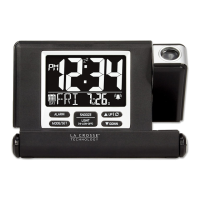
The La Crosse Technology Wireless Charging Alarm Clock is a versatile device designed to provide timekeeping, alarm functions, and convenient wireless charging for compatible smartphones. This alarm clock features a sleek design with a clear LCD display that shows the time, day of the week, and date or temperature, depending on the selected display mode.
The primary function of this device is to serve as an alarm clock, offering users the ability to set and manage alarms with a customizable snooze duration. Beyond basic timekeeping, it integrates a 5W wireless charging pad on its top surface, allowing users to charge Qi-enabled smartphones by simply placing them on the platform. Additionally, it includes a 1 Amp USB charging port on the right side for charging other devices via a cable. A unique feature of this alarm clock is its "Glow Light," which provides ambient lighting with various color options and adjustable brightness levels, enhancing the aesthetic and functionality of a bedside table.
To begin, plug the 5V Power Adapter into an outlet and then into the Power Jack on the bottom of the alarm clock. A greeting will appear on the LCD, and the clock will enter the Settings Menu. The menu order includes Language, 12/24 Format, Hour, Minutes, Year, Month, Date, and Fahrenheit/Celsius. Use the +/- buttons on the back to adjust values and the SET button to confirm selections and move to the next step. The Settings Menu can be exited at any time by tapping the SNOOZE/LIGHT button. After the initial setup, holding the SET button on the back of the clock will re-enter the Settings Menu.
The LCD display shows AM/PM indicator, snooze indicator, weekday, time, auto-dim indicator, alarm indicator, and calendar or temperature. The backlight intensity of the LCD display can be adjusted by pressing the SNOOZE/BACKLIGHT button on the top of the clock. There are four brightness levels, plus an off option.
The LCD display can be programmed to automatically dim during preselected times. To access Auto-Dim settings, hold the SNOOZE/BACKLIGHT button. Use the +/- buttons to turn the feature on or off, then press SNOOZE/BACKLIGHT to confirm. Adjust the starting and stopping hours using the +/- buttons, confirming each with SNOOZE/BACKLIGHT. The AUTO DIM icon will appear on the LCD when activated.
The clock offers multiple display modes, which can be selected by pressing the SET button on the back. Options include:
To set the alarm, hold the alarm button on the back of the clock to enter the Alarm Settings Menu. Use the +/- buttons to set the desired alarm time, then press the alarm button to confirm. Next, set the snooze duration (from 5 to 120 minutes) using the +/- buttons and confirm with the alarm button to exit. Once activated, the alarm icon will appear on the LCD. To activate or deactivate the alarm, simply press the alarm button. The alarm icon will indicate its active status. The alarm features an ascending beep frequency over a 2-minute period. If not snoozed or turned off, it will stop after 2 minutes. When the alarm sounds, tapping the SNOOZE/LIGHT button will snooze it for the preselected duration, and a countdown will appear on screen. The snooze feature can be repeated as many times as desired.
The Glow Light offers ambient lighting. Press the GLOW button to cycle through different light options. The color selection order is Cycle | Red | Yellow | Green | Cyan | Dark Blue | Purple | White. Tapping the SNOOZE/LIGHT button when a color is displayed will select that individual solid color, making it remain on that color. Selecting "CYCLE" will smoothly transition between all colors. The Glow Light brightness can be adjusted using the +/- buttons, offering four intensity levels plus an OFF option. Holding the GLOW button will also turn off the Glow Light.
Place your Qi-enabled phone on the charging platform, ensuring it sits flush and centered on the charging pad. A blue Charging Indicator Light below the LCD will be solid when the phone is successfully charging. If the light flashes slowly, the device may not be positioned properly or is not compatible. Removing large/bulky cases might resolve charging issues.
A 1 Amp USB Charging Port is located on the right side of the alarm clock. Connect an external device's USB charging cable (not included) into this port to charge. Charging times may vary, with a maximum output of 1 Amp.
If the blue light blinks, ensure the phone is centered on the charging pad, is Qi-enabled, and does not have a large/thick case interfering with charging. Also, check for foreign objects on the charging pad.
If the table surface gets warm, ensure the clock is on a hard, clean surface. Avoid placing it on cloth, paper, or other items that may obstruct airflow. Clear any dust or obstructions from the vents on the bottom of the clock.
If experiencing issues with the clock, a factory reset can be performed by using a pen or paper clip to press the RESET button on the back of the clock.
Wireless charging uses magnetic induction. Do not place anything between your phone and the charging pad. Keep the charging pad clear of foreign objects. Magnetic mounts, cases, or other objects between the phone and charger may reduce performance or damage magnetic strips or RFID chips found in credit cards, security badges, passports, and key fobs. Remove such items or ensure they are not between the phone and the charging pad during charging.
For detailed product videos, manuals, and more, visit the support website at www.lacrossetechnology.com/support. Have the model number (617-148) handy. For additional support, contact the customer support team online at bit.ly/contact_techsupport or by phone at 1.608.782.1610, available Monday-Friday 8:00 am to 6:00 pm CST.
| Display Type | LCD |
|---|---|
| Power Source | AC Adapter |
| Alarm Function | Yes |
| Temperature Display | Yes |
| Battery Backup | Yes |
| Snooze | Yes |
| Display Features | Adjustable Brightness |
| Time Display | 12/24 Hour |
| Power Source Voltage | 5V AC adapter |
| Battery Power Source | 2 "AAA" Batteries (not included) |