Do you have a question about the La Crosse Technology C83100 and is the answer not in the manual?
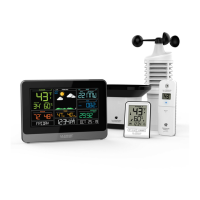
Install C and AA batteries into Wind, Rain, Thermo-Hygro, Bonus sensors, and station backup.
Download the La Crosse View app and follow instructional videos to connect your station.
Mount your sensors in appropriate locations for optimal performance and data collection.
Provides essential safety information regarding button cell batteries if swallowed.
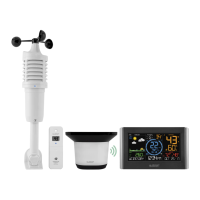
Mount wind sensor vertically in an open, unobstructed area for accurate readings.
Mount rain sensor in an open, level area, off the ground, and keep bucket clear of debris.
Mount thermo-hygro sensor in a well-ventilated, shaded area, preferably on a north-facing wall.
Controls for viewing history, settings, Wi-Fi status, and adjusting values.
Controls for extra sensors, sensor ID management, and backlight adjustments.
Explains how to use SET, TEMP/WIND/RAIN, LIGHT, +/-, SENSOR, DAILY/HOURLY buttons.
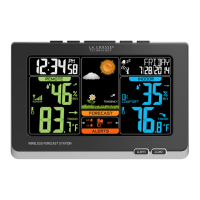
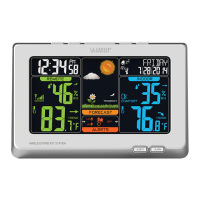
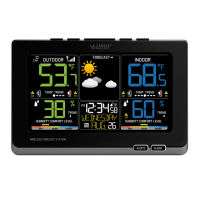
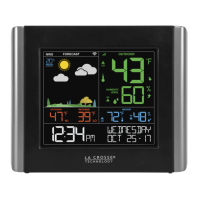
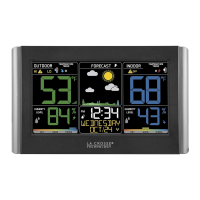
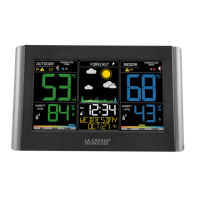
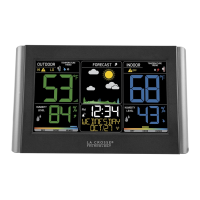
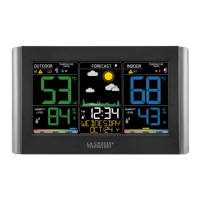
Explanation of icons for outdoor temperature, humidity, and indoor readings.
Icons for 12-hour forecast, chance of precipitation, wind speed, and pressure.
Icons for low battery, sensor reception, Wi-Fi connection, and units (°F/°C, IN/MM).
Icons for Pressure, Low Battery, Sensor Reception, and Probe Reading in the extra sensor area.
Icons for INHG/HPA, Pressure Trend Arrows, Auto Scroll, and Probe Reading.
Explains how to view additional sensors or enable Auto Scroll.
Specifies iOS and Android requirements for using the La Crosse View app.
Ensures the station's Wi-Fi indicator is flashing to signal readiness for connection.
Download the La Crosse View app and follow on-screen instructions for setup.
Verify 2.4GHz Wi-Fi network and correct password entry for successful connection.
The station's unique device ID is found on the back of the display unit.
Receive notifications within 15 minutes to add sensors after station connection.
Press the Cloud Icon in the app's home screen to begin adding detected sensors.
Compares features available when the station operates standalone versus when connected.
Connected stations gain access to more data like Wind Speed, Direction, Rainfall, and Forecasts.
Connected features include Internet Time, Calendar, Advance Forecast Icons, and Remote Monitoring.
Displays advanced forecast icons and percentage chance of precipitation for 12-hour periods.
Provides AccuWeather Daily/Hourly forecasts, HI/LO temperatures, and wind direction data.
Allows customization of up to three data items to be streamed to your station display.
Visual examples of 12-hour forecasts for sunny, partly sunny, and cloudy conditions.
Examples of forecasts for Light Rain, Rain, T-Storm, Light Snow, Snow, and Wintry Mix.
Examples of 12-hour forecasts for Wind, Ice, and Fog conditions.
Scroll through 7 days of future forecasts, displaying icons and HI/LO temperatures.
The display automatically reverts to the default 12-hour forecast after 10 seconds.
Messages like 'CONNECT TO WIFI' or 'WAIT FOR WEATHER' indicate connection status.
Scroll through 12 hours of future forecasts, showing icons, precipitation, temp, and wind.
Small discrepancies may exist due to different data fetching timings from AccuWeather.
Displays daily AccuWeather HI/LO temperature predictions when connected to the app.
Shows daily outdoor temperature records from the sensor if the station is unconnected.
Wind direction in letters replaces Top 1HR when connected to the internet.
An internet indicator appears on the display when the station is connected.
Use the La Crosse View app to select up to three data items to stream to your station.
Navigate the app, find the Data Stream section, and customize display items.
Includes Wind Speed, Direction, UV Index, Dew Point, Sunrise/Sunset, Temp/Humidity, and more.
Allows entering up to 20 characters for special events or reminders.
Allow up to 10 minutes for new Data Stream selections to appear on the station.
Press the TX button on sensors to force a signal for detection by the app.
Scan the sensor's barcode ID or manually enter it in the La Crosse View app.
Navigate app menus, select 'Add Device', confirm, and name sensors for integration.
Visit the PARTS TAB to purchase additional sensors for station or app use.
Wi-Fi icon indicates connection; Internet icons indicate app/server connection.
Indicates the station is fully connected to the La Crosse View app and weather server.
Suggests checking Wi-Fi router, app connection, or notifications for updates.
Troubleshoot power, ensure device on 2.4GHz network, or search for Wi-Fi connection.
Indicates a weather/time service connection issue, resolved by the weather server.
Station is functional standalone but offers more features when connected to the app.
Includes Backlight, Settings, Extra Sensor Area, History Readings, and Sensor Management.
Adjust backlight brightness through 5 levels using the LIGHT button.
Levels range from OFF (0%) to Level 4 (100%) brightness.
Backlight dims to level 1 at a set hour and returns to full brightness upon waking.
Use LIGHT and +/- buttons to set start and stop hours for automatic dimming.
Hold the SET button for 3 seconds to access the station's settings menu.
Use +/- buttons to adjust values and SET to confirm and move to the next item.
Includes Beep, Time Format, Hour, Minutes, Year, Month, Date, Temp & Pressure Units.
The Extra Sensor area defaults to showing Relative Pressure when first powered on.
Supports up to 4 additional Thermo-Hygro, Wind Speed, or Water Leak sensors.
Press EXTRA SENSOR button to cycle through sensors or enable Auto Scroll.
The Extra Sensor area cannot read Rain sensors.
Additional sensors can be purchased via the PARTS TAB link.
Hold the EXTRA SENSOR button for 3 seconds to add a sensor to the station.
Install batteries in the sensor and press the TX button to force a signal transmission.
Allow up to 3 minutes for sensor ID and type to display on the station.
Scan the sensor barcode ID to register it in the La Crosse View app.
Press EXTRA SENSOR to view sensor and ID, then hold MINUS to select for deletion.
Hold the MINUS button for 3 seconds to delete the sensor from the station.
Deleted sensors no longer show on station; remove batteries from deleted sensors.
Displays highest wind speed in past 31 seconds and past 60 minutes.
Shows wind direction in letters when connected; Top 1HR is viewable in history.
Use WIND button to view history; use PLUS button to toggle through monthly data.
Covers 1 Hour, 24 Hours, 7 Days, Month, and Year highest wind speeds.
Press RAIN button to cycle through history; press LIGHT to return to normal display.
Shows rain from event start until 30 mins of no rainfall, then resets to zero.
Rainfall in the past 60 minutes, based on the last twelve 5-minute samples.
Covers rainfall in the past 24 hours, 7 consecutive days, and the current month.
Shows current month plus past 11 months total rainfall for the year.
Displays total rainfall accumulated since the station was powered on or reset.
1 hour, 24 hour, and 7 day totals count down to zero if no rain occurs.
Press RAIN to view readings, then hold MINUS for 5 seconds to reset the individual value.
The rainfall reading will be reset to zero after the operation is completed.
Press TEMP button to view HI/LO records with time and date of occurrence.
Details the sequence for viewing outdoor/indoor HI/LO temp/humidity and dew point.
Hold MINUS button for 5 seconds after pressing TEMP to reset individual values.
Combination of outdoor temp, humidity, and wind speed displayed in Outdoor Temp area.
Shows Heat Index above 80°F, Wind Chill below 50°F, or current temp between 50-80°F.
Outdoor temperature trend arrows update every 15 minutes, reflecting the past hour.
UP arrow for 2°F+ rise, RIGHT for steady, DOWN for 2°F+ fall in temperature.
Station has an internal sensor for accurate relative pressure readings.
Defaults to 29.92 InHg, adjustable in Settings Menu for units (InHg/hPa).
UP/DOWN arrows indicate pressure tendency based on a 3-hour average comparison.
Solid indicator means connected; flashing means searching; no indicator means not connected.
Indicators are present for Thermo-Hygro, Wind, Rain, and Extra Sensors.
Press SENSOR button to view ID number and type for station and connected sensors.
Hold the PLUS (+) button to search for sensors; reception indicator will flash.
Search takes up to 3 minutes; indicator stops flashing when sensor is found.
Press SENSOR to view ID, then hold MINUS to select sensor for removal.
Station automatically searches for a replacement sensor of the same type after deletion.
Confirm new sensor ID by pressing SENSOR button after installing batteries in the new sensor.
Low battery indicators appear for TH, Wind, Rain sensors, and the main station.
Replace batteries in the specific sensor or station as indicated by the alert.
Hold RAIN and LIGHT buttons together for 5 seconds to initiate a factory restart.
Removes sensor IDs and Wi-Fi settings, returning the station to its default state.
Station searches for sensors; reconnect to La Crosse View app with Wi-Fi password.
Install fresh 'C' batteries, ensuring correct orientation and cover tightening.
Mount in an open area, vertically with wind cups on top, within 400 feet transmission range.
Use screws through the bracket to attach, insert pole, tighten knob and screws.
Use your own mounting pole (max 1 inch diameter) and tighten screws securely.
Flip locking tabs, remove funnel, install 2-AA batteries, and re-secure cover and tabs.
Remove cardboard and tape protecting the rocker mechanism before sensor use.
Mount in an open, level area, 3-6 feet high, with direct line of sight to station.
Avoid depressions for proper drainage; ensure accessibility for periodic cleaning.
Install 2-AA batteries according to polarity and replace the battery cover securely.
Mount on a north-facing wall or shaded area, under an eave or deck rail, vertically.
Press TX to send signal; press F/C to select Fahrenheit or Celsius display.
Insert power cord; remove CR2032 tab for time/date backup during power outages.
Place near outlet, mount on wall, or use pull-down stand. Ensure good Wi-Fi range.
Insert 2 AAA batteries into the LTV-D1 Bonus Station according to polarity.
Place the bonus station on a desk, counter top, or mount it on a wall.
Manually set 12/24 Hour Time, Hour, Minutes, and Fahrenheit/Celsius.
Press SET/IN-OUT button to switch between indoor and outdoor temperature/humidity readings.
Hold +/SEARCH for 3 seconds if outdoor readings show dashes due to lost connection.
Remove batteries for 15 min, press any button 20 times, then install fresh batteries.
Call 1.844.200.8752 or visit bit.ly/contact_techsupport for assistance.
Customer support team is available Monday-Friday, 8am-6pm CST.
Engage on social media to ask questions, watch videos, and provide feedback.
Details temperature, humidity, pressure ranges, and transmission specs for all components.
Lists power cord, battery backup, and sensor battery requirements for operation.
Provides estimated battery life for the station and various sensors.
Provides the width, depth, and height of the main weather station unit.
Lists dimensions for Thermo-Hygro, Wind Speed, Rain, and Bonus station sensors.
Updates Temp/Humidity every 51 seconds, or every 3 minutes if no change.
Updates Wind Speed for every 0.8km change or 3 minutes if no change.
Checks Rain every 45 seconds for 0.2mm rainfall or 3 minutes if no change.
Do not mix battery types/ages. Replace all batteries at once and ensure correct polarity.
Clean battery contacts before installation. Remove batteries if equipment is unused.
Provides a 1-year limited warranty for manufacturing defects in materials and workmanship.
Contact customer support via phone or online for questions or product returns.
Warning regarding potential chemical exposure (styrene) and its link to cancer risk.
Equipment tested and compliant with FCC Part 15 limits for Class B digital devices.
Measures to correct interference include reorienting antenna or increasing separation.
Device must not be co-located or operated with other antennas/transmitters.
Device complies with Industry Canada's licence-exempt RSSs and operational conditions.
Provides the Canadian statement in French regarding interference and operation.
Acknowledges Apple and Google as trademarks for their respective services.
| Display Type | LCD |
|---|---|
| Indoor Temperature Range | 32°F to 122°F (0°C to 50°C) |
| Outdoor Temperature Range | -40°F to 140°F (-40°C to 60°C) |
| Indoor Humidity Range | 20% to 95% |
| Power Requirements (Sensor) | 2 x AA batteries (not included) |
| Time Display | 12/24 hour format |
| Wireless Transmission | 433 MHz |
| Wireless Range | 330 feet (100 meters) |
| Features | moon phase |