Buttons
BASICS
1. WIND ALERTS
Hold to enter Wind Alert Settings. Press to turn
Wind Alert on/o.
2. WIND
Press to view Wind Speed History. While viewing,
hold the MINUS button to reset the history value.
3. TEMP.
Press to view Temperature and Humidity History.
While viewing, hold MINUS button to reset the
history value. Hold to search for TH reading.
6. EXTRA
Press to toggle through rain, pressure, and extra
sensor data. Hold to add sensors. While viewing,
hold the MINUS button delete the sensor.
9. DAILY/HOURLY
Press to see Daily or Hourly Forecast.
Hold to auto-scroll Forecast data.*
4. SET
Press to view Wi-Fi status. Hold to enter Settings
Menu.
7. SENSOR
Press to view sensor ID numbers. While
viewing, hold the MINUS button delete the
sensor.
5. PLUS/MINUS (+/-)
Use to adjust values.
8. LIGHT
Press to adjust backlight. Hold to enter
Auto-Dim settings.
1
3
2
6 8
7
4
9
10
Side View Back View
* Your display must be connected to Wi-Fi to receive Daily/Hourly forecast information.
Please Note: Only the hour can be set.
07
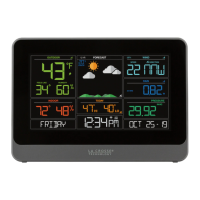
LCD Display Brightness
Adjusting the LCD Display Brightness
Auto-Dim Settings
Press the LIGHT button to adjust the backlight intensity.
There are 4 brightness levels, plus an o option.
1.
2.
3.
4.
Hold the LIGHT button to enter
the Auto-Dim Settings Menu.
Program your display to automatically
dim during preselected times.
Press the +/- buttons to turn the
Auto-Dim feature on or o. Press
LIGHT to confirm.
Press the +/- buttons to adjust
the starting hour. Press LIGHT to
confirm.
Press the +/- buttons to adjust the
stopping hour. Press LIGHT to
confirm and exit.
The icon will appear on the LCD when the Auto-Dim feature activated.
BASICS
08
10. WIFI
Press during initial setup for Wi-Fi
Connection (see app). Hold to re-enter
Configuration Mode and clear previous
Wi-Fi settings.