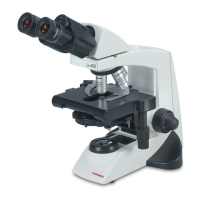
The Labomed CxL is a laboratory microscope designed for both professionals and students, offering a blend of modern design and advanced optical and mechanical features for diverse applications.
Function Description
The CxL microscope is used for observing specimens with high clarity and contrast. It provides magnified views of microscopic samples, making it suitable for various laboratory and educational settings. The instrument is equipped with a built-in illumination system, either Halogen or LED, to provide bright and consistent lighting for observation. Its focusing mechanism allows for precise adjustment of the specimen's clarity, while the revolving nosepiece facilitates quick switching between different magnification levels. The mechanical stage enables precise positioning of the specimen, and the condenser system helps optimize illumination and contrast.
Usage Features
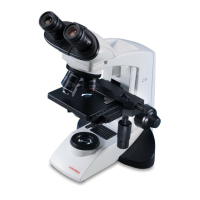
The CxL features a 360° rotatable Monocular, Binocular, or Trinocular body, inclined at 45°, which enhances user comfort during prolonged observation. The sturdy, pressure die-cast stand incorporates ball bearing "frictionless" sideways focusing, ensuring smooth and precise adjustments without loss of motion. High-powered objectives are spring-loaded to prevent accidental damage to specimen slides, offering an added layer of protection. The quadruple nosepiece has a comfortable ribbed grip for easy rotation and protects the turret system. All objective positions are par-centered and par-focalized, ensuring consistent focus and alignment when switching magnifications.
The ball bearing mechanical stage provides smooth travel over a 76 x 50mm area, with spring-loaded stage clamps to securely hold specimens in the desired position. A 0.1mm vernier scale allows for accurate location of specific areas on the specimen. The X-Y movement control knob enables precise horizontal and vertical movement of the stage.
For illumination, the CxL offers both Halogen (6V-20W) and LED configurations. The LED version includes an in-built rechargeable battery and charging circuit, allowing for continuous operation even under fluctuating voltages. The battery can be charged with a direct input power supply of 110V-240V AC 50Hz/60Hz. The microscope is equipped with a removable N.A. 1.25 Abbe condenser, which enhances illumination levels, and an iris diaphragm for better resolution and contrast control.
The observation head can be easily installed by loosening a head locking screw, mounting the dovetail into the microscope arm, and then tightening the screw. Eyepieces are inserted into the ocular tubes and secured with clamping screws. For outdoor observation or when a power source is unavailable, a reflection mirror attachment can be used to utilize natural light. The mirror is fitted into the window lens of the microscope frame, and the observation tube is rotated 180° to receive unobstructed light. The daylight filter should be removed when using the reflection mirror as it can tint the image blue.
Adjusting the interpupillary distance (IPD) is crucial for comfortable viewing; users can move the eye tubes laterally until the left and right fields of view coincide, achieving stereo vision and reducing eye strain. The diopter adjustment ring on the eyepiece allows for individual focus correction, compensating for differences in vision between the user's eyes and ensuring optimal parfocality. Eye guards are provided to prevent ambient light from entering the line of vision, and they can be folded down when wearing eyeglasses to prevent scratching.
The condenser position and aperture iris diaphragm can be adjusted to optimize illumination. The condenser height adjustment knob moves the condenser up or down, while the aperture iris diaphragm slides to fully illuminate the objective's aperture. Switching objectives is done by rotating the ribbed grip of the revolving nosepiece. A daylight (blue) filter can be fitted into the condenser to modify the observation light into a natural color.
For high-magnification observation with the 100X immersion objective, immersion oil is applied to the specimen. This ensures proper contact between the objective's cover lens and the specimen, preventing distorted or dull images. The process involves focusing with lower magnifications (10X, then 40X), applying a drop of immersion oil, and then engaging the 100X objective. Air bubbles in the oil should be removed by gently rotating the nosepiece.
Maintenance Features
The CxL microscope is designed for a long and safe operational life with minimal maintenance. Routine maintenance primarily involves keeping the working parts lubricated and the optics clean. A dust cover is provided and should be used when the microscope is not in use to protect it from dust.
Cleaning glass components, such as lenses, involves gently wiping them with a cleaning cloth. For fingerprints or oil smudges, a cleaning cloth slightly moistened with a mixture of petroleum (85%) and isopropanol (15%) is recommended. Xylene can be used for cleaning optics, with caution. The cleaning procedure involves blowing away loose dust, removing water-soluble dirt with distilled water or diluted hand soap, and then removing oil with a solvent using a spiral motion from the center to the rim (or rim to center for larger surfaces). Zig-zag motions should be avoided as they can spread dirt.
Non-glass components, including painted surfaces, should be cleaned with a lint-free, soft cloth slightly moistened with a diluted neutral detergent. Organic solvents like thinner, xylene, ether, or alcohol should be avoided on painted surfaces. Loose dust and dirt can be removed with a soft-haired brush.
The condenser/phase turret can be cleaned by fully loosening its securing thumb screw, removing the condenser, and wiping the front lens with an optical cleaning solution and lens tissue. The condenser is then re-attached and adjusted.
For safety, the microscope should be installed on a sturdy, level surface, away from direct sunlight, high temperatures, humidity, dust, and vibrations. Adequate space (10cm or more) should be left around the unit for natural ventilation. The power cord provided by Labomed should always be used and routed away from the microscope frame to prevent melting due to heat exposure. Proper grounding of the unit is essential for electrical safety. Metallic objects should never be allowed to penetrate the air vents.
Warning labels are placed on parts requiring special precaution, such as the bottom of the microscope frame (for high temperature in the bulb/LED compartment and risk of electric shock) and for general warnings against non-compliance with instructions. These labels should be read and maintained.
Replacement of critical components like the halogen bulb or LED requires turning off the microscope, disconnecting the power cord, and allowing the lamp socket and bulb to cool. The designated bulb or LED must always be used. Fingerprints or stains on the bulb should be avoided as they reduce its life. The LED battery can be replaced by accessing the battery compartment on the bottom plate. Fuses should also be replaced with designated fuses, ensuring the main switch is off and the power cord is disconnected.
Disinfection of the microscope can be performed using normal household bleach (Sodium hypochlorite 5%) or 70% Isopropyl alcohol, applied with a moist muslin cloth. Users should wear a mask and gloves during disinfection, and ensure the cloth is not dripping wet to prevent seepage and rusting. Alcohol should be used in well-ventilated spaces due to its flammability.
The instrument should not be disassembled, as this can impair its operational efficiency and accuracy. Periodic servicing by a factory-authorized dealer/representative is recommended to maintain performance.