EasyManua.ls Logo

Laser Rapier II User Manual

Laser Rapier II
14 pages
To Next Page IconTo Next Page
Page #1 background imageLoading...
Page #1 background image
MOST IMPORTANT- WHEN RETURNING UNIT FOR SERVICE
1. All units returned under warranty must be accompanied by copy of
original dated invoice. Failure to do this will incure repair charges.
2. Please include full details of the fault.
3. Include payment of £8 for return carriage.
4. Send unit to: SERVICE DEPARTMENT: Pentechnic, 1 Grange
Cottages, Penkridge, Staffs ST19 5NH
                        
LIMITED ON (1) YEAR WARRANTY (UK)
This warranty gives you specific legal rights, and you may also have other rights.
TESORO/LASER assures you of the finest electronic equipment and service.
TESORO/LASER warrants that each detector manufactured by it will be free from
defects in materials and workmanship for a period of one (1) year. Should any fail-
ure to conform to the foregoing warranty appear within this period,
TESORO/LASER will, at its option, repair or replace the defective detector with-
out any charge except any transportation charges. This warranty does not cover
any detector that has been abused, tampered with, or repaired by an unautho-
rized party. This warranty applies only to units purchased from AUTHORIZED
UK DEALERS. This warranty excludes batteries, damage caused by leaking bat-
teries, cable faults due to flexing on body mount units, and wear of the search coil
housing. Complete, detach and mail the portion below within 10 days of purchase
in order to activate your warranty. Send the WARRANTY to : TREASURE
WORLD, 192 Albany st. LONDON NW1 4AP.
Cut along this line
MODEL SERIAL No.
DATE
PURCHASER’S NAME
ADDRESS
Where did you first learn of TESORO/LASER products?
What made you decide to buy TESORO/LASER?
Purchased where?
What do you like or dislike about the product?
LASER METAL DETECTORS
192 Albany Street
London, NW1 4AP
Telephone 207-387-3142
━━━━━━━━━━━━━━━━━━━━━━━━━━━━━━━━━
OPERATOR INSTRUCTION MANUAL
Question and Answer IconNeed help?

Do you have a question about the Laser Rapier II and is the answer not in the manual?

Laser Rapier II Specifications

General IconGeneral
BrandLaser
ModelRapier II
CategoryMetal Detector
LanguageEnglish

Summary

Returning Unit for Service

Limited (1) Year Warranty (UK)

Care and Use

Basic Care

Essential guidelines for maintaining the detector's condition and preventing damage from misuse or environmental factors.

Protecting Your Investment

Tips to ensure the detector maintains peak performance over time and avoid common issues.

Recommended Recovery Method

Plugging Method

Technique for recovering targets by cutting a 'plug' in the ground, suitable for specific soil conditions.

General Description

Rapier II Features Overview

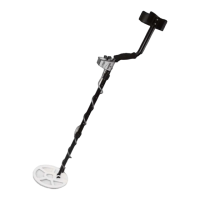
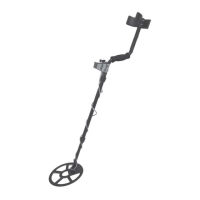
Details the key features and design principles of the Rapier II metal detector.

Specifications

Technical details including operating frequency, searchcoil type, weight, and battery requirements.

Getting Started

Unpacking Your Detector

Lists the components included with the Rapier II and instructions for checking for missing items.

Installing the Battery

Procedure for inserting and securing a 9-volt alkaline battery into the detector's compartment.

Assembling Your Detector

Step-by-step instructions for assembling the Rapier II detector from its components.

Field Use

Handling Your Detector

Guidance on how to hold and sweep the detector comfortably and effectively for optimal performance.

Performing the Audio Battery Test

Procedure for checking the detector's battery status using the automatic test circuit.

Operating Techniques

Pinpointing a Target

Methods for accurately locating a detected metal target using the detector's modes.

Recognizing False Signals

Identifying and distinguishing unwanted false signals from actual target responses.

Setting the Threshold Level

Instructions for adjusting the background hum to a consistent, low-volume tone for target detection.

Adjusting the Pole & Searchcoil

Setting Sensitivity in MAXBoost

Guidance on using the MAXBoost feature for increased depth and its potential impact on signal clarity.

Setting Discrimination Level

How to adjust the detector to ignore unwanted metal trash targets while still detecting desired items.

Tuning Your Detector

Setting the Sensitivity Level

Adjusting the sensitivity control for optimal performance based on ground mineralization and site conditions.

Selecting the Proper Operating Mode

Explanation of the Discriminate and Pinpoint modes and how to choose between them for different searching scenarios.

Operating the Controls

Sensitivity ON/OFF-Battery Test Control

Functionality includes power ON/OFF, battery testing, and sensitivity adjustment.

Discrimination Level Control

Adjusts the detector's response to unwanted trash metal targets.

Tone Selection Switch

Allows selection between low and high audio tones for different conditions.

Threshold Level Control

Sets the audio level of the detector's threshold hum.

QuickCheck Pinpointing Push-button

Used to momentarily switch to Pinpoint Mode for target location.

Audio Volume Control

Notes that the speaker has no volume control and recommends headphones.

Related product manuals