EasyManua.ls Logo

Launch X-431 PROS MINI 3.0 - User Manual

Launch X-431 PROS MINI 3.0
3 pages
Print Icon
To Next Page IconTo Next Page
Loading...
LAUNCH
Product Profile
VCI Device
X-431 PROS MINI V3.0 is a stylish Android-based diagnostic device developed by LAUNCH. It
inherits from LAUNCH's advanced diagnosing technology and is characterized by covering a
wide range of vehicle models, featuring powerful functions, and providing precise test result.
Through simple wireless(BT) communication, it achieves full car model and full system vehicle
trouble diagnosis. It supports WLAN connection, which enables you to access the Internet,
update online and perform remote diagnosis etc, getting your job fixed faster and easier.
Charging & Turning On
1
3. Plug the power adaptor into the AC outlet.
1. Open the cover of the charging port located on the top of the tool.
2. Connect one end of the included charging cable into the charging port of the tool, and
the other end to the power adaptor.
4. If the tool is being charged, a charging indicator displays . Once the indicator turns ,
charging is complete.
5. Pressing the POWER button will start the tool and enter the home screen.
Network Setup
2
1. On the home screen, tap “Settings” > WLAN.
To enable you to surf the Internet, register App, launch remote diagnosis and update the
diagnostic software etc, please follow the steps below to configure the network:
2. Slide the WLAN switch to ON, the system starts searching for available wireless
networks.
4. When “Connected” appears, it indicates the tablet is properly connected to the
Internet.
3. Select a wireless network. If the chosen network is open, the tablet will connect
automatically, if the selected network is encrypted, a network password will need to be
entered.
The VCI(Vehicle Communication Interface) device works as a vehicle communication
interface device, which is designed to read the vehicle data and then send it to the tablet
via wireless (BT) communication.
Charging port
Note: On first use of the tool, or if the tool remains idle for a long period of time, there may be
insufficient battery power to start the tool. Please charge for a minimum of 5 minutes before
attempting to turn it on again. Please use the power adaptor included within the kit to charge the
tool. No responsibility can be assumed for any damage or loss caused as a result of using any power
adaptor other than the one supplied.
Vehicle's DLC
(Collects vehicle
data.)
VCI Device
(Decodes the vehicle data sent from the
VCI device and indicates the test result.)
Display Tablet
Ÿ It only applies to passenger
vehicles with 12V battery
voltage.
Ÿ Remember to remove the VCI
device from the DLC if it is
not in use.
Ÿ Please re-insert the VCI
device into the docking slot
on the back of the tablet after
use to avoid loss.
Notes:
Ÿ It illuminates RED when the VCI
device is plugged into the vehicle’s
DLC.
Notes:
Ÿ BLUE indicates that the VCI device
is working in wireless (BT)
communication mode.
Wireless(BT) communication
+86 755 8455 7891
overseas.service@cnlaunch.com
POWER button
Quick Start Guide
PROS MINI
Question and Answer IconNeed help?

Do you have a question about the Launch X-431 PROS MINI 3.0 and is the answer not in the manual?

Summary

Product Profile

Charging & Turning On

Charging Process

Connect the tool to a power source via the charging cable and adapter to charge it.

Powering On

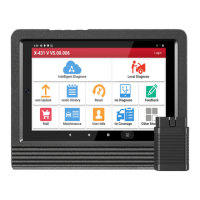
Press the POWER button to start the tool and access the home screen.

Network Setup

Configure WLAN Connection

Access settings, enable WLAN, select a network, and enter password if required for internet connection.

Register & Update

Launch App and Create Account

Open the application, register a new account or log in, and create a user profile.

Activate VCI Module

Input the VCI module's Product S/N and Activation Code to activate it.

Download Diagnostic Software

Download and install necessary diagnostic software via WLAN for full functionality.

Preparation & Connections

Vehicle Preparation

Ensure ignition is on, battery voltage is 9-18V, and throttle is closed before connecting.

Locate and Connect DLC

Find the vehicle's DLC socket and connect the VCI device using the appropriate cable.

Start Diagnostics

Initiate Diagnostic Session

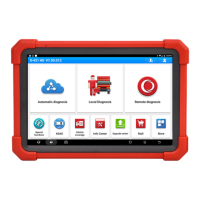
Tap 'Diagnose', select vehicle model, and choose software version to begin a diagnostic session.

Overview

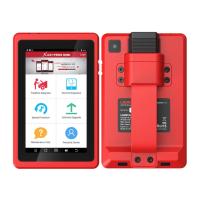
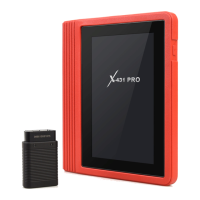
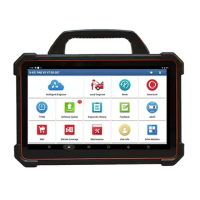
The X-431 PROS MINI V3.0 is a sophisticated Android-based diagnostic device designed by LAUNCH, inheriting advanced diagnostic technology to provide comprehensive vehicle analysis. This tool is characterized by its extensive coverage of vehicle models, robust functionality, and the delivery of precise test results. Its core function is to facilitate full car model and full system vehicle trouble diagnosis through simple wireless (Bluetooth) communication. Additionally, it supports WLAN connectivity, enabling users to access the Internet, perform online updates, and conduct remote diagnostics, which streamlines the repair process.

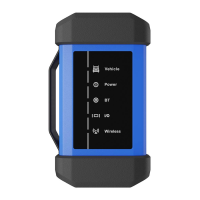
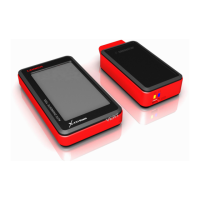
The device comprises two main components: a VCI (Vehicle Communication Interface) device and a Display Tablet. The VCI device is responsible for collecting vehicle data, which it then transmits wirelessly via Bluetooth to the Display Tablet. The Display Tablet receives this data, decodes it, and presents the test results to the user. The VCI device features an OBD II 16-pin connector for direct connection to the vehicle's DLC (Data Link Connector). A mode indicator on the VCI device illuminates RED when plugged into the vehicle's DLC and turns BLUE when operating in wireless (Bluetooth) communication mode.

For optimal performance and longevity, several usage and maintenance features are highlighted. The VCI device is designed for passenger vehicles with a 12V battery voltage. Users are reminded to remove the VCI device from the DLC when not in use and to re-insert it into the docking slot on the back of the tablet after use to prevent loss.

Before initial use, or if the tool has been idle for an extended period, it may require charging. Users should charge the device for a minimum of 5 minutes before attempting to power it on. It is crucial to use only the power adapter included in the kit for charging, as using any other power adapter may result in damage or loss, for which no responsibility will be assumed. The charging process involves opening the cover of the charging port, connecting the included charging cable to the tool and the power adapter, and then plugging the power adapter into an AC outlet. A charging indicator will display during charging and turn off once charging is complete. Pressing the POWER button will start the tool and lead to the home screen.

To enable internet access, application registration, remote diagnosis, and diagnostic software updates, network setup is required. This involves navigating to "Settings" > WLAN on the home screen, sliding the WLAN switch to ON, and selecting an available wireless network. If the network is open, the tablet will connect automatically; if encrypted, a password will be required. A "Connected" status indicates a successful internet connection.

The initial setup process for new users involves several steps:

  1. Launch the Application: Tap the application icon on the home screen. Illustrations guide users through important operations. Scroll to "Start Now" to enter the Job menu, then tap "Login" in the upper right corner.
    • For first-time users, tap "New registration" to access a sign-up page.
    • Existing users can tap "Login" directly.
    • If the password is forgotten, "Retrieve password" can be used.
  2. Create an Account: Fill in all required fields and tap "Register." Providing real information is recommended for access to more functions and better service.
  3. Activate VCI Module: Input the Product S/N and Activation Code (found in the password envelope) and tap "Activate."
  4. Download Diagnostic Software: After successful registration, a prompt will ask to download the diagnostic software. Tapping "Yes" will lead to the download screen. If "No" is selected, the software can be downloaded later via "Software Upgrade" in the function menu. Tapping "Update" downloads and installs the software. A strong WLAN signal is essential during this process.

For diagnostic procedures, proper preparation and connections are vital:

  1. Preparation: Ensure the ignition is on, the vehicle battery voltage is between 9-18V, and the throttle is in a closed position.
  2. Locate Vehicle's DLC Socket: The DLC (Data Link Connector) is typically a standard 16-pin connector located on the driver's side, about 12 inches from the center of the dashboard. If not found under the dashboard, a label will indicate its position. For vehicles without a DLC, refer to the Automobile Repair Manual.
  3. Connection: Select the appropriate diagnostic connector based on the vehicle's DLC type.
    • For vehicles with a universal OBD-II diagnostic socket, plug the VCI device directly into the DLC or use an OBD-II extension cable.
    • For vehicles not equipped with an OBD-II management system, select the corresponding non-16pin connector, plug it into the DLC, connect the other end to the OBD I adapter, and tighten the captive screws. Then, connect the adapter to the VCI device. Power can be supplied to the OBD I adapter via an optional Battery Clamps Cable (connecting to the vehicle's battery) or an optional Cigarette Lighter Cable (connecting to the vehicle's cigarette lighter receptacle).

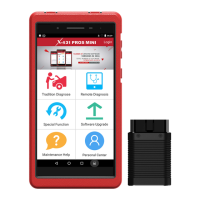
To start a new diagnostic session, new users should follow this sequence: Tap "Tradition Diagnose," then select the vehicle model (this step is skipped if "VINScan" is performed), select the software version, select the test function, and finally, select the test system. It is important to note that the VCI device must be activated and the diagnostic software downloaded before diagnosing a vehicle. All software is regularly updated, and users are strongly encouraged to keep their software synchronized with the latest versions to benefit from improved capabilities and functions.

All illustrations and pictures provided are for reference purposes only, and the actual tool may vary. This Quick Start Guide is subject to change without prior notice. For more detailed operations and information, users should refer to the comprehensive user manual.

Launch X-431 PROS MINI 3.0 Specifications

General IconGeneral
RAM2 GB
Storage32 GB
Operating SystemAndroid 7.0
ConnectivityWi-Fi, Bluetooth
LanguagesMultiple languages supported
ProcessorQuad-core
Camera5MP
PortsUSB
Supported ProtocolsOBD II, CAN
Diagnostic FunctionsActuation Tests
Update MethodOnline update

Related product manuals