6
Assembly
Note: Determine the left and right sides of the machine
from the normal operating position.
Installing the Handle
Folding or unfolding the handle improperly can
pinch, stretch, or damage one or more of the
cables. Any pinched, stretched, or damaged cable
may cause an operational failure that results in an
unsafe operating condition.
• Do not pinch, stretch, or damage the cables.
• Handle the cables with care when folding or
unfolding the handle.
• Do not use the lawn mower if one or more of
the cables are pinched, stretched, or damaged.
Contact your Authorized Service Dealer.
Warning
1. Lay the upper handle on the ground behind the lawn
mower with the handle label facing up.
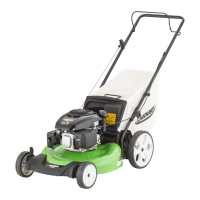
2. Rotate the lower handle toward the rear of the lawn
mower and insert the bottom of the lower handle ends
into the pins as shown in Figure 2.
2
1
3
4
5
6
m-5309
Figure 2
1. High setting hole (2)
2. Low setting hole (2)
3. Lawn mower housing
4. Traction cable bracket
5. Pin (2)
6. Bottom of lower handle
end (2)
Note: Figure 2 shows the handle for models 10550 and
10552 only.
3. Insert the traction cable bracket in place as shown in
Figure 2 (models 10550 and 10552 only).
4. Insert a lock washer and wing nut in either the high
setting hole or low setting hole as shown in Figure 2.
To set the handle height, see Adjusting the Handle
Height on page 6.
5. Install the upper handle section onto the lower handle
section until the lower handle section nests inside the
upper handle section.
6. Install two bolts and knobs (from the loose parts bag)
to fasten the bottom of the upper handle section to the
lower handle section.
7. Tighten the upper knobs on the upper handle section.
8. Assemble the handle knobs and handle screws and
tighten them securely.
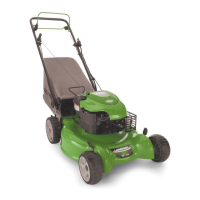
Installing the Starter Rope
Pull the starter rope through the rope guide on the handle
(Fig. 3).
Figure 3
1. Rope guide 2. Starter rope
Note: To install the starter rope more easily, squeeze the
blade control bail (Fig. 13).
Adjusting the Handle Height
You can set the handle to the high or low settings (Fig. 2).
Select the handle height setting most comfortable for you.
Align the holes in the lower handle section with the holes
in the lawn mower housing. Use the hardware shown in
Figure 2 to secure the handle to the lawn mower housing.
Note: For self-propel models, match the holes in the
traction cable bracket to the holes in the left side of the
lawn mower housing. Secure the bracket with the handle
hardware (Fig. 2).