Do you have a question about the LawnMaster FD1501 and is the answer not in the manual?
Specific safety guidelines tailored for operating yard chippers.
Details on electrical connections, double insulation, and proper extension cord usage.
Instructions for unpacking, listing required tools, and identifying package contents.
Instructions for attaching the chassis and wheels to the chipper unit.
Steps for connecting the collection bag to the chipper.
Procedures for connecting power, starting, stopping, using the chipper, and managing overload.
Routine maintenance, cleaning, storage, and blade service instructions.
Guidance on identifying and resolving common chipper malfunctions.
Information on product warranty, exploded views, and parts lists.
This document serves as the operator's manual for the LawnMaster Chipper FD1501, providing comprehensive instructions for its assembly, operation, and maintenance, along with important safety guidelines. The manual emphasizes the importance of reading and understanding all instructions to prevent electric shock, fire, and serious personal injury.
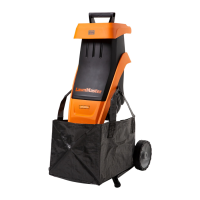
The LawnMaster Chipper FD1501 is designed for chipping yard waste, debris, sticks, and twigs. It is specifically intended for processing dry branch material up to 1-1/2 inches (38 mm) in diameter. The chipper is not designed for processing leaves, vines, or bamboo, and users are explicitly warned against placing green material or bamboo into the chipper. The chipped material accumulates directly into a collection bag, which is mounted to the chipper unit. The device features a motor reset button and an On/Off switch for control. Its double-insulated design provides an additional layer of protection against electrical hazards.
Before initial use, users must thoroughly familiarize themselves with the chipper's operation. The manual outlines a clear assembly process, starting with attaching the chassis and wheels. The chipper unit is laid on its side, and the two chassis pieces are inserted into designated holes on the chipper housing, secured with screws. The axle is then slid through the chassis, followed by the wheels, washers, and cotter pins, which are pressed into place. Finally, hub caps are aligned and pushed onto both sides of the axle. Once assembled, the collection bag is attached by hanging it onto the mounting hook.
Connecting the chipper to a power supply involves a cord retainer mechanism to prevent accidental disconnection. Users are instructed to form a loop with the extension cord, pass it through a hole in the cord retainer, and place it around a hook, then pull the loop tight. The extension cord's outlet end is then attached to the chipper's power cord plug. It is crucial to use only an approved outdoor extension cord as specified in the manual.
To start the chipper, ensure the hopper chute is empty to prevent jamming. The chipper is plugged into a grounded 2-prong outlet, and the On/Off switch is turned to the ON position. If the chipper does not start, the switch should be turned OFF, the motor reset button pressed, and then the switch turned ON again. To stop the chipper, the On/Off switch is turned to the OFF position, and users must allow at least 5 seconds for the blade to stop rotating completely.
When operating the chipper, users are advised to turn it ON first, then place sticks and yard debris into the narrow hopper opening. A push paddle, supplied with the chipper, must always be used to help feed yard material into the hopper. Crucially, hands should never be placed inside the hopper. The chipper should always be turned OFF and allowed to come to a complete stop before any interaction with the internal components.
The chipper includes an overload protection feature. If the chipper is overloaded, for example, by branches that are too thick, it will automatically switch off. In such an event, the user must turn the ON/OFF switch to the OFF position, unplug the chipper, wait a few minutes for the motor to cool down, and remove any blockages. After cooling and blockage removal, the chipper can be plugged back in, the reset button pressed, and then the ON/OFF switch turned ON.
Emptying the collection bag requires turning off the chipper and removing the bag. Users are warned against overfilling the bag, as it can fill unevenly under the discharge duct.
Regular maintenance is essential for the chipper's performance and longevity. Before any maintenance, the product must be switched off, disconnected from the power supply, and allowed to cool down. Protective, heavy gloves and safety equipment are mandatory when performing blade maintenance.
General maintenance includes keeping the chipper clean and in good repair. Before each use, the switch and cord should be inspected for damage. Users should also check for any damaged, missing, or worn parts, loose screws, jammed moving parts, or other conditions that might affect operation. The chipper should never be sprayed with water due to the electric shock hazard. If abnormal vibration or noise occurs, the chipper must be turned OFF immediately, the problem corrected, and the chipper should not be used again until properly repaired or replaced.
Cleaning the chipper involves wiping its exterior with a dry soft cloth. The hopper must be removed from the housing body before cleaning its interior. Hosing down or washing the tool with water is prohibited. For storage, the chipper should be kept in a safe, dry place out of children's reach, and not covered in nylon bags, which could lead to moisture development.
A key maintenance task is reversing and replacing the blade. The chipper features a two-sided reversible blade. When one side becomes dull, it can be flipped to use the other side. Any dull or damaged blade should be replaced or properly sharpened. Users are reminded to handle the blade with extreme care due to its sharpness. To access the blade, the chipper must be turned off and unplugged. The hopper locking knob is unscrewed counterclockwise to open the housing cover. The upper housing cover is then carefully lifted to expose the blade. A screwdriver or wooden dowel is used to secure the blade support by slotting it into an access hole and turning the support until a blocking aperture aligns with the access hole. The hex key, stored in a recess inside the chipper, is used to loosen the screw counterclockwise, allowing the removal of the screw, washer, and blade from the blade support. After reversing or replacing the blade, the washer and screw are reinserted, and the screw is tightened clockwise with the hex key. The hex key is then returned to its recess, and the upper housing is re-positioned and secured with the hopper locking knob.
| Power Source | Electric |
|---|---|
| Motor Power | 15 Amp |
| Weight | 12 kg |
| Chipper Type | Electric Chipper Shredder |
| Max Chipping Diameter | 1.5 inches |
| Chipping Capacity | 40 mm |