Do you have a question about the Leica HistoCore MULTICUT and is the answer not in the manual?
Explanation of warning symbols, notes, and tips used throughout the manual.
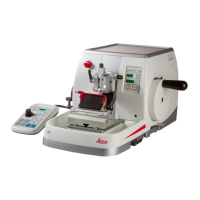
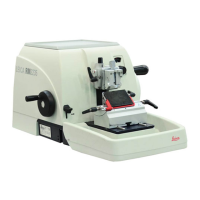
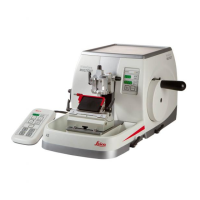
Details about the specific HistoCore MULTICUT instrument model covered by this manual.
Defines the proper application and purpose of the HistoCore MULTICUT microtome.
Specifies the required training and knowledge for operating personnel.
Essential safety guidelines, precautions, and general warnings for instrument use.
Covers warnings related to instrument markings, transport, installation, and operation.
Describes the instrument's built-in safety features like handwheel locking and blade guards.
Identifies and labels the main parts and controls of the HistoCore MULTICUT.
Details the technical features and capabilities of the microtome's basic instrument.
Provides comprehensive technical specifications including environmental and dimensional data.
Specifies the environmental and physical conditions needed for proper instrument setup.
Lists all components included in the standard delivery of the HistoCore MULTICUT.
Provides step-by-step instructions for safely unpacking and installing the instrument.
Guides the user through the process of assembling the handwheel onto the instrument.
Details connecting the instrument to power, control panel, and checking voltage.
Procedure for safely powering on the HistoCore MULTICUT for the first time.
Overview of integrated and separate control panels, buttons, and displays.
Guides for setting up the base and inserting the two-in-one blade holder E.
Instructions for adjusting the clearance angle and inserting cassette clamps.
Procedures for clamping specimens, knives, and disposable blades safely.
Steps for trimming specimens, performing sectioning, and concluding the daily routine.
How to use and configure the electronic coarse feed wheel for specimen movement.
Instructions for using the specimen holder fixture and orienting the specimen.
Procedure for adjusting the instrument's force balance for optimal performance.
Instructions for assembling various fixtures used with specimen clamps.
Overview of different specimen clamps and holders available as accessories.
Information on different knife holder bases and holders, including the two-in-one blade holder E.
How to install and use the anti-static section waste tray.
Instructions for using the backlighting accessory with the microtome.
Details on the top tray for storing utensils and specimens.
Guide to assembling and using the universal microscope carrier.
Instructions for mounting and using the magnifying lens with LED illumination.
Lists possible error codes displayed on the instrument and their solutions.
Troubleshooting guide for common issues like section thickness variation or compression.
Covers common instrument issues such as no display or incorrect voltage settings.
Troubleshooting specific problems related to the two-in-one blade holder E, including pressure plate and clamping top.
Guide to adjusting the clamping distance of the clamp mount on the base plate.
Detailed instructions for safely cleaning the microtome and its components.
Information on routine maintenance tasks for the instrument.
Recommendations for ensuring trouble-free operation and service intervals.
Guide on which parts to lubricate and how often for optimal performance.
Details Leica Biosystems' guarantee and warranty terms for the product.
How to contact support and what information to provide for service calls.
Guidelines for the proper decommissioning and disposal of the instrument.
| Brand | Leica |
|---|---|
| Model | HistoCore MULTICUT |
| Category | Laboratory Equipment |
| Language | English |