The Leitner OfficeAlly™ LH380 is a wireless headset designed for use with landline telephones, computers, and Bluetooth-enabled devices, offering versatile connectivity for various communication needs. It features UniBase® Technology, which allows for conferencing calls between any two connected devices, such as a cell phone and a landline.
Key Features and Controls:
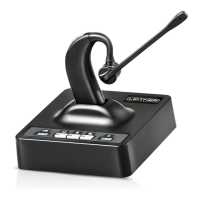
Headset Controls:
- Incoming Volume Up (A): Increases the listening volume.
- Microphone Mute Button (B): Mutes and unmutes the microphone.
- Incoming Volume Down (C): Decreases the listening volume.
- Headset ON/OFF (and Online Indicator) (D): Turns the headset on/off and indicates its online status.
Charging Base Controls and Ports:
- Battery Indicator (1): Shows the current battery level (25%, 50%, 75%, 100%). The first light flashes when the battery is below 20%.
- Computer Mode Button (2): Activates computer mode.
- Bluetooth Mode Button (3): Activates Bluetooth mode.
- Telephone Mode Button (4): Activates telephone mode.
- Indicator Lights (5): Provide visual feedback on power, Bluetooth connection, online status, and charging.
- Power Light (1): Indicates the base is plugged in.
- Bluetooth Indicator (2): Indicates a Bluetooth connection (turns off when the headset is in the charging base, but Bluetooth remains connected).
- Online Indicator (3): Indicates the headset is on.
- Charging Light (4): Turns off when the battery is 100% charged.
- USB Connector Port (6): Connects the base to a computer.
- Power Port (7): Connects the AC adaptor to the base.
- AUX Port (8): Used for connecting a Leitner Handset Lifter.
- Telephone Connector Port (9): Connects the base to a telephone's headset port or handset jack.
- Handset Connector Port (10): Connects the curly cord of a telephone handset to the base.
- Microphone Volume Up/Down (11): Adjusts the microphone volume.
- Accessory Selection Switch (12): Used for selecting accessories like the Handset Lifter (set to RHL).
- Compatibility Switch (13): Adjusts headset compatibility for different phone models (most phones use 1, Cisco phones use 4 with a headset jack).
Audio Signals:
- 2 quick beeps (60 sec repeat): Low battery.
- 2 beeps: Nearly out of range.
- 2 pitch tone: Out of range.
- 2 rapid beeps: Back in range.
- 1 beep: Receiver volume up/down.
- 2 pitch tone (8 sec repeat): Mute is on.
- 1 beep: Mute off/on.
The headset provides warning beeps when walking out of range. If disconnected, it automatically reconnects when back in range. If out of range for more than 5 minutes, the call will disconnect.
Setup and Connectivity:
- Power and Initial Charge: Plug the power adaptor into the charging base. The power light will illuminate. Charge the headset for at least 4 hours before first use.
- Connecting to a Telephone with a Headset Jack: Use the included connector cord to link the base's telephone port to the phone's headset port. Adjust the compatibility switch on the base's bottom (most phones use 1; Cisco phones use 4 when using the headset jack).
- Connecting to a Telephone Without a Headset Jack: Connect the phone's curly cord to the base's handset port. Use the connector cord to link the base's telephone port to the phone's handset jack. Refer to the compatibility switch settings.
- Connecting a Leitner Handset Lifter (Optional): Connect the headset to the desk phone as described in step 2b. Attach the handset lifter to the desk phone and plug it into the AUX port on the charging base. Set the accessory selection switch to RHL. This enables answering/ending calls via the headset's ON/OFF button up to 350 feet away.
- Connecting to a Leitner Electronic Hookswitch (EHS) Cable (Optional): Refer to EHS cable instructions for setup. Similar to the handset lifter, an EHS cable allows remote call control via the headset's ON/OFF button.
- Connecting to Your Computer: Use the included USB cable to connect the charging base to an available USB port on your computer. If not automatically recognized, go to sound settings and select "DECT Headset" as both the default microphone and speakers.
Bluetooth Connectivity:
- Turn off the headset.
- Hold the Bluetooth button on the base for three seconds until the light starts flashing.
- Enable Bluetooth on your device (e.g., iPhone, Android) and select 'DECT Headset' from the list of available devices.
- The Bluetooth light on the charging base will stop flashing once successfully connected.
Call Management:
- Making a Landline Call:
- Ensure telephone mode is active on the base.
- Press the ON/OFF button on the headset.
- Press the headset button on your phone, or lift the handset. If a handset lifter or EHS cable is connected, the line will automatically connect.
- Dial the number.
- To end the call, place the headset on the charging base or press the ON/OFF button. With a handset lifter/EHS cable, the call disconnects automatically; otherwise, manually hang up the phone.
- Making a Bluetooth Call:
- Ensure Bluetooth is connected (refer to page 11).
- Ensure Bluetooth mode is active on the base.
- Press the ON/OFF button on the headset.
- Dial the call on your Bluetooth device.
- If needed, change the audio source on your device to 'DECT Headset'.
- To end the call, press the ON/OFF button, place the headset on the charging base, or manually end the call from your device.
- Answering a Landline Call:
- Press the ON/OFF button on the headset and ensure the base is in telephone mode.
- Press the headset button on your phone, or lift the handset. With a handset lifter/EHS cable, the call connects automatically.
- Answering a Bluetooth Call:
- Press the ON/OFF button on the headset, and the call will connect automatically.
- Ending a Call: Press the ON/OFF button on the headset or place it on the charging base. Manually hang up the call from your landline phone or Bluetooth device if no lifter/EHS is used.
UniBase® Technology:
This feature allows conferencing calls between two devices (e.g., cell phone and landline).
- Start a call on your first device.
- Hold the mode button for the second device you want to add (Computer, Bluetooth, or Telephone).
- After a few seconds, the mode lights for both selected devices will illuminate.
- To exit UniBase mode, press the mode button of the device you wish to remain on. Sounds from your computer will be shared automatically during a conference call.
Volume Control:
- Headset Listening Volume: While the headset is on, use the Incoming Volume Up (+) and Down (-) buttons on the headset. A beep confirms each adjustment.
- Headset Microphone Mute: Press the mute button on the headset. While muted, the headset beeps every 8 seconds. Press again to unmute.
- Headset Microphone Volume: Use the volume control buttons on the bottom of the headset base.
- Ring Detection Volume: If using a handset lifter or EHS cable, you'll hear a ring tone in the headset for incoming calls. While the headset is off, use the volume control buttons on the headset to adjust the ring tone and notification audio signals.
Auto-On Feature:
This feature automatically turns on the headset when picked up from the charging base.
- To Activate: With the headset off, hold the + and - buttons on the headset together for three seconds. The headset light will flash slowly.
- To Deactivate: Repeat the steps; the headset light will flash quickly.
Call Control (Microsoft Lync & Skype for Business):
This allows answering and ending calls directly from the headset.
- To Activate: Hold the up button on the bottom of the charging base together with the Computer Mode button on the top of your base for three seconds. The base will flash 6 times.
- To Deactivate: Hold the down button on the bottom of the charging base together with the Computer Mode button on the top of your base for three seconds. The base will flash 6 times.
Connecting a Secondary Headset for Conference Calls or Training:
- Turn on the primary headset.
- With the secondary headset off, place it on the charging base.
- The secondary headset's online indicator light will turn on, and the primary base's online indicator light will flash, indicating registration.
- Once registered, the base's online indicator light will stop flashing, and the headset's online indicator light will begin flashing.
- If the secondary headset has Auto-On enabled, it connects automatically when lifted. If disabled, press the ON/OFF button on the headset to connect.
The secondary headset remains registered until the primary headset is turned off or either headset is returned to its original base. Re-registration takes about ten seconds. The OfficeAlly can be conferenced with any on-the-ear OfficeAlly headset.
Registering a New Primary Headset:
If you need to replace your headset:
- Press and hold the telephone button on the base for five seconds until the light flashes, indicating registration mode.
- With the headset off, press and hold the mute button on the headset for about five seconds until it begins to flash, entering registration mode.
- Keep the headset out of the base until the light on the telephone button turns solid.
- The headset is now registered. The light will stop flashing after about 30 seconds.
Troubleshooting:
- No battery lights/not charging: Unplug the base, remove the battery from the headset for 30 seconds, reinstall it (Leitner logo facing you), plug the base back in. Press and hold the Telephone Mode button on the base until it flashes, then press and hold the Mute button on the headset until it flashes. Place the headset next to the base (not in the charging base) until the Telephone Mode light becomes solid.
- Headset charged/on but no audio: If using the headset jack, ensure the phone's headset button is on. Check the compatibility switch (underneath the base) is set to 1 (Cisco phones typically 4).
- Headset not working with computer: Ensure the USB cord connects the base to the computer. If not automatically recognized, check sound settings and select "DECT Headset" as default microphone and speakers.
- Can hear others, but they can't hear you: Adjust the microphone volume using controls underneath the charging base. Contact support if needed.
Health and Safety Instructions:
- Operating, charging, and storage temperatures: 32 °F to 104 °F (0 °C to 40 °C).
- General Warnings:
- Keep away from children (small parts are a choking hazard).
- Do not disassemble the product or AC adaptor.
- Do not insert objects into the product.
- Avoid contact with liquids.
- Discontinue use if overheated, damaged, dropped, or exposed to liquids.
- Do not place near heat sources or in poorly ventilated areas.
- Discontinue use if skin irritation occurs.
- Charging Warnings:
- Use only the provided charger.
- Charge according to instructions.
- Plug the AC adaptor into an easily accessible outlet.
- Headset Battery Warnings:
- The headset has a replaceable battery.
- Do not dispose of the battery in fire (it may explode).
- Do not open or mutilate the battery (corrosive materials).
- Never charge the battery outside the specified temperature range (32 °F to 104 °F).
- Recycling: Recycle or dispose of the battery properly via a local recycling center.
- Hearing Protection:
- Set volume low before putting on the headset.
- Avoid turning up volume to block noise.
- Limit high-volume use.
- Turn down volume if it prevents hearing people nearby.
Support:
For live product support, call 1-800-432-3738 (Mon-Fri 6:00 am-4:30 pm Pacific Time) or visit www.leitnerheadsets.com.