9
IMPORTANT!!!
The threaded inserts allow only one d400 to be
suspended at a time, therefore THE SUSPENSION
OF MORE UNITS IN A SINGLE VERTICAL CLUSTER
IS NOT RECOMMENDED. In case this is needed,
don’t hang more than 2 units.
2. Connections
The input of the d400 can be used to connect both line
and microphone signals. For the connection make use
of XLR or 1/4” JACK BALANCED signal cables (fig. 4).
The input level of the incoming signal can be set using
the VOL control. Leave the control in the CENTER
position (nominal input sensitivity +4dB) if the d400 is
connected to the line output of a mixer.
If you are using devices with a too high output level,
you can reduce the input gain turning the control
counterclockwise.
If you connect to the d400 a dynamic microphone or a
low-level signal you gain increase the input gain up to
+40dB turning the control clockwise.
If you need to send the same signal to a second d400
or to the T5SA sub-woofer you can use the XLR-M LINK
connector (fig. 5).
6. DPPM module - Connection panel (fig. 6)
1. Power supply cable socket.
2. ON/OFF switch with LED indicator.
3. Balanced COMBO socket for the input signal
connection.
4. Balanced XLR-M socket for the signal linking to a
second unit.
5. Control for separating the electrical earth from that
of the chassis.
6. Two-color LED that illuminates when there’s a
signal present at the unit’s input (GREEN color) or
when the internal LIMITER is active (RED color).
7. 16-position encoder for the PRESET’s selection.
8. Air vents for the module cooling.
WARNING!!!
IN ORDER FOR THE MODULE TO WORK
CORRECTLY, IT’S VERY IMPORTANT TO KEEP THE
AIR VENTS ALWAYS FREE AND ABLE TO PROVIDE
A PROPER AIR CIRCULATION.
7. PRESETS
The PRESETS available in the d400 have been
prepared by LEM with the support of sound engineers
and audio technicians in order to provide the
loudspeaker system with different acoustical and
dynamic responses suitable for different applications,
different kind of signal and different tastes. Unlike the
conventional loudspeaker systems, d400 is able to give
you exactly the kind of sound you prefer or you need
for your applications. For the PRESET’s choice we
suggest not only to follow the directions you can find
below, but also to rely on the listening and on your
personal evaluations.
In the fig. 7 at the end of this manual you can find the
response diagrams of all the PRESETS included in the
d400.
01. LEM INDOOR: this is the d400 DEFAULT
PRESET, giving the typical response of the system
and suitable for the most common indoor
applications.
02. LEM OUTDOOR: a slight cut in the high and low
frequency region results in an improved efficiency
in the mid region. Suitable for the most common
applications in outdoor spaces and large venues.
03. FLAT (Flat Response): includes only the
CROSSOVER filters without any additional EQ, in
order to obtain the ‘natural’ response of the
system’s loudspeakers. Choose this PRESET if
you want to EQ the system by yourself using the
mixer’s EQ filters or an external equalizer.
04. ENTERTAIN (Entertainer): this PRESET has
been prepared for piano bar players and
entertaining musicians who use vocal microphones
together with digital keyboard with MIDI or MP3
songs, MINIDISK players or other instruments like
guitars and horns. It gives a crisp sound and a
clear response without the need of massive
external equalizations.
05. MAX LOUD (Maximum Loudness) : this PRESET
reproduces the classic ‘loudness’ effect with a big
boost in the high and low end and a slight cut in
the mid region.
06. CD PLAYER: this PRESET has been prepared to
provide the best frequency response for the
reproduction of recorded music and is suitable for
DJs and as a P.A. system for installations in pubs,
disco bars and restaurants. It includes the use of
the multiband compressor for the best dynamic
response together with the maximum protection.
07. WALL MOUNT: this PRESET includes an
adjustment in the low range to optimize the
response when the speaker is installed lose to a
wall. .
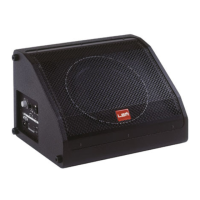
08. STAGE MONITOR: this is the PRESET to be
chosen when the d400 is used as a stage monitor.
The frequency response has been adjusted in
order to compensate the reflections from the floor,
while the mid-high EQ and the use of the ANTI-
FEEDBACK plugin allows the feedback
phenomena to be reduced to the minimum (see
the ANTI-FEEDBACK section).