Page 28
II-PLACEMENT AND INSTALLATION
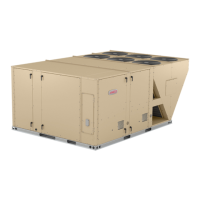
Make sure the unit is installed in accordance with the instal
lation instructions and all applicable codes. See acces
sories section for conditions requiring use of the optional
roof mounting frame (LARMF).
III-START UP - OPERATION
Refer to start-up directions and refer closely to the unit
wiring diagram when servicing. See unit nameplate for min
imum circuit ampacity and maximum fuse size.
A-Preliminary and Seasonal Checks
1- Make sure the unit is installed in accordance with the
installation instructions and applicable codes.
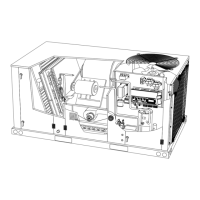
2- Inspect all electrical wiring, both field and factory in
stalled for loose connections. Tighten as required. Re
fer to unit diagram located on inside of unit control box
cover.
3- Check to ensure that refrigerant lines are in good con
dition and do not rub against the cabinet or other refrig
erant lines.
4- Check voltage at the disconnect switch. Voltage must
be within the range listed on the nameplate. If not, con
sult the power company and have the voltage correct
ed before starting the unit.
5- Recheck voltage and amp draw with unit running. If
voltage is not within range listed on unit nameplate,
stop unit and consult power company. Refer to unit
nameplate for maximum rated load amps.
B-Heat Pump Start Up
Note - The outdoor air ambient temperature must be above
the heat pump balance point setpoint (35_F default) to en
able heat pump operation. The balance point setpoint can
be adjusted using the following mobile service app menu
path: Go to RTU MENU > SETTINGS > RTU OPTIONS >
EDIT PARAMETER = 526 (HP DF BALANCE POINT)
1- Set thermostat or temperature control device to initiate
a first-stage heating demand.
A first-stage heating demand (W1) will energize com
pressors 1 and 2. All outdoor fans are energized with a
W1 demand.
Note - L1 and L2 reversing valves are de-energized in the
heating mode.
2- An increased heating demand (W2) will energize high
gas heat and de-energize heat pump operation.
C-Cooling Start Up
IMPORTANT
If unit is equipped with a crankcase heater. Make sure
heater is energized 24 hours before unit start-up to
prevent compressor damage as a result of slugging.
1- Initiate full load cooling operation using the following
mobile service app menu path:
RTU MENU > SERVICE > COMPONENT TEST > COOLING >
COOLING STAGE 3
2- Refer to Cooling Operation section for cooling start-up.
3- Units have two refrigerant circuits. See figure 12 or fig
ure 13.
4- Each refrigerant circuit is charged with R410A refriger
ant. See unit rating plate for correct amount of charge.
5- Refer to Refrigerant Check and Charge section for
proper method to check refrigerant charge.
Three Phase Scroll Compressor Voltage Phasing
Three phase power supplied to the unit disconnect switch
must be phased sequentially to ensure the scroll compres
sor and indoor blower rotate in the correct direction. Com
pressor and blower are wired in phase at the factory. Power
wires are color-coded as follows: line 1-red, line 2-yellow,
line 3-blue.
1- Observe suction and discharge pressures and blower
rotation on unit start-up.
2- Suction pressure must drop, discharge pressure must
rise and blower rotation must match rotation marking.
If pressure differential is not observed or blower rotation is
not correct:
3- Disconnect all remote electrical power supplies.
4- Reverse any two field-installed wires connected to the
line side of K2 contactor or disconnect switch if in
stalled. Do not reverse wires at blower contactor.
5- Make sure the connections are tight.
Discharge and suction pressures should operate at their
normal start‐up ranges.
D-Safety or Emergency Shutdown
Turn off power to the unit. Close manual and main gas
valves.
 Loading...