EasyManua.ls Logo

Lennox LRP14G - User Manual

Lennox LRP14G
25 pages
Print Icon
To Next Page IconTo Next Page
Loading...
Page 1
THIS MANUAL MUST BE LEFT
FOR FUTURE REFERENCE
INSTALLATION
INSTRUCTIONS
LRP14G(E/X) / LRP14AC / LRP14HP
UNITS
RESIDENTIAL PACKAGED UNITS
Gas/Electric – Air Conditioner – Heat Pump
508201-01
6/2021
Table of Contents
Unit Dimensions ..........................................................2
Roof Curb Dimensions ................................................4
Adjustable Roof Curb Dimensions...............................6
Installation ...................................................................7
Venting.........................................................................9
Duct System ..............................................................10
Filters .........................................................................10
Condensate Drain......................................................11
Gas Piping ................................................................. 11
Electrical Wiring ........................................................12
Heating Start-Up .......................................................13
Operation – Gas / Electric Units ................................15
Maintenance – Gas / Electric Units ...........................16
Wiring Diagram – LRP14GE......................................18
LRP14AC / LRP14HP ................................................19
Condensate Drain......................................................19
Sequence of Operation..............................................19
Maintenance – LRP14AC/LRP14HP .........................22
Wiring Diagrams – LRP14AC / LRP14HP .................24
©2021 Lennox Industries Inc.
Dallas, Texas, USA
WARNING
Improper installation, adjustment, alteration, service
or maintenance can cause property damage, personal
injury or loss of life. Installation and service must be
performed by a licensed professional HVAC installer or
equivalent, or service agency.
IMPORTANT
The Clean Air Act of 1990 bans the intentional venting of
refrigerant (CFCs, HCFCs and HFCs) as of July 1, 1992.
Approved methods of recovery, recycling or reclaiming
must be followed. Fines and/or incarceration may be
levied for noncompliance.
CAUTION
As with any mechanical equipment, contact with sharp
sheet metal edges can result in personal injury. Take
care while handling this equipment and wear gloves and
protective clothing.
Question and Answer IconNeed help?

Do you have a question about the Lennox LRP14G and is the answer not in the manual?

Summary

Unit Dimensions

Small Base Gas;Electric Dimensions

Detailed physical dimensions for the small base gas/electric unit.

Large Base Gas;Electric Dimensions

Detailed physical dimensions for the large base gas/electric unit.

Roof Curb Dimensions

Small Base Gas;Electric Roof Curb

Specifications for roof curb openings for the small base unit.

Large Base Gas;Electric Roof Curb

Specifications for roof curb openings for the large base unit.

Adjustable Roof Curb Dimensions

Dimensions for adjustable pitch roof curb installations.

Installation Overview

Inspection and Location Selection

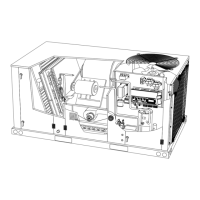
Procedures for unit inspection and selecting installation site.

Construction Use Guidelines

Conditions for using unit during construction to avoid warranty void.

Clearances and Rigging Instructions

Minimum clearances and unit rigging instructions for safe installation.

Venting System Setup

Venting Requirements

Guidelines for venting combustion products.

Vent Hood Installation

Instructions for attaching the vent hood to the unit.

Duct System and Filters

Duct System Design

Requirements for designing and installing ductwork.

Filter Installation and Maintenance

Information on air filter installation and maintenance.

Gas and Condensate Connections

Condensate Drain Setup

Proper installation and trapping of the condensate drain line.

Gas Piping Guidelines

Recommendations and safety for gas piping installation.

Electrical Wiring and Controls

Electrical Wiring Requirements

Requirements for electrical power supply and wiring connections.

Thermostat Integration

Room thermostat location and wiring recommendations.

Heating Start-Up Procedure

Steps and checks for initiating the heating function.

Gas System Operation and Adjustment

Gas System Checks and Adjustments

Post-start checks, pressure adjustments, and burner setup.

System Operation Modes

Heat Anticipator Setting

Proper setting for heat anticipator to control heating cycles.

Cooling System Operation

Sequence of operation for the cooling system.

Cooling System Performance

Values and checks for optimal cooling system performance.

Heating Operation and Safety

Heating sequence, blower delays, and critical safety controls.

Maintenance and Diagnostics

General Maintenance Tasks

Routine tasks like filter changes and coil cleaning.

Motor and Coil Care

Lubrication, cleaning, and protection of motors and coils.

Burner and Heat Exchanger Care

Instructions for cleaning burners, vent outlet, and heat exchanger.

Control System Diagnostics

Understanding LED status for troubleshooting control system faults.

LRP14 GE Wiring Diagram

Heat Pump Operation

Heater Kit and Crankcase Heater

Installation and function of optional heater accessories.

Heat Pump Cooling Sequence

Operation sequence for the cooling mode in heat pumps.

Heat Pump Heating Stages

Operation sequences for heat pump and auxiliary electric heat.

Defrost System Operation

How the defrost system operates to prevent ice buildup.

Defrost Control Features

Timing, pressure switches, and diagnostic LEDs for defrost control.

System Performance Data

Air Conditioner Cooling Performance

Performance values for AC units based on air temperature.

Heat Pump Cooling Performance

Performance values for HP units in cooling mode.

Heat Pump Heating Performance

Performance values for HP units in heating mode.

LRP14 AC; LRP14 HP Wiring Diagram

Overview

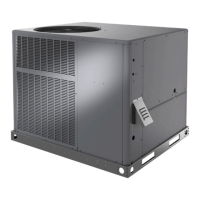
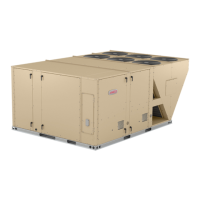
This document provides installation instructions and operational guidelines for residential packaged units, specifically Gas/Electric, Air Conditioner, and Heat Pump models. These units are designed for outdoor installation on either a rooftop or a slab. They arrive fully assembled, with all piping, refrigerant charge, and electrical wiring factory installed and tested. The only components requiring field installation are electric power, gas piping, condensate drain, duct connections, and the vent cover.

Function Description:

The device is a self-contained, factory-optimized HVAC system designed to provide both heating and cooling for residential applications. It utilizes a direct ignition control for gas heating and an HFC-R-410A refrigerant system for cooling. The unit incorporates various safety controls to ensure reliable and safe operation, including a limit control, pressure switch, flame sensor, and rollout switch. For heat pump models, a defrost system is included to manage ice buildup on the evaporator coil during heating operation.

Usage Features:

Installation:

  • Outdoor Installation: The unit is designed exclusively for outdoor use, with all electrical components protected from water.
  • Condenser Air Supply: Ensure an unlimited supply of air to the condenser coils.
  • Ground Level Installation: For ground-level installations, use a level prefabricated pad or concrete slab, ensuring it is not tied to the building foundation. Maintain levelness within a 1/4" maximum tolerance across the unit's length or width, which is critical for proper float switch operation.
  • Location Considerations: Avoid locations where the combustion air supply could be exposed to corrosive substances such as permanent wave solutions, chlorinated waxes and cleaners, chlorine-based swimming pool chemicals, water softening chemicals, deicing salts or chemicals, carbon tetrachloride, halogen-type refrigerants, cleaning solvents, printing inks, paint removers, varnishes, cements and glues, antistatic fabric softeners, masonry acid washing materials, chlorinated laundry products, or hydrochloric acid.
  • Construction Use: Using the unit as a construction heater or air conditioner is not recommended. If used, specific conditions must be met to avoid voiding the warranty, including thermostat control, pre-filter installation, sealed return air duct, maintaining return air temperature between 55°F (13°C) and 80°F (27°C), regular filter replacement, and verification of operating conditions.
  • Clearances: Maintain specific clearances for combustibles and service access as detailed in the manual. The minimum clearance to combustible material below the flue is 10 inches. Overhanging structures or shrubs should not obstruct condenser air discharge, combustion air inlet, or vent outlet.
  • Rigging: Exercise care when moving the unit. Connect rigging to the unit base rails using both holes in each corner, and use field-provided spreaders that exceed the unit dimension by 6 inches. For forklift use, forks must be a minimum of 42 inches long. Ensure weight is distributed equally during lifting.
  • Unpacking: Remove stacking brackets, packaging material, and plastic fork slot bumpers from the base rails.
  • Service Access: Access to serviceable components is provided through four removable panels: upper access, heat exchanger access, control access, and compressor access.
  • Venting: The vent outlet must be installed to prevent building degradation and comply with national and local codes. Products of combustion are discharged through a screened opening on the gas heat side panel. The vent system must terminate at least 4 feet below, 4 feet horizontally from, or 1 foot above any door, window, or gravity air inlet, and at least 3 feet above a forced air inlet within 10 feet. Ensure snow accumulation will not restrict flue product flow. Maintain a 4-foot horizontal clearance from electric meters, gas meters, regulator, and relief equipment. Avoid locating the vent where condensate could cause ice buildup on walls, overhangs, sidewalks, patios, or walkways. Products of combustion must not accumulate in confined spaces.
  • Vent Hood Installation: Attach the provided vent hood to the side of the utility panel using the screws in the instruction bag.
  • Duct System: Design and size the duct system according to ACCA methods. Use a closed return air duct system, potentially with economizers or outdoor fresh air intake. Flexible joints are recommended for duct connections at the unit. The unit supports both horizontal (side) and downflow (bottom) duct connections. All units include a factory-installed drain pan overflow switch. Seal and weatherproof duct-to-unit connections.
  • Filters: Air filters are not supplied. A field-provided air filter must always be installed ahead of the evaporator coil. An optional filter rack kit can be purchased for installation inside the coil compartment.
  • Condensate Drain: The unit has a 3/4" FPT coupling for condensate line connection. Plumbing must conform to local codes, using a sealing compound on male pipe threads. A drain trap is essential, as the drain is on the negative pressure side of the blower. The drain line must be properly trapped, routed to a suitable drain, and primed before commissioning. Install drain lines and trap without blocking service access.
  • Gas Piping: Proper sizing of gas piping depends on gas flow, specific gravity, and length of run, adhering to national and local codes. Install a drip leg and a ground joint union. A manual shutoff valve may be required outside the unit. Use pipe thread sealing compound resistant to propane gas sparingly. Check all joints for leaks with soapy solution after gas connections are complete. Never use a flame to check for gas leaks. The furnace and its manual shutoff valve must be disconnected from the gas supply piping system during pressure testing above 1/2 PSIG (3.48kPa). A 1/8" N.P.T. plugged tapping must be installed upstream of the gas supply connection for test gauge connections. A grommet is provided to seal the gas supply line to the control compartment.
  • Electrical Wiring: All wiring must comply with national and local electrical codes, using 75°C minimum wiring. Run the 208 or 230 volt, 60 hertz electric power supply through a fused disconnect switch to the control box. Power supply must be N.E.C. Class 1. A field-provided disconnect switch is required. Replacement wire must match the type shown on the wiring diagram. Electrical wiring must be sized for minimum circuit ampacity. Use copper conductors only. Each unit requires a separate branch circuit and proper fusing. Use waterproof connectors for electrical power and control wiring to prevent moisture ingress.
  • Thermostat: Locate the room thermostat on an inside wall away from drafts, sun exposure, or heat sources. Use color-coded insulated #18 AWG wires for connection.
  • Crankcase Heater (if used): Some models may have a crankcase heater to prevent liquid refrigerant migration. Power must be maintained to the unit to keep this active.
  • Heater Kit Accessory (if used): For auxiliary heat, a heater kit accessory can be installed. Disconnect power, remove the high voltage wire harness plug, remove the heater blockoff, insert the heater into the control panel, and plug the heater wiring harness into the control assembly.

Heating Start-Up:

  • Pre-Start Checklist: Verify gas type matches nameplate, and the vent cover is properly installed.
  • To Light Main Burners: Turn off electrical power, set thermostat to lowest setting, slide gas valve switch to "ON," turn on electrical power, and set thermostat to desired temperature.
  • To Shut Down Main Burners: Turn off electrical power and slide gas valve switch to "OFF."
  • Post-Start Checklist: Check for gas leaks, verify correct manifold gas pressures (3.5" w.c. for natural gas, 10" to 10.5" w.c. for LP/propane), check supply gas pressure (within rating plate limits), and adjust temperature rise per rating plate.
  • Manifold Gas Pressure Adjustment: For natural gas, minimum permissible supply pressure is 5" w.c. For LP/propane, minimum permissible supply pressure is 11" w.c. Adjust regulator by turning the screw clockwise to increase pressure or counterclockwise to decrease pressure.
  • High Altitude: Input rate is for elevations up to 2000 feet. For higher elevations, refer to the National Fuel Gas Code or Canadian Installation Codes for input rate reduction.
  • Burner and Burner Orifice Instructions: To check or change burners/orifices, close gas shutoff valve, turn off power, remove burner access panel, disconnect union in gas supply line, label and disconnect wires to gas valve, remove manifold, replace orifices, and reassemble.

Cooling System Operation:

  • Cooling Sequence: When the thermostat calls for cooling, the R to Y circuit closes, energizing the compressor, condenser fan motor, and blower motor. A combustion air inducer operates for 10 seconds at the start of each cooling cycle to prevent insect nesting.
  • Blower Delay – Cooling: The circulating air blower is controlled by a timing circuit in the integrated blower/ignition control. Blower "ON" delay is 5 seconds after compressor start, and "OFF" timing is 60 seconds after compressor shutdown. No "OFF" delay for "fan only" calls.
  • Cooling System Performance: The unit is factory-optimized. If performance is questioned, check line voltage, airflow, internal seals, service panels, ductwork for leaks, and blower speed settings. If issues persist, remove system charge, evacuate, and weigh in refrigerant to nameplate charge.
  • Continuous Fan: Continuous blower operation is possible by closing the R to G circuit on the thermostat.

Heating Sequence of Operation:

  • Heating Sequence: When the thermostat calls for heating, the R to W circuit closes. The combustion air blower and circulating air blower start. Once combustion air blower speed reaches proper RPM, the pressure switch closes, initiating a 30-second pre-purge. The ignition control then energizes the main gas valve and spark electrode for 10 seconds. If flame is not sensed, the gas valve de-energizes, and a 30-second inter-purge period begins, followed by another trial for ignition (up to three trials). If flame is still not established, the control retries after 1 hour indefinitely. Once flame is sensed, the circulating air blower energizes after a 30-second delay. When the thermostat is satisfied, the combustion air blower and gas valve de-energize. The circulating air blower continues for a short period.
  • Blower Delay – Heating: The circulating air blower "OFF" delay is 120 seconds after burner shutdown. The "ON" delay is 120 seconds after the "W" signal to allow the furnace to warm up.
  • Safety Controls:
    • Limit Control: Located behind the heat exchanger access panel, it opens at abnormally high circulating air temperatures, automatically resetting. It closes the main gas valve if inadequate airflow causes high temperatures.
    • Pressure Switch: Prevents spark electrode and gas valve from energizing if the combustion air blower fails.
    • Flame Sensor: Closes the gas valve if flame is not sensed after the 10-second trial for ignition.
    • Rollout Switch: Located on top of the burner box, it shuts off ignition control and closes the main gas valve in case of sustained main burner rollout. Reset by pushing the button.
  • Defrost System (Heat Pump Models): Includes a defrost thermostat and defrost control board. The defrost thermostat, located on the evaporator coil, closes contacts when sensing 35°F or cooler, signaling the defrost control board to start defrost timing. It terminates defrost when the liquid line warms to 60°F. The defrost control board combines time/temperature defrost control, defrost relay, diagnostic LEDs, and a terminal strip for field wiring. It automatically switches between heating and defrost modes. During a compressor cycle, the control accumulates compressor run time at 30, 60, or 90-minute intervals. If the defrost thermostat is closed when the selected compressor run time interval ends, the defrost relay energizes, and defrost begins. An on-board outdoor ambient temperature sensor bypasses the low pressure switch below 15°F in heating mode to prevent nuisance trips. A defrost cycle initiates if a low pressure switch trips, the defrost sensor is closed, and the defrost time interval has expired.
  • Defrost Control Timing Pins: Selectable timing pins allow adjustment of accumulated compressor run time before a defrost cycle initiates (30, 60, or 90 minutes). Default is 90 minutes if no jumper is in place. Maximum defrost period is 14 minutes.
  • Pressure Switch Circuit: High and low pressure switches are connected to the defrost control board on heat pump models. During a single demand cycle, the defrost control locks out the unit after the fifth pressure switch interruption. The unit remains locked out until power is interrupted or the TEST pins are jumpered for 0.5 seconds.
  • Compressor Delay (Quiet Shift): A field-selectable function reduces sounds during defrost mode cycling by cycling off the compressor for 30 seconds.
  • Time Delay: The defrost control includes a 5-minute compressor timer to protect against short cycling. This delay is bypassed by jumpering the TEST pins for 0.5 seconds.

Maintenance Features:

General Maintenance:

  • Periodic Inspection: Consists of changing or cleaning filters and cleaning the evaporator coil. Other furnace components may also require cleaning.
  • Safety Precaution: Always shut off all electrical power to the unit before performing any maintenance procedures to prevent personal injury.

Specific Component Maintenance:

  • Filters: Not supplied with the unit. Inspect monthly. Replace disposable or clean permanent type filters as needed. Do not replace permanent types with disposable.
  • Motors: Indoor and outdoor fan and vent motors are permanently lubricated and require no maintenance. Indoor fans with permanent magnet constant torque motors remain energized and are controlled by 24V signals.
  • Evaporator Coil: Prevent dirt and debris accumulation. Clean as often as necessary using a brush, vacuum cleaner attachment, or water. If using water, ensure power is off. Be careful not to damage coil fins.
  • Condenser Coil: Clean annually with water and inspect monthly during the cooling season. May need cleaning at startup if manufacturing oil is present. Do not obstruct hot condenser air discharge with overhanging structures or shrubs.
  • Burners: To clean, remove them as outlined in the Burner and Burner Orifice Instructions section. Vacuum and/or brush as required.
  • Vent Outlet: Visually inspect periodically for soot or dirt buildup. Clean as necessary to maintain adequate opening for flue product discharge.
  • Heat Exchanger: With proper combustion adjustment, the heat exchanger seldom needs cleaning. If sooted, determine the cause. To clean, remove the burner assembly, combustion blower, and flue collector box. Use a wire brush on a flexible wand to brush inside the heat exchanger and flue collector box. If soot is excessive, remove and clean the vent motor and housing. After brushing, blow all areas with air and vacuum as needed. Reassemble in reverse order, ensuring all joints on the vent side of the combustion system are airtight using high-temperature sealing compound.

Diagnostics:

  • Control System Diagnostics (Gas/Electric Units): The ignition control board has an LED that indicates normal or abnormal operations with specific flash codes for different conditions (e.g., no call for heat, call for heat, system lockout, pressure switch issues, high limit/rollout switch open, flame sensed but gas valve not energized, internal failure).
  • Defrost Board Diagnostic LEDs (Heat Pump Models): The defrost board uses two LEDs (Green DS2, Red DS1) for diagnostics, flashing specific sequences for conditions like no power to control, normal operation, anti-short-cycle delay, low pressure switch ignored, and various fault/lockout codes (e.g., low pressure switch fault/lockout, high pressure switch fault/lockout).

Lennox LRP14G Specifications

General IconGeneral
TypeHeat Pump
SEER Rating14
HSPF Rating8.2
Compressor TypeScroll
RefrigerantR-410A
StagesSingle-stage
Voltage208/230V
Cooling Capacity (BTU/h)24, 000 - 60, 000
Warranty10-Year Limited Warranty on Compressor and 5-Year Limited Warranty on Parts

Related product manuals