EasyManua.ls Logo

Lennox Merit ML17XC1 Series - User Manual

Lennox Merit ML17XC1 Series
16 pages
Print Icon
To Next Page IconTo Next Page
Loading...
©2022 Lennox Industries Inc.
Dallas, Texas, USA
Page 1
THIS MANUAL MUST BE LEFT WITH THE
HOMEOWNER FOR FUTURE REFERENCE
General
This ML17XC1 outdoor air conditioner with all-aluminum
coil is designed for use with HFC-410A refrigerant only.
This unit must be installed with an approved indoor air han-
dler or coil. For AHRI Certied system match-ups and ex-
panded ratings, visit www.LennoxPros.com.
These instructions are intended as a general guide and do
not supersede local codes in any way. Consult authorities
having jurisdiction before installation.
NOTICE!
Charging information is given on the charging
procedure sticker on the unit access panel. For more in-
depth information, consult the Installation and Service
Procedures manual on LennoxPros.com or through the
Technical Support department at 800-453-6669.
INSTALLATION
INSTRUCTIONS
AIR CONDITIONER
508254-01
4/2022
Merit
®
Series ML17XC1 Units
WARNING
Improper installation, adjustment, alteration, service
or maintenance can cause property damage, personal
injury or loss of life. Installation and service must be
performed by a licensed professional HVAC installer or
equivalent, or service agency.
CAUTION
As with any mechanical equipment, contact with sharp
sheet metal edges can result in personal injury. Take
care while handling this equipment and wear gloves and
protective clothing.
IMPORTANT: Special procedures are required for clean-
ing the all-aluminum coil in this unit. See page 15 in this
instruction for information.
STEP 1 – SETTING THE UNIT – Clearances
NOTES -
Service clearance of 30 in. (762 mm) must be maintained on one of
the sides adjacent to the control box.
Clearance to one of the other three sides must be 36 in. (914 mm).
Clearance to one of the remaining two sides may be 12 in. (305
mm) and the final side may be 6 in. (152 mm).
A clearance of 24 in. must be maintained between two units.
48 in. (1219 mm) clearance required on top of unit.
See
NOTES
See NOTES
See NOTES
See
NOTES
CONTROL
BOX
NOTICE: Specific applications may require adjustment of the listed installation clearances to provide protection for
the unit from physical damage or to avoid conditions which limit operating efficiency. (Example: Clearances may
have to be increased to prevent snow or ice from falling on the top of the unit. Additional clearances may also be
required to prevent air recirculation when the unit is installed under a deck or in another tight space.)
FIGURE 1
Question and Answer IconNeed help?

Do you have a question about the Lennox Merit ML17XC1 Series and is the answer not in the manual?

Summary

STEP 1 - SETTING THE UNIT

Clearances

Specifies required clearances for proper unit installation and airflow.

Unit Placement

Details on placing the unit on a level surface or slope.

STEP 2 - REFRIGERANT PIPING

Flushing Existing Line Set & Indoor Coil

Procedures for flushing existing line sets and indoor coils.

LIQUID LINE FILTER DRIER INSTALLATION

Procedure for installing the liquid line filter drier.

LINE SET INSTALLATION

Guidance on properly installing and isolating refrigerant line sets.

Removing Existing Indoor Metering Device

Steps for removing existing fixed orifice or expansion valve.

Install Indoor Expansion Valve

Instructions for installing the indoor expansion valve unit.

Brazing Procedures

Detailed steps for brazing refrigerant line set connections.

Install Indoor Expansion Valve

Further instructions for installing the indoor expansion valve.

STEP 3 - LEAK TEST AND EVACUATION

TEST FOR LEAKS

Method for performing a leak test on the system.

EVACUATE THE SYSTEM

Steps for achieving system evacuation using a vacuum pump.

STEP 4 - ELECTRICAL - Circuit Sizing and Wire Routing

High Voltage and Field Control Wiring

Wiring diagrams and procedures for high voltage and control wiring.

STEP 5 - UNIT START-UP

Checking and Adding System Charge

Guidance on checking and adjusting refrigerant system charge.

ML17 XC1 Start-Up and Performance Checklist

A checklist for verifying start-up and performance parameters.

Homeowners Information

Homeowner Maintenance

Recommended maintenance tasks for homeowners.

Professional Maintenance

Pre-Service Check

Checks to perform before calling for professional service.

Outdoor Unit

Professional inspection points for the outdoor unit.

Indoor Unit

Professional inspection points for the indoor unit.

General System Test

Procedures for testing the system's overall operation.

Overview

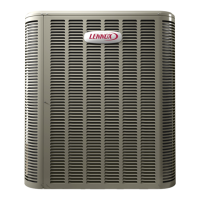
This document provides installation and maintenance instructions for the Merit® Series ML17XC1 Air Conditioner units, which are designed for use with HFC-410A refrigerant. These units feature an all-aluminum coil and must be installed with an approved indoor air handler or coil. For optimal performance and safety, installation and service should be performed by a licensed professional HVAC installer or service agency.

Function Description:

The ML17XC1 is an outdoor air conditioner designed to provide cooling by circulating HFC-410A refrigerant through a system that includes an indoor air handler or coil. The unit's primary function is to remove heat from the indoor environment and dissipate it outdoors, thereby lowering the indoor temperature. It is crucial that the unit is matched with an indoor coil as specified by AHRI to ensure proper operation and efficiency. The system is factory-charged with enough HFC-410A refrigerant to accommodate a 15-foot length of refrigerant piping, with additional charging instructions provided for longer line sets. The unit is equipped with a high-pressure switch on the liquid line and a low-pressure switch on the compressor suction line to ensure safe operation by monitoring and regulating system pressures.

Usage Features:

  • Refrigerant Compatibility: Designed exclusively for HFC-410A refrigerant.
  • Coil Type: Features an all-aluminum coil.
  • System Match-ups: Requires an approved indoor air handler or coil for proper installation. AHRI Certified system match-ups and expanded ratings are available on LennoxPros.com.
  • Line Set Flushing: If connecting to an existing line set or indoor coil previously charged with mineral oil or manufactured before January 1999, the coil and line set must be flushed prior to installation to prevent heat transfer issues and reduced system performance.
  • Filter Drier Installation: A provided filter drier must be field-installed in the liquid line between the outdoor unit's liquid line service valve and the indoor coil's metering device to ensure a clean, moisture-free system. Failure to install this component will void the warranty.
  • Expansion Valve: The outdoor unit can be used with either a fixed orifice (RFC) or an expansion valve metering device (purchased separately) at the indoor coil. Instructions are provided for installing the expansion valve internally or externally to the indoor coil.
  • Sensing Bulb Installation: Detailed instructions are given for attaching the vapor line sensing bulb in the proper orientation, emphasizing thermal contact with the vapor line.
  • Leak Testing and Evacuation: A comprehensive procedure is outlined for leak testing the line set and indoor unit using HFC-410A refrigerant and nitrogen, followed by evacuation to a specified absolute pressure to ensure a vacuum-sealed system.
  • Electrical Connections: Wiring must conform to national and local electrical codes. The unit requires a 24VAC transformer (minimum 40 VA) for low-voltage control power. Instructions emphasize proper grounding and the use of copper wire only.
  • Thermostat Installation: The room thermostat should be installed on an inside wall, approximately in the center of the conditioned area, and 5 feet (1.5m) from the floor, avoiding direct sunlight or drafts.
  • Service Valves: The liquid and vapor line service valves are used for various procedures including removing refrigerant, flushing, leak testing, evacuating, checking charge, and charging. Operating instructions for both ball-type and angle-type service valves are provided.
  • Crankcase Heater: If equipped, the crankcase heater should be energized 24 hours before unit start-up to prevent compressor damage.

Maintenance Features:

  • Professional Maintenance: The heating and air conditioning system should be inspected and maintained twice each year (before the start of the cooling and heating seasons) by a licensed professional HVAC technician.
  • Homeowner Maintenance:
    • Filter Replacement: Check the indoor unit filter monthly and replace it if necessary.
    • Drain Line Check: Monthly inspection of the indoor unit drain line for obstructions is recommended.
    • Outdoor Unit Clearance: Monthly removal of obstructions (grass clippings, leaves, papers) around the outdoor unit to ensure proper airflow.
    • Shrubbery Trimming: Trim shrubbery away from the unit and periodically check for debris.
    • Snow Clearance: During winter months, keep snow level below the louvered panels.
  • Coil Cleaning: The all-aluminum coil should be cleaned using potable water at a moderate pressure (less than 50 psi). If water alone is insufficient, a coil cleaner with a pH in the range of 5 to 9 is recommended, followed by thorough rinsing. In coastal areas, the coil should be cleaned several times per year to prevent corrosive buildup.
  • Sprinkler/Soaker Hose Precaution: Sprinklers and soaker hoses should not be installed where they could cause prolonged exposure of the outdoor unit to treated water, as this can corrode metal parts and diminish performance.
  • Pre-Service Check (Homeowner): Before calling for service, homeowners should verify thermostat settings, ensure all electrical disconnect switches are ON, check for blown fuses or tripped circuit breakers, confirm access panels are in place, and ensure the air filter is clean.
  • Professional Inspection Items: A licensed technician will inspect component wiring, fan and blade condition, base pan drains, refrigerant piping and insulation, capacitors, contactor contacts, fan motor bearings/bushings, and outdoor coils. For indoor units, they will check wiring, air filters, blower cleanliness, drain pans, condensate drains, indoor coil, duct system, and blower motor bearings.
  • General System Test: Technicians will perform a system test to check operating functions, unusual noises or odors, measure indoor/outdoor temperatures and system pressures, verify refrigerant charge, total static pressure, airflow settings, and temperature drop across the indoor coil.

Lennox Merit ML17XC1 Series Specifications

General IconGeneral
Compressor TypeSingle-stage
RefrigerantR-410A
Energy Star CertifiedYes
Cooling Stages1
Cooling Capacity1.5 - 5 Tons
SEER Rating17
CompressorScroll
CabinetPermaGuard™ Cabinet
Warranty5-Year Limited Parts

Related product manuals