Page 58
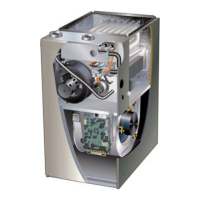
SL280UHV NOX INSERTS
FIGURE 40
FIGURE 41
Remove 5 screws if necessary
(either side of cabinet)
1
2
3
4
5
18− Reconnect all wires.
19− Reconnect top cap and vent pipe to combustion air in-
ducer outlet.
20− Reconnect gas supply piping.
21− Turn on power and gas supply to unit.
22− Set thermostat and check for proper operation.
23− Check all piping connections, factory and field, for gas
leaks. Use a leak detecting solution or other preferred
means.
CAUTION
Some soaps used for leak detection are corrosive to
certain metals. Carefully rinse piping thoroughly af-
ter leak test has been completed. Do not use
matches, candles, flame or other sources of ignition
to check for gas leaks.
24− If a leak is detected, shut gas and electricity off and
repair leak.
25− Repeat steps 24 and 26 until no leaks are detected.
26− Replace access panel.
 Loading...