Do you have a question about the Lenovo ThinkCentre M715q and is the answer not in the manual?
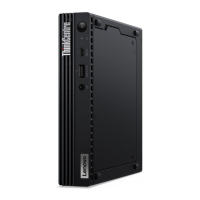
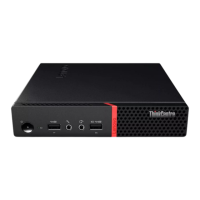
Identifies and describes front panel ports and indicators.
Identifies and describes rear panel ports and connectors.
Illustrates and labels components on the system board.
Explains the purpose and location of the machine type label.
Details methods for physically securing the computer using locks.
Lists the technical specifications of the computer.
Essential guidelines and warnings before starting hardware replacement.
Steps to prevent electrostatic discharge damage to components.
Defines and categorizes CRUs and FRUs.
Lists CRU replacement procedures and important notes.
Step-by-step guide to safely remove the computer's outer cover.
Instructions for removing and installing the power adapter.
Procedure for removing and installing the vertical stand.
Steps for removing and installing the VESA mount bracket.
Procedure for removing and installing an external optical drive.
Instructions for removing and installing the I/O box.
Steps for removing and installing the power adapter bracket.
Procedure for removing and installing the internal speaker.
Instructions for replacing a wireless mouse.
Procedure for replacing a wireless keyboard.
Steps for removing and installing the system fan.
Procedures for replacing 2.5-inch and M.2 storage drives.
Steps for removing and installing a memory module (RAM).
Procedure for replacing the coin-cell battery.
Instructions for removing and installing the Wi-Fi card.
Final steps to reassemble and secure the computer after CRU replacement.
Important considerations and requirements for FRU replacement.
Procedure for removing and installing the internal speaker holder.
Steps for removing and installing the computer's heat sink.
Procedure for removing and installing the microprocessor (CPU).
Procedures for replacing the front and rear Wi-Fi antennas.
Steps for removing and installing the system board.
Final steps to reassemble and secure the computer after FRU replacement.
Contains legal notices, disclaimers, and warranty information.
| Processor cache | 2 MB |
|---|---|
| Processor cores | 4 |
| Processor model | A10-9700E |
| Processor family | AMD A10 |
| Processor frequency | 3 GHz |
| Processor manufacturer | AMD |
| Processor boost frequency | 3.5 GHz |
| Number of processors installed | 1 |
| Operating system architecture | 64-bit |
| Memory slots | 2x SO-DIMM |
| Internal memory | 4 GB |
| Memory clock speed | 2666 MHz |
| Internal memory type | DDR4-SDRAM |
| Maximum internal memory | 32 GB |
| Memory layout (slots x size) | 1 x 4 GB |
| HDD size | 2.5 \ |
| HDD speed | 7200 RPM |
| Storage media | HDD |
| Optical drive type | No |
| Total storage capacity | 500 GB |
| On-board graphics card | Yes |
| On-board graphics card model | AMD Radeon R7 |
| Wi-Fi standards | 802.11a, Wi-Fi 5 (802.11ac), 802.11b, 802.11g, Wi-Fi 4 (802.11n) |
| Bluetooth version | 4.2 |
| Cabling technology | 10/100/1000Base-T(X) |
| Top Wi-Fi standard | Wi-Fi 5 (802.11ac) |
| Ethernet LAN data rates | 10, 100, 1000 Mbit/s |
| Power supply | 65 W |
| Sustainability certificates | RoHS, EPEAT Gold, ENERGY STAR |
| USB 2.0 ports quantity | 3 |
| Volume | 1 L |
| Product color | Black |
| Housing material | Metal |
| Product type | Mini PC |
| Motherboard chipset | AMD B300 FCH |
| Password protection type | HDD, Power on, Supervisor |
| Depth | 182.9 mm |
|---|---|
| Width | 179 mm |
| Height | 34.5 mm |
| Weight | 1320 g |