Do you have a question about the Lenovo Yoga A940 and is the answer not in the manual?
Overview of the front view of the Yoga A940, detailing components like microphones, camera, and display.
Details the rear view of the Yoga A940, identifying ports like air vents, power connector, and Ethernet connector.
Explains the left view of the Yoga A940, listing connectors such as USB, Thunderbolt, memory card slot, and audio jack.
Describes the right view of the Yoga A940, highlighting USB ports, LED lamp button, and speakers.
Resolving issues with blank screens or no image displayed on the monitor, checking power and signal connections.
Addressing no sound issues from integrated speakers or headphones, checking volume, drivers, and connections.
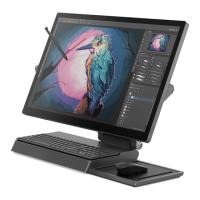
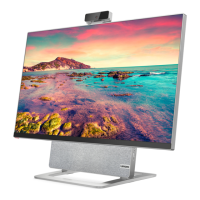
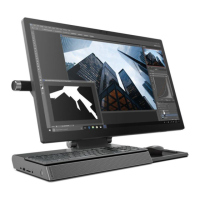
The Lenovo Yoga A940 is an all-in-one desktop computer designed for creative professionals and users seeking a versatile and interactive experience. Its unique design allows for flexible screen positioning and integrates several peripheral devices to enhance productivity and creativity.
The front of the Yoga A940 features a multi-touch display, which is the primary interface for interaction. Above the display, there are microphones, a camera indicator, a camera cover slider, and a camera. The camera can be a standard camera or a Windows Hello compatible camera, offering secure login options. The camera cover slider is a privacy feature, allowing users to physically cover the camera lens when not in use. A red dot indicates that the lens is covered, ensuring visual confirmation of privacy. Below the display, the computer integrates speakers with Bluetooth connectivity, providing audio output for both the computer and paired smartphones.
The rear of the Yoga A940 houses several essential connectors and features. Air vents are strategically placed to prevent overheating, and it is crucial not to block them. A monitor/computer mode switch allows users to toggle between displaying content from the computer or an HDMI input. The power connector is located here, along with an Ethernet connector for wired network access. The computer also includes HDMI in/out connectors and multiple USB 3.1 Gen 1 connectors for connecting various peripherals and external devices.
On the left side of the computer, you'll find a USB 2.0 connector, a Thunderbolt 3 (USB-C) connector, and a USB 3.1 Gen 2 connector. The Thunderbolt 3 (USB-C) connector is highly versatile, supporting external display devices with a compatible cable and facilitating high-speed data transfer. A memory card slot is available for convenient access to data from memory cards. A combo audio jack is provided for headphones or headsets, though it's important to note that it may not support conventional microphones, and recording functions might vary with third-party devices due to industry standards. The power button, with its integrated indicator, is also located on this side.
The right side of the Yoga A940 features another USB 2.0 connector. A unique aspect of this side is the LED lamp button, which controls an integrated LED lamp. This button allows users to turn the LED lamp on or off and adjust its brightness, providing ambient lighting for the workspace.
The Yoga A940 comes with several peripheral devices designed to enhance its functionality:
Lenovo Dial: This is a key creative input device specifically designed for the Yoga A940. It features a press button and two rotating rings. When connected to the computer via one of the USB 2.0 connectors, the Lenovo Dial can be used to quickly change settings or execute commands within supported applications. It includes a 360° LED light that changes color to indicate the active application. The outer rotating ring, inner rotating ring, and press button offer customizable functions for various Adobe and Microsoft Office applications like Illustrator, Photoshop, Premier Pro, Lightroom, Word, PowerPoint, and Excel. For unsupported programs or the Windows Desktop, it defaults to a general mode.
Wireless Charging Pad: The computer integrates a wireless charging pad, allowing users to charge compatible phones wirelessly. An indicator light on the pad provides status updates: blinking white means the phone is charging, solid amber indicates a charging error (suggesting adjustment of phone position or removal of metal objects), and off means no compatible phone is detected. For optimal charging, the phone should be placed in the center of the pad.
Lenovo Digital Pen: The Lenovo Digital Pen uses an AAAA battery, which may or may not be included. If included, an insulation pad must be removed before first use. The pen features a top button and a bottom button, offering various functions across different applications. For instance, the bottom button often serves as an eraser in applications like Microsoft Word, Edge, OneNote, Sticky Notes, Sketchpad, and Screen sketch (part of Windows Ink Workspace). The top button's function varies by application, such as "Color 2" in Paint or "No function" in others. To use the eraser, hold down the bottom button and tap on the strokes to be erased.
Wireless Mouse and Keyboard: The Yoga A940 typically includes a wireless mouse and keyboard. Users should refer to the documentation provided with these devices for specific usage instructions. It's important to note that not all listed peripheral devices may come with every computer model.
The Yoga A940 features a touch-sensitive display, allowing for direct interaction with the computer using fingers or a touch pen. This input method functions similarly to a mouse or keyboard, transmitting position information to the computer.
Touch Screen Calibration: For precise positioning, especially upon first use or if the touch screen's response is inaccurate, calibration is recommended. This involves searching for "Tablet PC Setting" in the taskbar, clicking "Calibrate," and then touching each calibration point in sequence with a finger or a touch pen (with a diameter of over 9 mm).
Other Touch Screen Settings: Additional settings can be accessed by searching for "Pen and Touch" in the taskbar. Here, users can adjust touch actions, including "Speed" and "Spatial tolerance" parameters, to match their natural double-tapping style. A graphic in the lower right-hand corner of the window allows for testing these settings.
Precautions when using the touch screen:
The manual provides guidance for resolving common issues:
Solving problems: If a problem arises after adding or removing a part, verify the installation procedures. For peripheral device issues, ensure proper connection. If an error message appears, record it for support personnel. For program errors, consult the program's help document.
Troubleshooting display problems:
Troubleshooting audio problems:
Troubleshooting software problems:
Troubleshooting problems with optical drives and hard disks:
The drivers for this computer model specifically support Windows 10.
The Windows help system offers detailed information on using the operating system. Access it by opening the Start menu and clicking "Get Started," or by typing "Get Started" or a query into the taskbar's search box. For system recovery after a serious error in Windows 10, go to Start > Settings > Update & security > Recovery and follow the on-screen instructions. The Windows operating system is provided by Microsoft Corporation, and users should adhere to the END USER LICENSE AGREEMENT (EULA). For OS-related questions, contact Microsoft directly.
The BIOS setup utility is ROM-based software that provides basic computer information and options for configuring boot devices, security, hardware mode, and other preferences.
Regular cleaning is crucial for the computer's components, especially the sophisticated integrated circuit boards, to prevent dust buildup.
| Display | 27-inch 4K UHD (3840 x 2160) IPS touchscreen |
|---|---|
| Processor | Intel Core i7-8700 |
| Graphics | AMD Radeon RX 560 (4GB GDDR5) |
| RAM | 32GB DDR4 |
| Storage | 1TB HDD |
| Operating System | Windows 10 |
| Ports | USB 3.0, HDMI, Ethernet, Audio jack |
| Wireless | Wi-Fi 802.11ac, Bluetooth 4.2 |