5
Ref.
No. Part No. Description Qty.
1 010171 Retainer “C” Clip 1
2 018628 Nylon Washer, 1/4 6
3 030503 Deflector Arm Mount Spacer 1
4 035030 Offset Bracket Deflector 1
5 060029 Machine Screw, 1/4-20x2 2
6 060033 Flat Washer, 1/4” 1
7 060034 Operating Lever and Rubber 1
8 060036 Lock Nut, Nylon Insert, 1/4 8
9 060057 Machine Screw Pan Head, 1/4-20x7/8 6
10 060059 Hex Nut, 1/4-20 1
11 060071 Hex Lock Nut, 5/16-18 1
12 060072 Nut, Nylon Insert, 5/16-18 1
13 060073 Lock Washer, 5/16 1
14 061052 Cotter Pin, 1/8 x 1 1
15 061053 Flat Washer, 3/8 1
16 061066 Deflector Tube, Plastic Only 1
17 -- -- --
18 -- -- --
19 706251 Deflector Actuator Rod 1
20 706252 Lever Rod Deflector Bracket 1
21 706253 Tube Bracket Mount, Lever, Deflector 1
22 706254 Deflector Tube Mount 1
23 030418 Remote Bracket 1
8
1
7
23
9
2
8
14
12
19
9
11
15
13
20
8
8
22
9
9
5
3
2
6
10
9
16
8
4
2
2
21
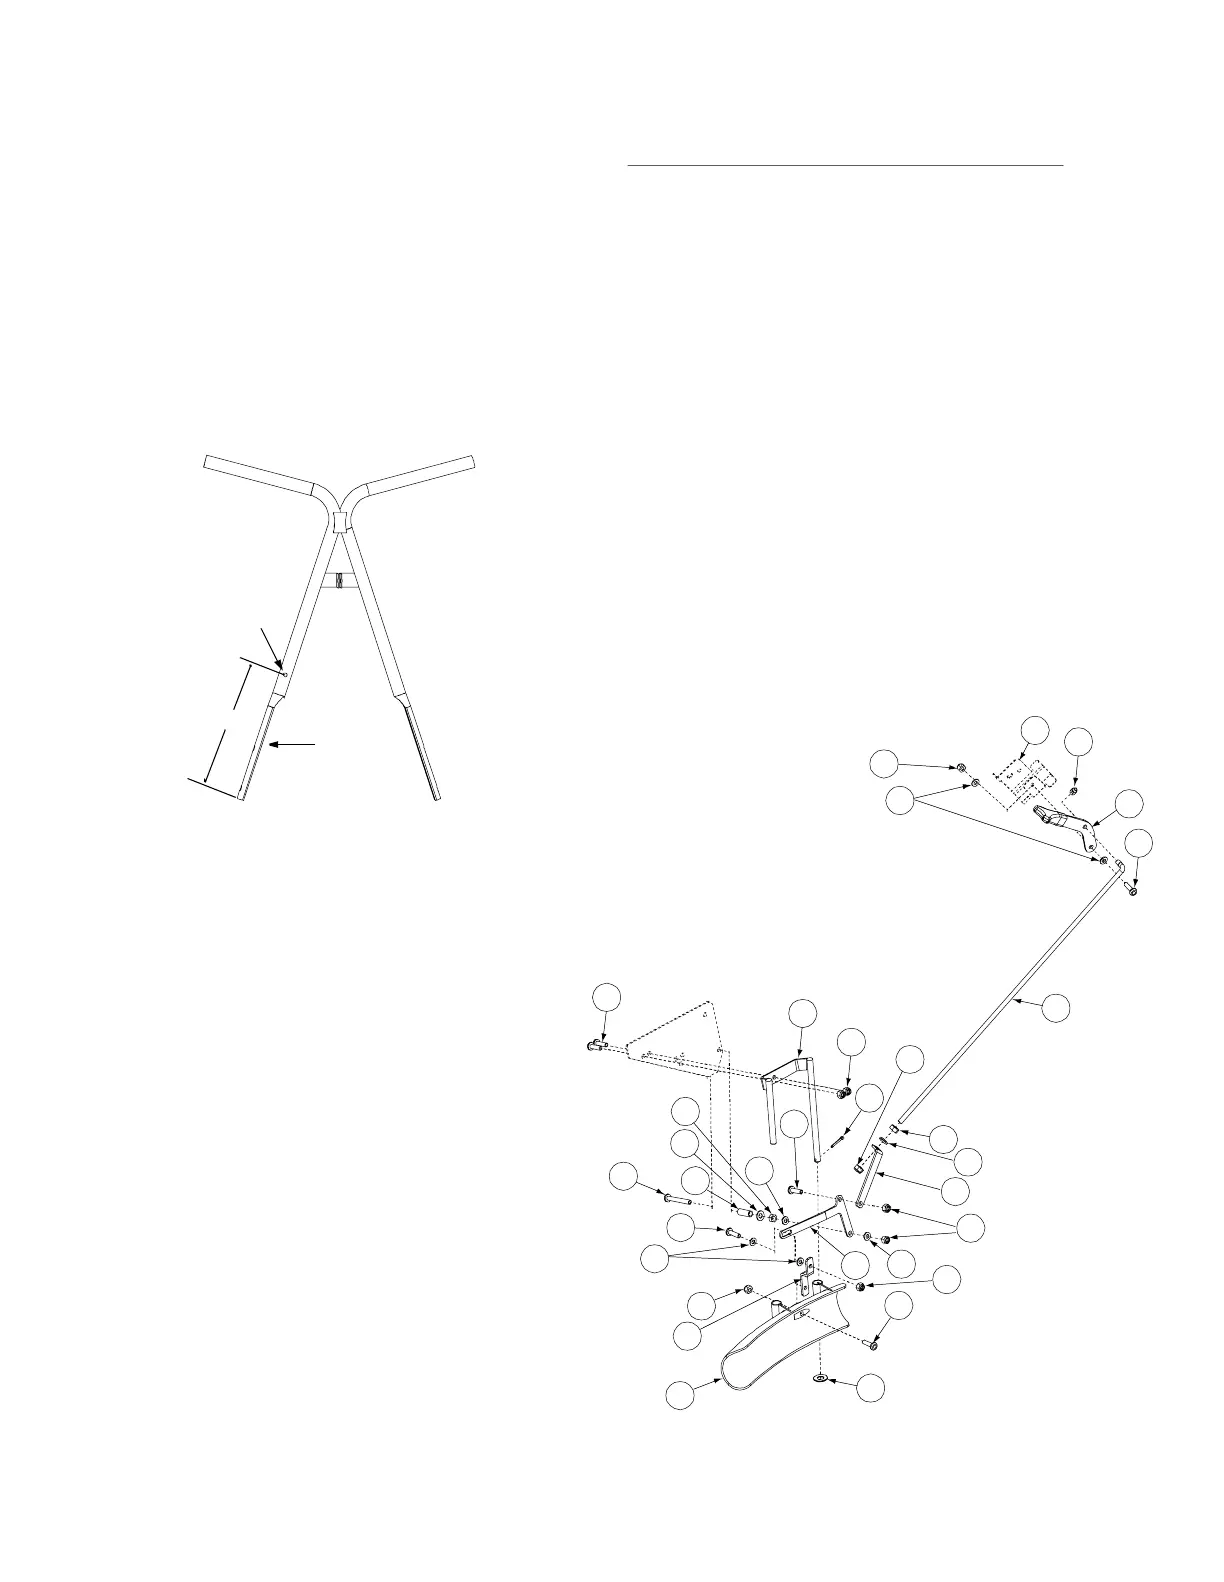
NOTE: Adjust the friction at the
three deflector arm pivot points
by tightening the nuts and then
backing them off 1/8th turn. Ad-
just the friction at the operating
lever pivot so that it will hold its
position.
Mounting Instructions
1. Install the deflector tube mount (ref. 22) onto the right
side of the spreader frame (from the inside) as shown.
2. Install the tube bracket mount (ref. 21) to the right side
of the frame using appropriate hardware as shown.
a. Install 1/4-20 x 2 (ref. 5) through frame plate using
spacer (ref. 3), washer (ref. 6), and tighten using 1/
4-20 nut (ref. 10).
b. Install nylon washer (ref. 2), bracket mount (ref.21)
nylon washer (ref 2) and tighten nut (ref. 8) until
bracket mount (ref. 21) easily turns.
3. Install offset bracket (ref. 4) onto deflector (ref.16)
a. Slide Long end of offset bracket into slot on
deflector (ref.16)
b. Install 1/4-20 screw (ref. 9) and tighten sub
assembly using 1/4-20 nut (ref. 8)
4. Slide deflector subassembly onto deflector tube mount
(ref. 22)
a. Install washer (ref. 15) onto deflector tube mount
and lock in place using cotter pin (ref. 14)
5. Fasten offset bracket (ref. 4) to bracket mount (ref. 21)
using appropriate hardware.
a. Install 1/4-20 screw (ref. 9) and tighten sub
assembly using 1/4-20 nut (ref. 8) until deflector (ref.
16) moves easily on deflector tube mount (ref. 22)
6. Install lever rod bracket (ref. 20) to bracket mount (ref.
21).
a. Install, making sure small flange of lever rod bracket
faces to the inside of the spreader, using
appropriate hardware.
7. Install remote bracket (ref. 23) onto right side of upper
handle.
a. Install using one 1/4-20 (ref. 5) and one 1/4-20 nut
(ref. 8)
8. Install operating lever (ref. 7) using appropriate
hardware
9. Install rod (ref. 19) into operating lever (ref. 7) and into
lever rod bracket (ref. 20)
10. Slide deflector up toward the bottom of the hopper as
far as it will go.
11. Place the operating lever (ref. 7) i the “OFF” position
and adjust the lock nut (ref. 11) so it is down against
the lever rod bracket (ref. 20).
a. Tighten nylock nut (ref. 12) up against the underside
of the lever rod bracket (ref. 20)
Drill 9/32" Hole
Right Handle
9.5
The Optional Remote Deflector - Part No. 706250
 Loading...