WARNING! Operate equipment
only when in direct sight.
WARNING! Trapping, crushing
or entanglement danger
whilst operating windlass
manually or under power.
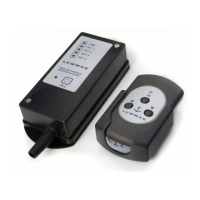
5.1 Transmitter function
• NOTE: Transmitters supplied in the
kit are already pre-programmed to
the receivers.
• Press the ON button for 2 seconds,
the LED will light. Release the
button and the LED will blink
slowly indicating the transmitter is
operational but not transmitting a
signal.
• When an operation button is pressed
the LED will blink quickly indicating
it is sending a signal. When released
the LED will blink slowly.
• Transferring from one operating
button to the opposite (UP to DOWN
or LEFT to RIGHT) has a standard
1.5 second delay. Simultaneous use
of NON opposite buttons is allowed
(4 channel unit only).
• The transmitter will switch off
automatically after 2 minutes if not
used.
5.2 Receiver function
• When power is applied, the green
LINE LED lights up. After 1 second
the red PROG LED lights up as well.
• The red PROG LED keeps lit for
15 seconds. This is the time the
receiver is ready to accept a new
transmitter code and memorize it.
• When an operation button on the
transmitter is pressed a yellow OUT
LED on the receiver will light up
corresponding to action requested.
5.3 Programming additional
transmitters to the receiver
• To add a new transmitter to a device
you already use follow these steps:
1. Apply power to receiver, press the
PROG button until the red LED
lights and release, you will have 15
seconds to programme to receiver
2. Press the new transmitter ON button
for 2 seconds until the LED blinks.
3. Press the bottom left (OUT 1) button
and hold.
5. Operation
4. Press the receiver PROG button.
5. Release the button on the
transmitter.
6. If the code has been accepted the
receiver’s red PROG LED will blink 4
times and then turns off to confi rm
programming.
7. Check the new transmitter functions
correctly.
• It is possible to store up to 5
transmitters at the same time, when
the memory is full any additional
transmitters will overwrite the fi rst
code the receiver had programmed
in its memory.
5.4 Battery replacement
WARNING! Isolate the
windlass/thruster using
circuit breaker/isolator.
• Unscrew the 6 screws on the
transmitters rear cover and carefully
remove.
• Replace batteries with 2 x 1.5V AAA
Alkaline batteries taking care not to
drop the circuit board and batteries.
Check the batteries polarity match
the + and – markings on the board.
• Reposition the rear cover and screw
tight taking care not to over tighten
the screws.
5.5 Troubleshooting
Windlass/thruster not working.
• Is the transmitter switched?
• Does the transmitter blink when
operation button pressed. If not
change the batteries.
• Move the transmitter closer to the
receiver.
• Check installation.
• Follow troubleshooting instructions
in windlass/thruster manual.
Dis
cover other anchors & docking on our website.
 Loading...