EasyManua.ls Logo

Lewmar 3 - User Manual

Lewmar 3
5 pages
Print Icon
To Next Page IconTo Next Page
Loading...
Lewmar 3 & 5 Button Wireless Remote Control
66300103 Issue 1
GB
Owner’s Installation
WARNING! This manual forms
part of the product and MUST
BE kept with boat documents.
To the best of our knowledge, the
information in this manual was correct
when it went to press. However,
Lewmar cannot accept liability for
any inaccuracies or omissions it may
contain. In addition, our policy of
continuous product improvement may
change specifi cations without notice.
As a result, Lewmar cannot accept
liability for any differences between
the product and the manual.
Thank you for purchasing a Lewmar
Wireless remote control kit.
Simple to Install in new installations
and retro-fi t.
Compatible with all Windlasses
operated by a contactor.
Compatible with TT Thruster
installations.
Watertight key-fob Transmitter unit
Control from multiple transmitter
units.
1.1 Product support
Lewmar products are supported by a
worldwide network of distributors and
Authorised Se
rvice Representatives. If
you encounter any diffi culties with this
product, please contact your national
distributor, or your local Lewmar
dealer.
1.2 CE & FCC Approvals
For CE approval certifi cates contact
Lewmar.
This device complies with part 15 of
the FCC Rules. Operation is subject to
the following two conditions:
1. This device may not cause harmful
interference.
2. This device must accept any
interference received, including
interference that may cause
undesired operation.
1.3 Important information
about this manual
Throughout this manual, you will see
safety and product damage warnings.
You must follow these warnings
carefully to avoid possible injury or
damage.
The type of warnings, what they look
like, and how they are used in this
manual are explained as follows:
WARNING! This is a warning against
anything which may cause injury to
people if the warning is ignored. You
are informed about what you must or
must not do in order to reduce the
risk of injury to yourself and others.
SAFETY SYMBOL. When you see
the safety symbol it means:
“Do not...”; “Do not do this”;
or “Do not let this happen”.
1. Introduction
WARNING!
IMPORTANT: Read these notes
before continuing.
2.1 Wireless remote general
Please ensure that you thoroughly
understand the operation and safety
requirements of the wireless remote
control system and the units operated
before commencing the installation.
Windlasses and Thrusters are powerful
devices. Accidental or improper
operation can cause personal injury or
damage to boat and property.
Please read the following precautions
to limit the risk of accidental operation.
The operator should always have
a clear view of the windlass when
operating.
Insure all people on board are a safe
distance from the Windlass, rode
and anchor before operating.
The wireless transmitter should
be kept in its cradle or other
protected place when not in use. The
transmitter should never be placed
in a pocket or other location where
accidental unintended operation is
possible.
Windlass and Thruster system
should always be switched off at the
breaker panel or isolator when not in
use to prevent unintended operation.
Do not operate if under the infl uence
of drugs or alcohol.
Consult your Windlass and Thruster
manual for other operational
precautions.
DO NOT use the wireless remote
control system for any other purpose
than those described in this manual.
2. Safety Notices
Question and Answer IconNeed help?

Do you have a question about the Lewmar 3 and is the answer not in the manual?

Summary

Owners Installation

Product Support

Information regarding worldwide support network and authorized service representatives.

CE & FCC Approvals

Details on obtaining CE approval certificates and FCC compliance information.

Safety Notices

Wireless Remote General Safety

Important safety precautions for operating wireless remote controls with powerful devices like windlasses.

Installation

Basic Requirements for Installation

Lists essential tools and components required for the installation of the wireless remote kit.

Wireless Remote Kit Components

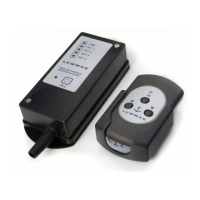
Details the contents of the 5-button and 3-button wireless remote kits, including transmitters and accessories.

Receiver Location and Placement

Guidance on selecting a suitable, dry, and accessible location for the receiver, away from interference.

Connecting the Optional External Antenna

Instructions for connecting an external antenna to the receiver unit for improved signal reception.

Electrical Wiring

Electric Cable Selection Guidance

Recommendations for selecting electrical cable that meets relevant standards and codes of practice.

Receiver Wiring Diagram and Notes

Illustrates the typical wiring diagram for the receiver and provides essential connection notes and warnings.

Operation

Transmitter Functionality

Describes how the wireless transmitter operates, including LED indicators and signal transmission.

Receiver Functionality

Explains how the receiver indicates activity, including LED status for power, programming, and output.

Programming Additional Transmitters

Step-by-step guide on how to add new transmitters to the receiver's memory.

Battery Replacement Procedure

Instructions for safely replacing batteries in the wireless transmitter unit.

Troubleshooting Common Issues

Provides solutions for common problems such as the windlass/thruster not working.

Overview

This document describes the Lewmar 3 & 5 Button Wireless Remote Control, model 66300103 Issue 1, an owner's installation manual for a wireless remote control system designed for marine applications.

Function Description:

The Lewmar Wireless Remote Control kit provides a convenient and safe way to operate marine equipment such as windlasses and thrusters from a distance. It is designed for both new installations and retro-fitting into existing systems. The system consists of a receiver unit and one or more watertight key-fob transmitter units. The receiver is compatible with all windlasses operated by a contactor and with TT thruster installations. The remote control allows for activation of specific functions (e.g., UP/DOWN for windlass, LEFT/RIGHT for thruster) through dedicated buttons on the transmitter. The system is designed to enhance operational safety by allowing the operator to maintain a clear view of the equipment during use.

Important Technical Specifications:

  • Receiver/Transmitter Models:
    • 2 & 4 Channel (Receiver): Supply 10 to 30 Vdc, Frequency 433.92 MHz, Protection Rating IP65, Operating Temperature 0 to +70 °C (32 to 158 °F), Maximum Load 3 A.
    • 68001005 (3-button transmitter): Supply 2 x 1.5 V AAA Alkaline batteries, Frequency 433.92 MHz, Protection Rating IP66.
    • 68001006 (5-button transmitter): Supply 2 x 1.5 V AAA Alkaline batteries, Frequency 433.92 MHz, Protection Rating IP66.
  • Power Supply (Receiver): 10-31 Vdc, 3 A.
  • Outputs (Receiver): The receiver is supplied with 2 or 4 relay outputs, each with one or two common contacts. The common contact must be connected to either the positive or negative pole, depending on the polarity of the connected load. A 3A fuse must be fitted to prevent overload due to short circuits.
  • Transmitter Batteries: 2 x 1.5V AAA Alkaline batteries.
  • Wireless Range: The manual does not specify a maximum range, but emphasizes keeping the transmitter closer to the receiver for optimal performance.
  • Approvals: CE & FCC Part 15 compliant.

Usage Features:

  • Simple Installation: Designed for ease of installation in both new and existing setups.
  • Multi-Transmitter Capability: The system supports control from multiple transmitter units. Up to 5 transmitters can be stored in the receiver's memory. If the memory is full, adding a new transmitter will overwrite the oldest stored code.
  • Transmitter Operation:
    • To activate the transmitter, press the ON button for 2 seconds. The LED will light up, then blink slowly, indicating it is operational but not transmitting.
    • When an operation button (e.g., UP, DOWN, LEFT, RIGHT) is pressed, the LED blinks quickly, signaling transmission. Upon release, it returns to a slow blink.
    • A 1.5-second delay is incorporated when switching between opposite operating buttons (e.g., UP to DOWN). Simultaneous use of non-opposite buttons is allowed on 4-channel units.
    • The transmitter automatically switches off after 2 minutes of inactivity to conserve battery life.
  • Receiver Operation:
    • Upon power application, the green LINE LED lights up, followed by the red PROG LED after 1 second. The red PROG LED remains lit for 15 seconds, indicating the receiver is ready to accept a new transmitter code.
    • When an operation button on the transmitter is pressed, a yellow OUT LED on the receiver illuminates, corresponding to the requested action.
  • Programming Additional Transmitters: A straightforward process involves applying power to the receiver, pressing the PROG button until the red LED lights, then pressing the new transmitter's ON button for 2 seconds, followed by the bottom left (OUT 1) button, then the receiver's PROG button. The receiver's red PROG LED will blink 4 times to confirm successful programming.
  • Safety Precautions:
    • The manual stresses the importance of reading all safety notes before installation and operation.
    • Windlasses and thrusters are powerful devices, and accidental or improper operation can cause injury or damage.
    • Operators must always have a clear view of the windlass when operating.
    • All people on board must be at a safe distance from the windlass, rode, and anchor before operation.
    • The wireless transmitter should be stored in its cradle or a protected place when not in use to prevent accidental activation. It should never be placed in a pocket or other location where unintended operation is possible.
    • The windlass and thruster system should always be switched off at the breaker panel or isolator when not in use.
    • Do not operate under the influence of drugs or alcohol.
    • The wireless remote control system should only be used for its intended purpose.
    • It is recommended that the wireless control system not be the sole control medium; deck/rocker switches for windlasses and TT control panels for thrusters should also be installed.

Maintenance Features:

  • Battery Replacement:
    • Requires unscrewing 6 screws on the transmitter's rear cover.
    • Replace with 2 x 1.5V AAA Alkaline batteries, ensuring correct polarity.
    • Care must be taken not to drop the circuit board and batteries during replacement.
    • Reposition the rear cover and screw tightly, avoiding overtightening.
  • Troubleshooting:
    • If the windlass/thruster is not working, check if the transmitter is switched on and if its LED blinks when an operation button is pressed. If not, replace the batteries.
    • Move the transmitter closer to the receiver.
    • Check the installation wiring.
    • Refer to the windlass/thruster manual for further troubleshooting.

Lewmar 3 Specifications

General IconGeneral
BrandLewmar
Model3
CategoryRemote Control
LanguageEnglish

Related product manuals