ENGLISH
14
Enclosure Installation Guide
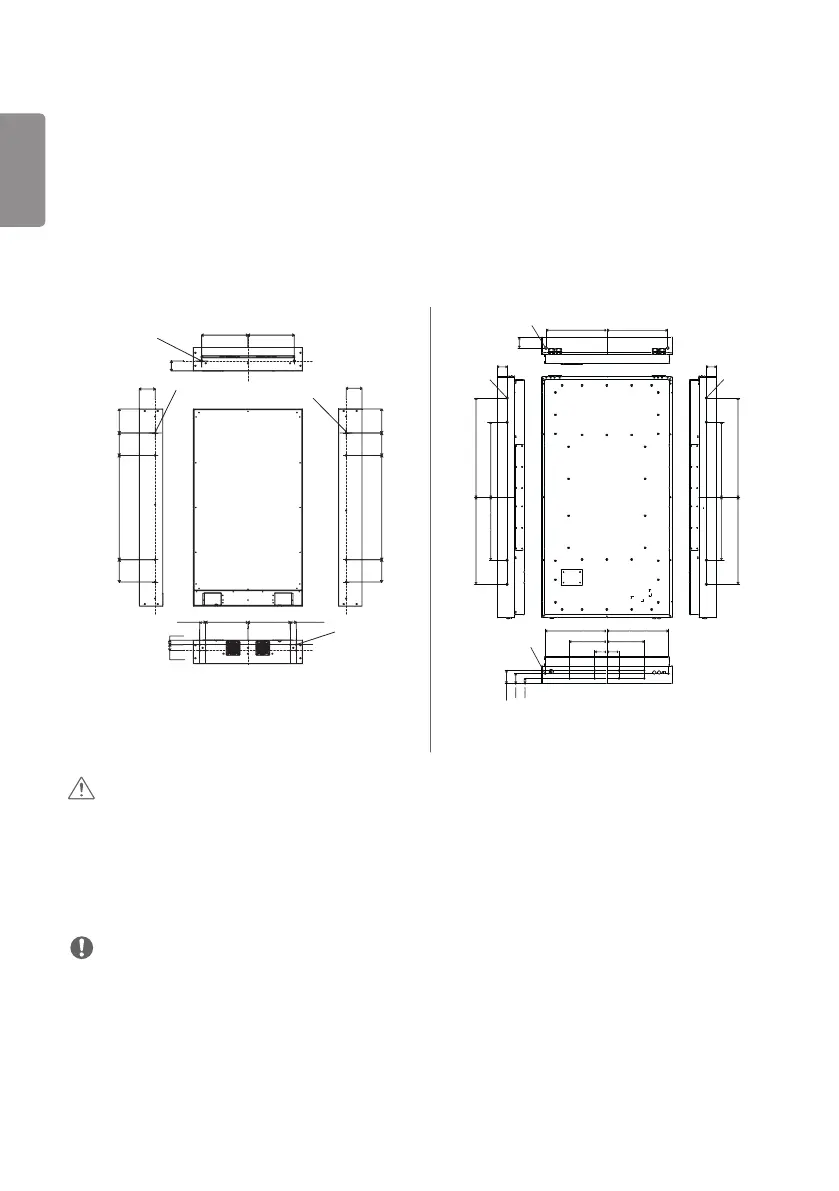
Fixing the Panel Screw Holes
Use the side screw holes when mounting the panel.
• Side screw hole
- 55XE3C: M8, Torque - 17 Kgf to 27 Kgf (Bottom side: 8 holes, Left, Right Sides: each of 4 holes)
- 75XE3C: M10, Torque - 17 Kgf to 27 Kgf (Bottom side: 10 holes, Left, Right Sides: each of 4 holes)
• Please use the 18.0mm (0.7inches) to 25.0mm (0.9inches) screws.
(Unit: mm(inches))
4-Ø8.0(0.31) Mounting Hole
4-Ø8.0(0.31) Mounting Hole
2-Ø10.0(0.39) Lifting Hole
8-Ø8.0 (0.31) Mounting
Hole
108.1(4.2)
164.7(6.4)
152.4(6.0)
711.2(28.0)
152.4(6.0)
108.1(4.2)
164.7(6.4)
152.4(6.0)
711.2(28.0)
152.4(6.0)
316.0
(12.4)
316.0
(12.4)
40.0(1.5)
40.0(1.5)
30.6(1.2)
289.2(11.3) 289.2(11.3)
40.0(1.5)
67.8
(2.6)
4-M10(0.3)
Mounting Hole
4-M10(0.3)
Mounting Hole
2-M16(0.6) Lifting Hole
503(19.8)
10-M10(0.3) Mounting Hole
503(19.8)
89.5
(3.5)
80.5(3.1)
820
(32.2)
720
(28.3)
620(24.4)
520(20.4)
80.5(3.1)
820
(32.2)
720
(28.3)
620(24.4)
520(20.4)
509(20.0)
509(20.0)
309(12.1) 309(12.1)
100(3.9)
100(3.9)
105.5
(4.1)
79.5(3.1)
39.5(1.5)
55XE3C 75XE3C
CAUTION
• Disconnect the power cord before moving or installing the monitor to avoid risk of electric shock.
• If you install the monitor on a ceiling or slanted wall, it may fall and result in injury. The product should be installed by
a professional installation company specified by the retail store.
• Do not over tighten the screws as this may damage the monitor and void your warranty.
• Any damage or injuries caused by misuse or use of improper accessories are not covered by the warranty.
NOTE
• Be sure to use the correct length.