This document is an owner's manual for the LG LSW440B Wall Mounting Bracket. It provides detailed instructions for installation, safety guidelines, and product specifications.
Function Description:
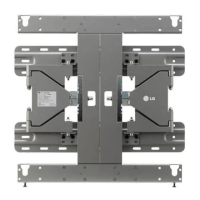
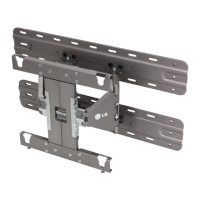
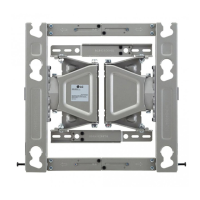
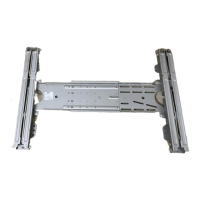
The LG LSW440B is a wall mounting bracket designed to securely attach a display (TV) to a wall. It allows for the display to be mounted in a fixed position, with some minor adjustments for leveling. The bracket is intended for use by trained and experienced installers to ensure safe and proper installation. It supports mounting on various wall types, including masonry walls (concrete, light concrete, natural stone, masonry brick, hollow block) and wooden stud walls. The design incorporates features to manage cables and protect the display from impact against the wall.
Important Technical Specifications:
The manual provides detailed dimensions and weight specifications for the wall mount, both with and without the bracket attached.
- Model Name: LSW440B
- Dimensions (without bracket removed):
- Width: 440 mm
- Height: 450 mm
- Depth: 14 mm
- Weight: 3.5 kg
- Weight with packing: 4.7 kg
- Dimensions (with bracket attached):
- Width: 460 mm
- Height: 450 mm
- Depth: 20 mm
- Weight: 5.2 kg
- Weight with packing: 6.4 kg
- Wall Mount VESA Specification: 400 x 400
- Max. UL Load Capacity: 50 kg
- Pull Out Load Capacity (Masonry Wall): 70 kgf (686 N) or above per fixated location
- Shear Load Capacity (Masonry Wall): 100 kgf (980 N) or above per fixated location
- Adjustability:
- Leveling adjustment: ± 10 mm
- Rotation (with bracket removed): 12 ± 2°
- Rotation (with bracket attached): 15 ± 2°
- Required Tools for Installation: Phillips head (+) driver (manual or motorized), 8 mm socket wrench, Level, Stud finder, Drill.
- Drill Bit Specifications:
- Wood (or steel): Ø 4 mm drill bit
- Concrete: Ø 8 mm drill bit
Usage Features:
The manual outlines a step-by-step installation process, emphasizing safety and precision.
-
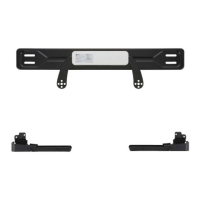
Fixating the Mounting Bracket on the TV:
- Involves attaching wall mount screws, guide spacers, and guide spacer screws to the TV's mounting holes.
- Screws should be inserted into the two top holes of the TV and tightened until the set, guide spacer, and screw are fully pressed against one another.
- If screws do not tighten fully, recheck assembly depth or consult the technical service manual.
-
Attaching to Masonry Walls:
- Requires checking wall material and thickness.
- Use specified anchors for concrete, light concrete, natural stone, masonry brick, and hollow block.
- Drill holes with an Ø 8 mm drill bit to a depth of 80-100 mm.
- Clean drilled holes and insert sealed anchors using a hammer.
- Align the wall mount with the holes, ensuring the angle adjusting part faces upward.
- Tighten wall mount bolts to a torque of 45-60 kgf/cm.
- For easier installation on masonry walls, the 8 screws connecting the wall mount to the wall bracket can be separated.
-
Mounting to Wooden Studs:
- Requires locating and marking the centers of wall studs using a stud finder.
- Align the wall bracket with the stud center and mark screw locations.
- Use a level to ensure screw marks are level.
- Drill holes with an Ø 4 mm drill bit to a depth of 76 mm or above.
- Clean drilled holes and tighten wall mount screws until the wall, wall bracket, and wall mount screw are pressed against one another (caution advised to avoid drywall damage from excessive force).
- Use a "+" driver (manual or motorized) or 8 mm wrench for tightening.
-
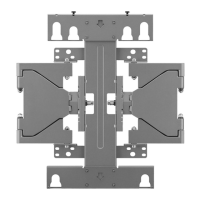
Assembling the Wall Mount Support and Display:
- Requires two or more people for installation.
- Set the display with the guide spacer onto the wall mount bracket, aligning the bottom assembly part and lifting lightly to align the top.
- Assemble the provided safety clip to prevent movement and tighten the safety clip screw completely. Failure to do so can cause the product to fall.
- Pull on the bottom of the set to ensure security.
- When fixing with a speaker, hold and lift the product, not the speaker.
- If rotating the display, only rotate 90 degrees (portrait mode).
- Maintain a certain distance from the wall to avoid excessive force on cables or accessories.
-
Leveling the Display:
- After installation, check the display's level.
- The wall mount has two screws for minor leveling adjustments (± 10 mm).
-
Cable Arrangement and Set Protection Cushion:
- Arrange cables as shown in the picture, using cable banding devices to hold them together.
- Attach the set protection cushion to mitigate impact between the wall and the set when adjusting the angle.
- Ensure power cords and cables are not crushed between the wall mount and the wall.
Maintenance Features:
The manual emphasizes proper installation and handling to ensure the longevity and safety of the product.
- Regular Checks: Periodically check that screws are tight against the wall, but do not overtighten.
- Cleaning: Do not wipe the product with a wet towel.
- Environmental Considerations: Do not install the product near heaters, humidifiers, vibrating objects, high voltage power cables, or power sources.
- Professional Installation: Strongly recommends installation by a trained and experienced installer designated by the retailer. This is crucial for safety and to prevent damage or injury.
- Moving/Replacing: If the wall mount needs to be moved or replaced, use a trained and experienced installer.
- Cable Management: Never hang power or signal cables on the rear side of the TV, as this can damage the cord and cause fire, electric shock, or product damage.
- Accessory Use: Only use attachments/accessories specified by the manufacturer.
- Safety Clips: Ensure safety clips are fully tightened to prevent the product from falling.
- Load Capacity: Do not install a TV that exceeds the weight restrictions of the wall mount.
- Tool Safety: Be careful with tools during installation to prevent accidents or damage.
- Children Safety: Keep included accessories out of reach of babies or children to prevent suffocation or swallowing hazards.