Manual de instalación
19
ESPAÑOL
Establecimiento de la E.S.P (External Static Pressure, Presión estática externa)?
Establecimiento de la E.S.P (External Static Pressure, Presiónestática externa)?
Preheat
ZONE
Operation unit Program set
Room Temp
MED
LO
AUTO
JET
Heater
Defrost
Filter
Humidify
Out door
Timer
On
Set no. Time
Off
01 03 05 07 09 11 13 15 17 19 21 23
1234
OPERATION
FAN SPEED
SUB FUNCTION
SET TEMP
HI
AUTO SWING
Time
Preheat
ZONE
Operation unit Program set
Room Temp
MED
LO
AUTO
JET
Heater
Defrost
Filter
Humidify
Out door
Timer
On
Set no. Time
Off
01 03 05 07 09 11 13 15 17 19 21 23
1234
OPERATION
FAN SPEED
SUB FUNCTION
SET TEMP
HI
AUTO SWING
Time
Time
SUB FUNCTION
SET TEMP
OPERATIONAUTO SWING
Preheat
ZONE
Operation unit Program set
Room Temp
MED
LO
AUTO
JET
Heater
Defrost
Filter
Humidify
Out door
Timer
On
Set no. Time
Off
01 03 05 07 09 11 13 15 17 19 21 23
1234
FAN SPEED
HI
Time
SUB FUNCTION
SET TEMP
OPERATIONAUTO SWING
Preheat
ZONE
Operation unit Program set
Room Temp
MED
LO
AUTO
JET
Heater
Defrost
Filter
Humidify
Out door
Timer
On
Set no. Time
Off
01 03 05 07 09 11 13 15 17 19 21 23
134
FAN SPEED
HI
2
Timer
1
2
3
5
4
Timer
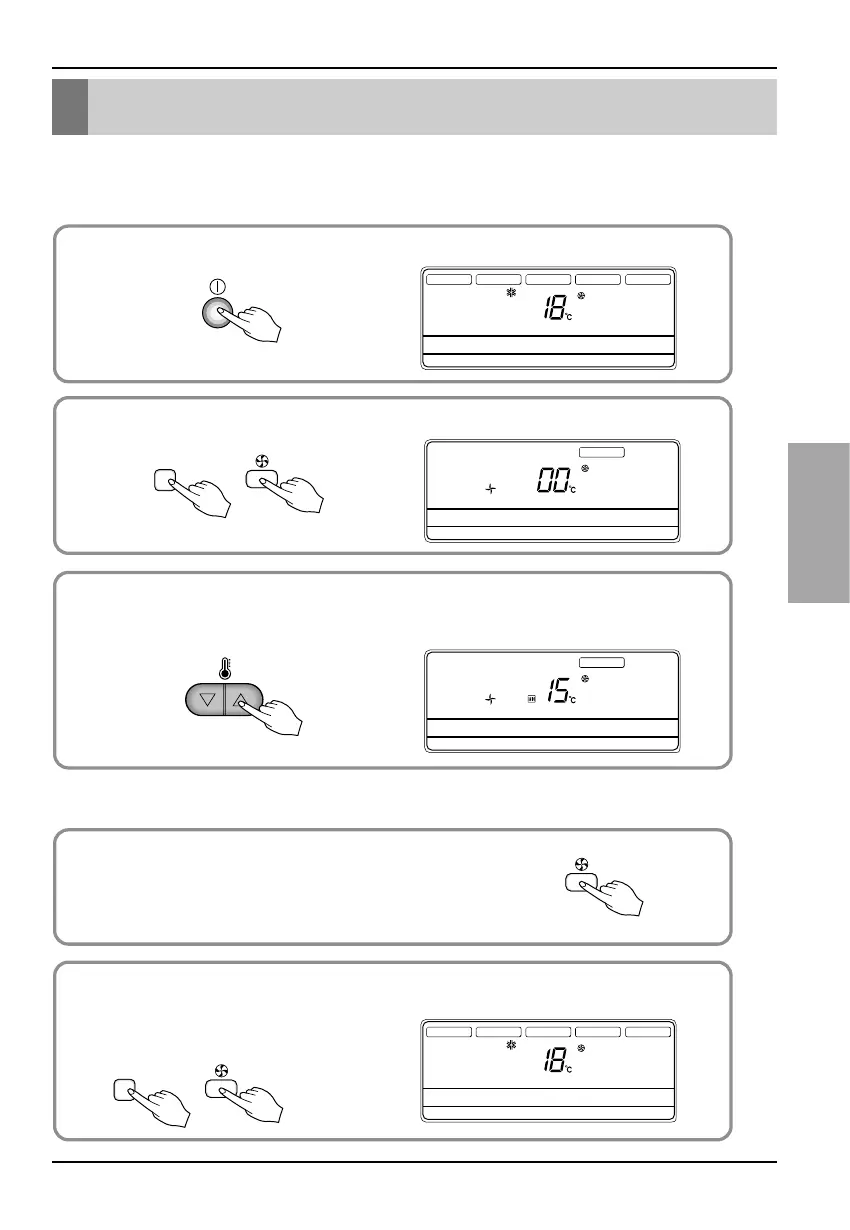
Cambio de RPM:
Ex) La presión estática externa es de 1mmAq para el modelo "9k".
• Al producir la unidad, el compresor se diseñó para estar apagado durante la configuración
de la E.S.P.
Pulse el botón “On/Off”.
La unidad comenzará a funcionar.
Pulse los botones “Timer” (Reloj) y “Wind” (Ventilación) a la vez durante más de 3 segundos.
Pulse el botón “Up” (más) o “Down” (menos) para ajustar la presiónestática externa.
Establezca el número que desea.
(Enesteejemplo,elnúmero es “215”.)
Cambie el modo de velocidad del ventilador pulsando el botónde
velocidad del ventilador.
A continuación, establezca los números de los pasos siguientes
repitiendo la fase3.
(Enesteejemplo,losnúmeros son “235” y “250” respectivamente)
Pulse los botones “Timer” (Reloj) y “Wind” (Ventilación) a la vez durante más de 3 segundos.
A continuación, Wind Data (Datos del ventilador) se memorizan en el PCB principal.
Nota: el intervalo de selecciónabarcade1a254.Comoelvisorsólo muestra dos dígitos, si el
intervalo de selección es superior a 100, el tercer dígito aparecerá en la pantalla de la siguiente
forma.