Due to our policy of continuous product innovation, some specications may change without notication.
©LG Electronics U.S.A., Inc., Englewood Cliffs, NJ. All rights reserved. “LG” is a registered trademark of LG Corp.
17
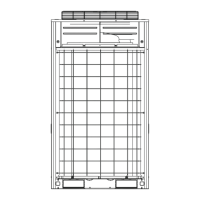
Outdoor Unit Functions
OTHER CONTROLS
Initial Setup
There are four (4) initial setup steps before operation can begin. All DIP switch settings must be completed before initial setup.
Step 1
Factory set value is displayed on the PCB LED for twenty-four (24) seconds.
Turn power on.
Code for the Master outdoor unit is
displayed for three (3) seconds.
Code for the Slave 1 outdoor unit is
displayed for three (3) seconds.
Code for the Slave 2 outdoor unit is
displayed for three (3) seconds.
Total system capacity is displayed for two
(2) seconds.
System type is displayed (2 is default).
• Heat Pump = 2
• Heat Recovery = 3
Electrical requirements are displayed.
• 208 = 22
• Heat Recovery = 46
Model Type.
14
12
10
36
2
46
1
Step 2
Communication Check: If display follows all sequences as shown above, the communication between the Master and Slave outdoor units
is normal. If the LED shows Error Code 104*, check the DIP switch settings and the communication cables between the Master and Slave
outdoor units.
Step 3
PCB Error Check: Error check will begin after forty (40) seconds.
Master / Slave unit
• All errors of all the units (including Slave) will be shown on the LED.
• If communication between main PCB and inverter PCB isn’t correct, Error Code 52* will be seen on the LED.
• If communication between main PCB and fan PCB isn’t normal, Error Code 105* will be seen on the LED.
• If any errors are displayed, check corresponding wires / cables.
Initial Setup