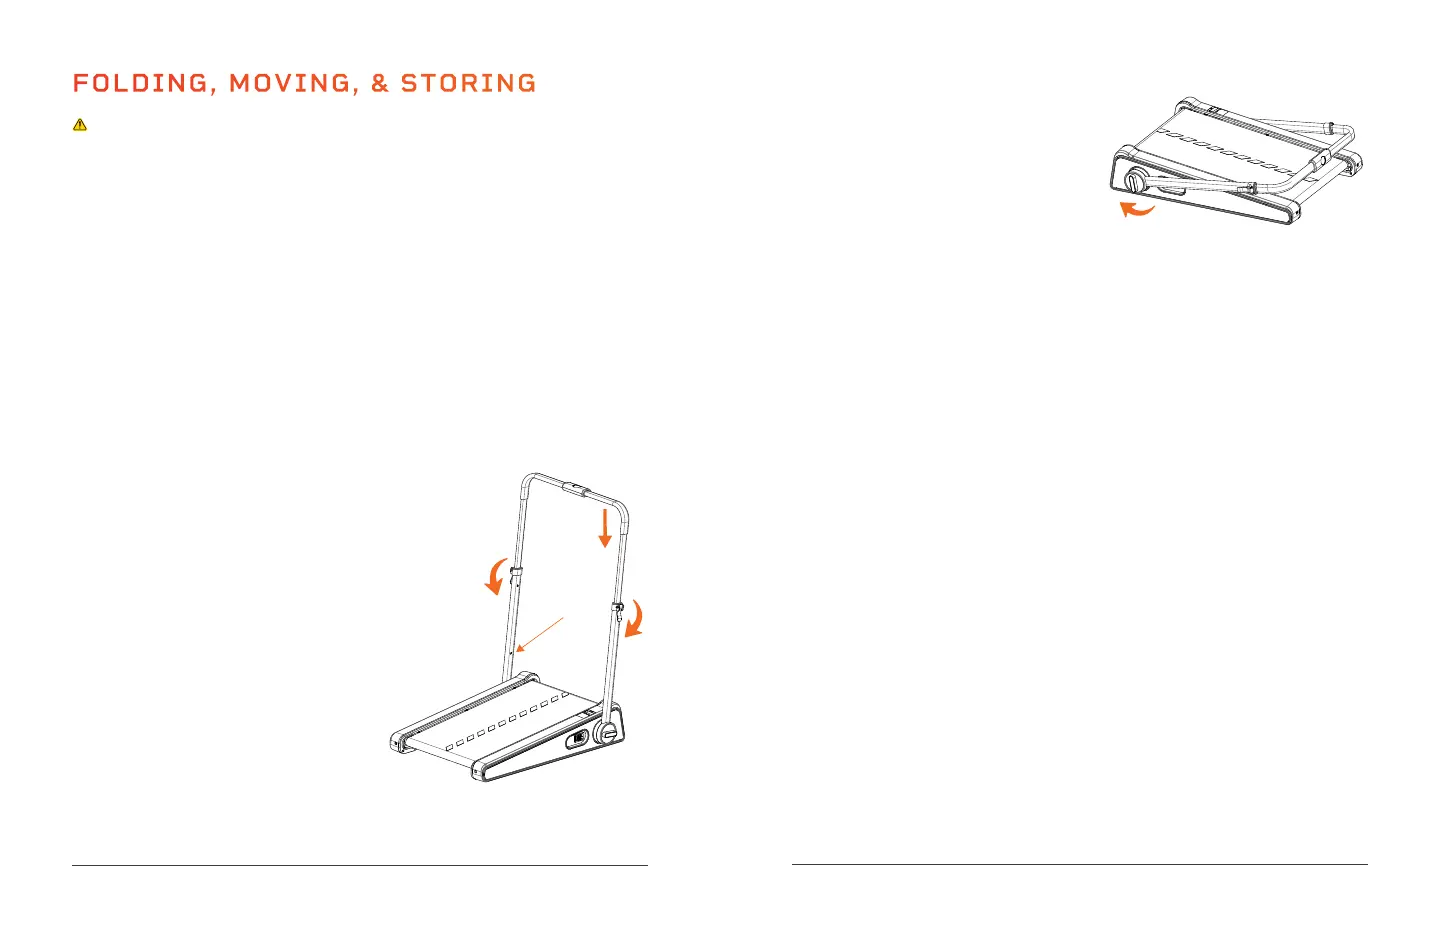
STEP 4 FOLD THE HANDLEBAR FRAME
1. Rotate the left and right locking
knobs counterclockwise.
2. With both locking knobs loosened,
pull the handlebar frame down
towards the back of the treadmill.
3. Tighten the locking knobs by turning them clockwise.
STEP 5 CHECK AND READY FOR STORAGE
1. Check to ensure that the treadmill is securely locked in the folded
position before moving or storing it.
2. The treadmill can now be moved and stored out of the way.
MOVING THE TREADMILL
The PacerMini Pro has wheels on the front of it to make it easier to move.
To move the treadmill:
1. Fold up the treadmill as instructed on the previous page. Ensure that
the power cord and all accessories are removed.
2. Grab the back of the treadmill and lift it onto the transport wheels at
the front of the treadmill.
3. The treadmill can now be easily rolled to its new location.
STORING THE TREADMILL
It’s best to store the treadmill flat in a closet, or under a bed, table, or
desk. Take care not to place any heavy objects on top of the treadmill.
• Never store the treadmill on its side as it can easily tip and fall.
• Store the magnetic safety key separately to prevent unauthorized use,
especially by children.
• Store in a cool, dry, indoor location.
• Do not store in direct sunlight, in a high-temperature or high-moisture
environment, or near heat sources.
FOLDING, MOVING, & STORING
CAUTION
• Always power OFF the treadmill at the Power switch and unplug the
power cord before folding, moving, storing, or setting up.
• Never allow children to fold, set up, or move the treadmill.
• Always ensure there are no children, pets, or objects in the way when
moving the treadmill.
• Never operate the treadmill in its folded state.
• Children must never climb on or play near the folded treadmill.
• Never store the treadmill on its side as it can easily tip and fall.
• Store the magnetic safety key separately to prevent unauthorized use,
especially by children.
FOLDING THE TREADMILL
STEP 1 TURN OFF POWER
1. Flip the Power switch at the
front of the treadmill to the OFF
position.
2. Unplug the power cord from the
electrical outlet.
STEP 2 REMOVE ACCESSORIES
1. Remove the remote control,
remote control holder, and safety
key from the handlebar.
2. Remove the power cord.
STEP 3 LOWER THE HANDLEBAR
1. Lift each latching lever.
2. Push the two metal adjustment
buttons into the adjustment holes
on the handlebar frame and push
down on the handlebar until it is in
the lowest position.
3. Press down the latching levers.
18 PacerMini Pro User Manual Lifepro Endurance Training Collection 19