17
ADZ (x4)
AGH
AGI
ADZ
ADZ
AIQ
AGP
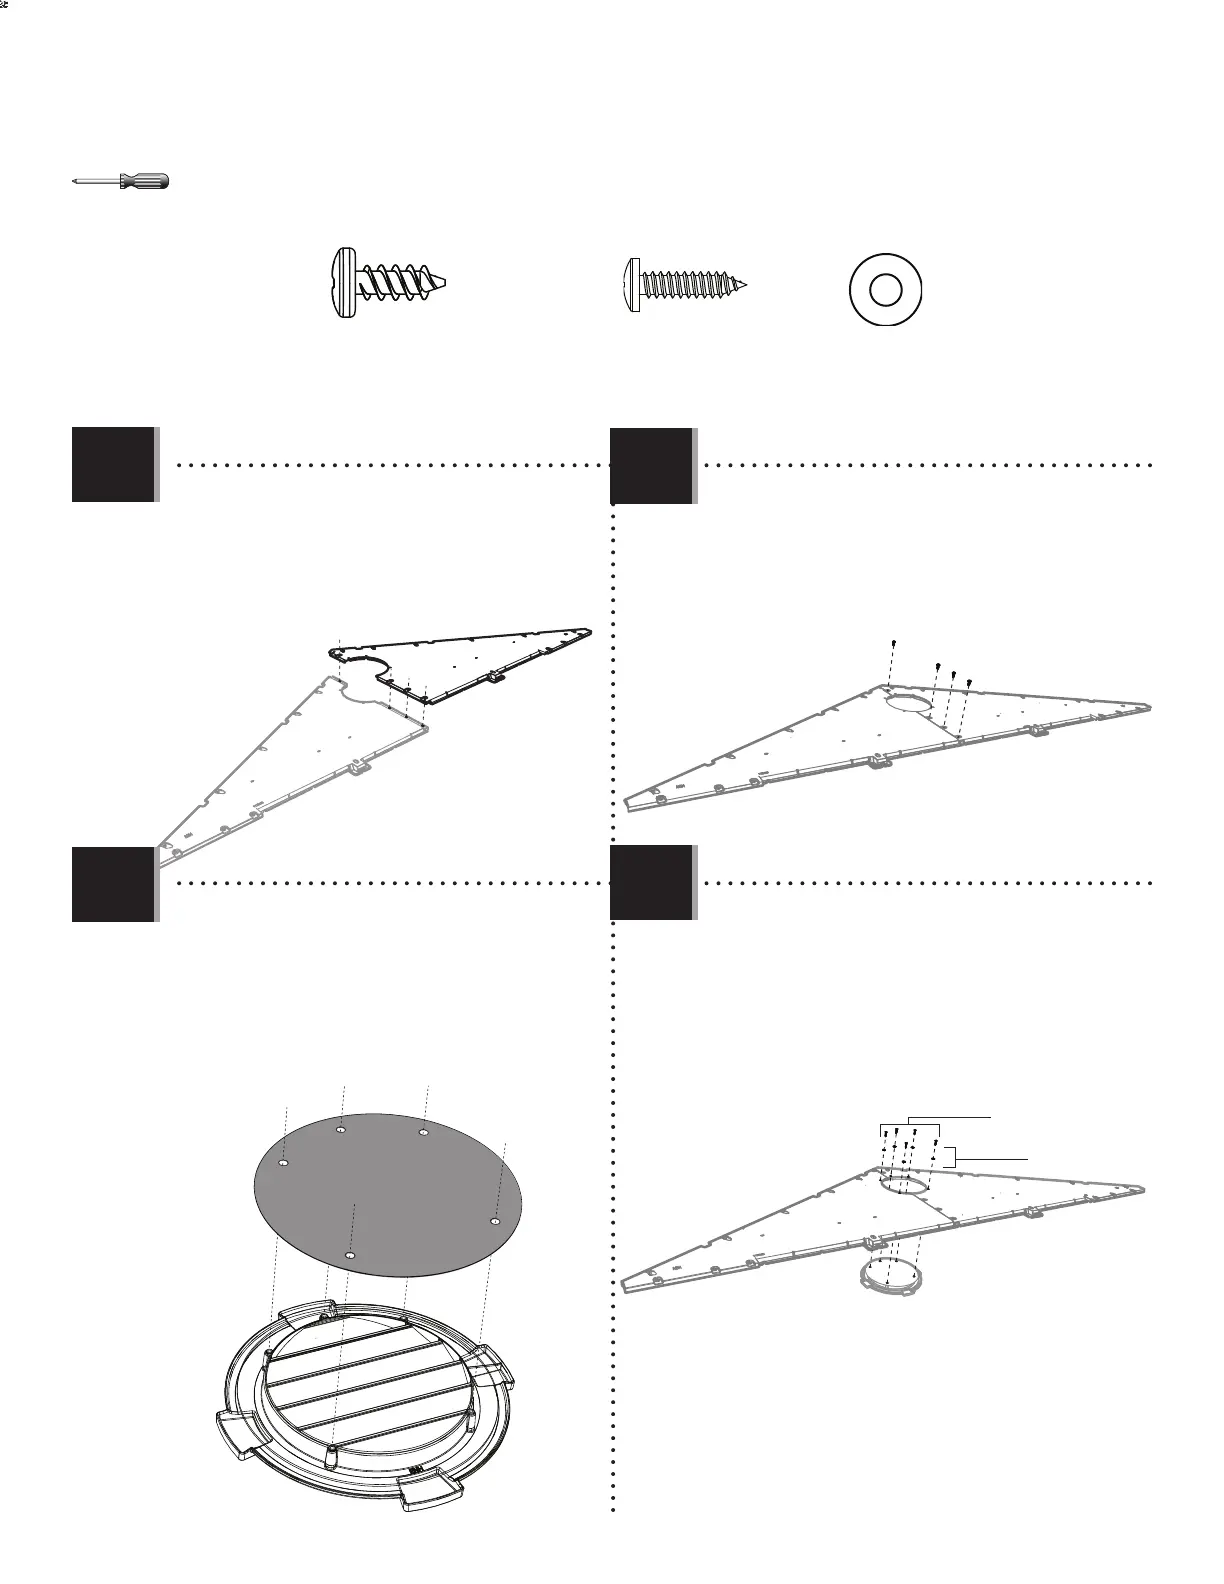
• Align the holes in the Left (AGH) and Right (AGI)
Rear Gable Halves.
• Alignez les trous dans les pignons gauche (AGH) et
droite (AGI).
• Alinee los agujeros en las fachadas traseras
izquierda (AGH) y derecha (AGI).
• Place the Screen (AIQ) over the Vent (AGP) and
align the fi ve holes in the Vent with those in the
Gable.
• Mettez la moustiquaire (AIQ) sur l’évent (AGP), et
alignez les cinq trous dans l’évent avec ceux du
toit à pignon.
• Coloque el mosquitero (AIQ) sobre la rejilla de
ventilación (AGP) y alinee los agujeros en la rejilla
con los de la fachada.
• Secure the two Gable Halves with four (4) Screws
(ADZ).
• Attachez l’un à l’autre à l’aide de quatre (4)
vis
(ADZ).
• Sujete el uno al otro usando cuatro (4) tornillos
(ADZ).
3.1
3.2
3.3
• If you have trouble with this section, follow the code below
to view a how-to video on this section.
• Si vous avez des problèmes avec cette section, suivez le
code en bas pour voir un vidéo sur l’assemblage dans cette
section.
• Si tiene problemas con esta sección, siga el código debajo
para ver un video sobre el ensamble en esta sección.
http://go.lifetime.com/8gable
L
I
FE
T
IME
©
TOOLS AND HARDWARE REQUIRED / OUTILS ET QUINCAILLERIE REQUIS / INSTRUMENTAL Y HERRAJE REQUERIDOS
X SECTION 3 (CONTINUED) / SECTION 3 (SUITE) / SECCIÓN 3 (CONTINUACIÓN)
ADZ (x4)
AGH
AGI
ADZ
ADZ
AIQ
ENH
• Align the holes in the Left (AGH) and Right (AGI)
Rear Gable Halves.
• Aligner les trous dans les demis pignons gauche
(AGH) et droit (AGI).
• Alinear los agujeros en las mitades de la fachada
trasera izquierda (AGH) y derecha (AGI).
• Align the fi ve holes in the Vent with those in
the Gable, and secure them with the hardware
included.
• Aligner les cinq trous dans l’évent avec ceux dans
le pignon, et fi xer-les à l’aide de la quincaillerie
incluse.
• Alinear los cinco agujeros en la rejilla con los de la
fachada, y sujetarlos con el herraje incluido.
• Place the Screen (AIQ) over the Vent (ENH) and align
the fi ve holes in the Vent with those in the Gable.
• Placer l’écran (AIQ) par-dessus l’évent (ENH) et
aligner les cinq trous dans l’évent avec ceux dans
le pignon.
• Colocar el mosquitero (AIQ) encima la rejilla de
ventilación (ENH), y alinear los cinco agujeros en la
rejilla con los de la fachada.
• Secure the two Gable Halves with four (4) Screws
(ADZ).
• Fixer les deux demis pignons à l’aide de quatre (4)
vis (ADZ).
• Fijar las dos mitades de la fachada con cuatro (4)
tornillos (ADZ).
3.1
3.2
3.3
3.4
ADW (x5)
AEE (x5)
ADW (x5)
AEE (x5)