EasyManua.ls Logo

Lifetime 60296 User Manual

Lifetime 60296
60 pages
To Next Page IconTo Next Page
Page #1 background imageLoading...
Page #1 background image
3D ANIMATION
OF THE FULL ASSEMBLY
WATCH
SCAN THE
CODE
OR SEARCH
1218184
Icon Legend................................4
Warnings & Notices.....................5
Parts Identifi er............................6
Floor & Wall Assembly..................8
Door Assembly..........................21
Lid Assembly............................33
Storage Shed Anchoring............48
Cleaning & Care........................54
Registration..........................55
Warranty.................................56
TOOLS REQUIRED TABLE OF CONTENTS
7/16" (11 mm)
1/2" (13 mm)
5/16" (8 mm) Wood Drill Bit
5/16" (8 mm) Masonry Drill Bit
Electric Drill Hammer Drill
CONTACT LIFETIME CUSTOMER SERVICE:
Call: 1-800-225-3865 (English)
7:00 am–5:00 pm (Monday–Friday) MST
and 9:00 am–1:00 pm Saturday MST
Live Chat: www.lifetime.com/instructions
(click on "LIVE CHAT" tab)
QUESTIONS?
MODEL# AND PRODUCT ID (both are needed when contacting us)
Model Number: 60296
Product ID:
BEFORE ASSEMBLY:
Assemble on a level surface
At least 3 people are recommended for setup
ITM./ART. 1900680
Pour le français, voir la page 2. Para el español, ver la página 3.
ASSEMBLY INSTRUCTIONS
MODEL #60091
HORIZONTAL
STORAGE SHED
MODEL 60296
FOR OUTDOOR DOMESTIC USE.
IMPORTANT, RETAIN FOR FUTURE REFERENCE: READ CAREFULLY.
For Customer Service in mainland Europe and the United Kingdom:
E-mail: cs@lifetimeproducts.eu
COPY
Question and Answer IconNeed help?

Do you have a question about the Lifetime 60296 and is the answer not in the manual?

Lifetime 60296 Specifications

General IconGeneral
BrandLifetime
Model60296
CategoryOutdoor Storage
LanguageEnglish

Summary

HORIZONTAL STORAGE SHED ASSEMBLY

BEFORE ASSEMBLY

Key preparatory steps before starting the shed assembly.

TOOLS REQUIRED

List of tools needed for the assembly process.

ICON LEGEND

WARNINGS & NOTICES

PARTS IDENTIFIER

FLOOR & WALL ASSEMBLY

HARDWARE REQUIRED

Hardware components needed for floor and wall assembly.

PARTS REQUIRED

Identification of plastic and metal parts for floor/wall sections.

Floor Panel Installation

Steps for laying out and connecting the floor panels.

Wall Panel Attachment

Instructions for attaching the first wall panels.

Support Tube Installation

Details on installing internal support tubes.

Final Floor Assembly Steps

Completing the floor structure with final connections.

DOOR ASSEMBLY

HARDWARE REQUIRED

Hardware components needed for door assembly.

PARTS REQUIRED

Identification of parts specific to the door assembly.

Lateral Support Channel

Attaching the lateral support channel to the door.

Hinge Installation

Attaching hinges to the door panels.

Door Attachment to Assembly

Final steps to attach the assembled doors to the shed.

LID ASSEMBLY & INSTALLATION

HARDWARE REQUIRED

Hardware components needed for lid assembly.

PARTS REQUIRED

Identification of parts specific to the lid assembly.

Lid Panel Preparation

Steps for preparing and aligning the lid halves.

Hinge and Crossbar Assembly

Installing hinges and crossbars for the lid.

Gas Spring Installation

Attaching the gas springs for lid support.

Final Lid Securing

Securing the lid assembly and adjusting the hasp.

STORAGE SHED ANCHORING

HARDWARE REQUIRED

Note that no specific hardware is included for anchoring.

SAFETY WARNINGS

Important safety precautions for anchoring the shed.

Anchoring Procedure

Step-by-step guide for anchoring the shed.
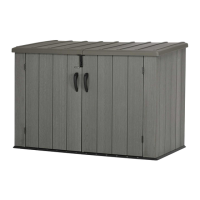
CLEANING & CARE

REGISTER YOUR PRODUCT ONLINE

LIMITED FACTORY WARRANTY

IMPORT INFORMATION

ENHANCE YOUR PURCHASE

Related product manuals