17
TOOLS AND HARDWARE REQUIRED / OUTILS ET QUINCAILLERIE REQUIS / HERRAMIENTAS Y HERRAJE REQUERIDOS
SECTION 3 (CONTINUED) / SECTION 3 (SUITE) / SECCIÓN 3 (CONTINUACIÓN)
3.4
3.5
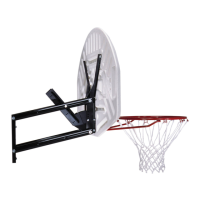
• Connect the rim (ALX) and plastic guard (ALD) to the backboard with the hardware
shown. Thread the jam nuts (AAV) all the way down on the U-bolt (BNP). On the
underside of the backboard, place steel spacers (ACS) onto the tap bolts (ABG),
and secure the nylock fl ange nuts (ABK) on to the tap bolts.
• Attachez l’anneau (ALX) et le recouvrement protecteur (ALD) au panneau
avec de la quincaillerie indiquée. Sur le revers du panneau, placez les
pièces d’écartement (ACS) sur les boulons tout fi leté (ABG) et ne serrer que
manuellement les écrous à bride nylock (ABK) sur les boulons.
• Coloque el aro (ALX) y el resguardo plástico (ALD) en el tablero usando los
elementos mostrados. En la parte trasera del tablero, coloque los espaciadores
de acero (ACS) en los pernos de toda rosca (ABG), y ajuste solamente a mano las
tuercas nylock con pestaña (ABK) en los blones de rosca entera.
• Insert the U-bolt (BNP) through the upper part of the opening on the backside of the backboard (AJI) as shown.
• Introduisez le boulon en « U » (BNP) dans la partie supérieure de l’ouverture sur le côté envers du panneau (AJI)
comme indiqué.
• Inserte la abrazadera de «U» (BNP) a través de la parte superior de la abertura en la placa de respaldo del tablero (AJI)
en la forma mostrada.
ACS (x2)
ABK (x2)
AAV (x2)
BNP
AJI
ALX
ALD
AAV
AAV
ABG
Underside view
Vue inférieure
Vista trasera
ABK
ABK
ACS
ABG
1/2"
(≈13 mm)