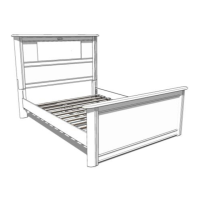
“Riviera” LightHeaded™ Bed
Assembly Instructions
www.LightHeadedBeds.com
Model #20197 Full size, Cheshire Cherry
Model #20327 Full size, Black
Model #20330 Full size, White
9/17/2015
1168346 B
Parts List
Part Description Quantity
EPX
Contains the hardware required to assemble your new Lightheaded Bed
1
EPJ
Metal Washer
8
EPK
Metal Lock Washer
8
EPL
Machine Screw
11
EPM
Wood Screw
24
CWT
Allen Wrench
1
EPN
LightHeaded™ Headboard—ships with LightHeaded™ lighting component kit
already installed
1
EQB
Caprail
1
EPO
Right Headboard Leg
1
EPP
Left Headboard Leg
1
EPQ
Footboard
1
EPR
Right Side Rail
1
EPS
Left Side Rail
1
EPT
Roll-Out Slats (12 pieces of wood connected with nylon straps)
1
EPV
Center Support Rail for Slats
1
EPW
Support Legs (Short and Long) for Center Support Rail
6
EPU
LightHeaded™ TechBox contains your remote control, power cord,
LightHeaded™ Lighting Instructions (for use and LightHeaded™ Image changing),
and most importantly your $20 LightHeaded™ Image gift coupon
1
Before you begin:
• Consider enlisting a family member or friend to help; it will make assembly easier,
faster, and more fun.
• Layout all of the parts listed below.
• Save all packing materials until assembly is complete to avoid accidentally
discarding smaller parts or hardware.
• You will need a Phillips head screw driver (not included)
Page 1