Rev: 02.03.2017
Page 5
Schwintek Bed Tilt Install Manual
Calibration
NOTE: The controller is not shipped in calibration mode. To enter calibration mode from normal mode,
hold down the configuration button for five seconds (Fig. 8A).
To calibrate the stops:
1. Flashing red LED indicates that the upward limit needs to be set (Fig. 8C).
2. Use the wall switch to move the unit to the desired top position (Fig. 9B).
3. When at the desired top position, press the configuration button (Fig. 8A).
4. The top limit is set.
5. Flashing green LED indicates that the downward limit needs to be set (Fig. 8B).
6. Use the wall switch to move the unit to its desired downward position (Fig. 9A).
7. When at the desired downward position, press the configuration button (Fig. 8A).
8. The downward limit is set.
9. Once the downward limit is set, both Red and Green LEDs will blink simultaneously for a moment (Fig.
8B; 8C).
10. Both limits have been set successfully.
NOTE: If an error occurs during this configuration, the Red and Green LEDs will quickly alternate flashing.
NOTE: To reset the stops, press and hold the configuration button for five seconds. This will allow the
system to enter calibration mode.
Fig. 9 - Switch
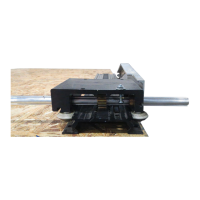
Fig. 8 - Controller
Motor Connector Port
Red LED (C)
Green LED (B)
Configuration
Button (A)
Down (A)
Up (B)