EasyManua.ls Logo

Little Tikes Island Wavemaker User Manual

Little Tikes Island Wavemaker
20 pages
To Next Page IconTo Next Page
Page #1 background imageLoading...
Page #1 background image
ASSEMBLY INSTRUCTIONS
Island Wavemaker
XIM651359-R1 - 1/21
1
Adult assembly required. Approx. assembly time: 30 min.
Look for video of assembly at
littletikes.com/videoinstructions
#651359M
2+
years
Question and Answer IconNeed help?

Do you have a question about the Little Tikes Island Wavemaker and is the answer not in the manual?

Little Tikes Island Wavemaker Specifications

General IconGeneral
BrandLittle Tikes
ModelIsland Wavemaker
CategoryToy
LanguageEnglish

Summary

Important Information and Warnings

General Safety Precautions

Essential safety guidelines and warnings for product use and assembly.

Parts Identification

Step 1: Install Drain Plug

Secure Drain Plug

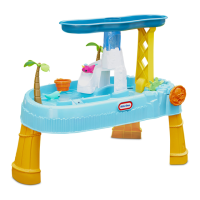
Insert and secure the drain plug using hands and pliers.

Step 2: Attach Legs

Secure Table Legs

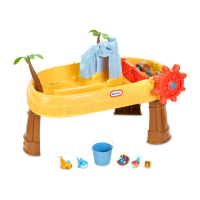
Insert and snap the three table legs into the tabletop.

Step 3: Install Crank Assembly

Connect Crank Mechanism

Insert and snap the crank assembly into the tabletop.

Step 4: Attach Paddle Covers

Attach Paddle Cover 2

Secure paddle cover 2 to the crank assembly using screws.

Attach Paddle Cover 1

Secure paddle cover 1 to the crank assembly, ensuring ridge faces outward.

Step 5: Install Steering Wheel

Mount Steering Wheel

Align and attach the steering wheel to the crank assembly axle.

Secure Steering Wheel Cap

Attach steering wheel cap and secure with a screw.

Step 6: Assemble Palm Trees

Attach and Mount Palm Trees

Snap palm tree tops onto bases and press into the table.

Step 7: Assemble Skull and Slide

Assemble Skull Components

Join skull front and back parts using screws.

Assemble Slide Components

Press slide top onto slide bottom and secure with screws.

Step 8: Mount Skull and Slide Assembly

Connect Skull/Slide to Table

Align and slide skull/slide assembly into table slots.

Step 9: Add Final Touches

Place Treasure Chest

Position treasure chest in designated areas.

Install Deck and Treasure Covers

Fit boat deck cover and treasure chest cover into openings.

Storage Instructions

Drain water and store parts inside the table when not in use.

Related product manuals