This document outlines the operation, maintenance, and troubleshooting for the Livoo Espresso Coffee Maker, model DOD174. This appliance is designed for household use and similar applications, such as staff kitchen areas, farmhouses, hotels, motels, and bed and breakfast environments.
Function Description
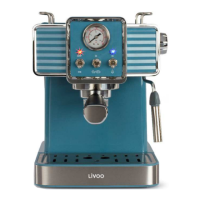
The Livoo Espresso Coffee Maker is designed to brew espresso coffee and froth milk for various coffee beverages. It features a water tank, a steam knob, a pressure gauge, and an on/off switch. The machine includes a steam tube for frothing milk, a cup holder tray, and a drip tray for convenience. It comes with two types of coffee filters: a standard coffee filter and a larger filter for ESE pods, allowing for flexibility in coffee preparation. The appliance is equipped with indicator lights (red for heating/coffee, blue for steam) to guide the user through different operational stages.
Usage Features
General Operation:
Before the first use, it is crucial to clean all removable parts and the internal conduits of the appliance. This involves filling the water tank, placing a mug under the coffee outlet, and running hot water through the system without coffee. For a more thorough initial cleaning, a 1:4 solution of vinegar and water or a descaling product can be used.
Brewing Espresso Coffee:
- Preparation: Ensure the appliance is placed on a stable, flat surface with the drip tray and cup holder tray installed. Fill the water tank with potable, fresh, cold water between the MIN and MAX marks.
- Filter Installation: Insert the chosen coffee filter (standard or ESE pod filter) into the filter holder.
- Coffee Filling: Fill the filter with freshly ground coffee, ensuring it does not exceed the filter's edge. Use the measuring spoon and coffee press to compact the coffee firmly. Remove any excess coffee from the filter's edge to ensure a proper seal.
- Assembly: Assemble the filter holder back into the appliance by rotating it to the right until it locks into position.
- Power On & Heating: Plug in the appliance and set the On/off switch to the "on" position. The red indicator light will blink, indicating the machine is heating. Once heating is complete, the red light will turn steady.
- Brewing: Slide the coffee switch downwards to start brewing coffee. Once the desired amount of coffee is obtained, slide the switch to the "off" position.
Frothing Milk:
- Preparation: After brewing coffee, slide the steam switch downwards. The blue indicator light will start blinking, then turn steady once the appliance has heated up for steaming.
- Milk Container: Fill a cup or mug with whole milk (at room temperature is recommended for best results). It is important to use a milk mug or container with a diameter of at least 70 ± 5 mm, ensuring it is tall enough to accommodate the milk doubling in volume during frothing.
- Frothing Process: Introduce the steam tube into the milk at a depth of 1-2 cm. Slowly rotate the steam knob anticlockwise to emit steam. Move the mug up and down while frothing.
- Completion: Once the desired milk froth is achieved, rotate the steam knob clockwise and set the steam switch to the "off" position.
- Warning: Do not rotate the steam knob quickly, as this can cause steam accumulation and milk ejection, leading to burns. The steam tube may emit some water droplets before producing steam.
Hot Water Dispensing:
- Power On & Heating: Turn the appliance on, and wait for the red indicator light to become steady, indicating it has finished heating.
- Dispensing: Slide the coffee switch downwards to dispense hot water.
- Completion: Once enough hot water is obtained, take the switch to the "off" position. Repeat these steps as necessary, allowing the machine to preheat between cycles.
Cooling Process:
After using the steam function or brewing coffee, the appliance's temperature will be high. Both indicator lights will blink quickly, signaling that the temperature needs to decrease. To cool down:
- Rotate the steam knob anticlockwise and slide the coffee switch to the "on" position. Water will be dispensed through the steam tube.
- Once the red light indicator stops blinking, turn off the coffee switch and set the steam knob to the "off" position. The temperature will decrease, and the machine will be ready to brew more coffee.
Standby Mode:
The appliance will switch to standby mode after 2 minutes of inactivity. If this occurs, it is recommended to turn the On/off switch to the "off" position.
Maintenance Features
Cleaning and Storage:
Always turn off and unplug the appliance from the power supply, allowing it to cool down completely before cleaning. Avoid using abrasive cleaners or scouring pads, as they can damage the product's surface.
- External Cleaning: Regularly clean the outer part of the appliance with a soft, dampened cloth. Do not use metal, sharp, or rough cleaning accessories.
- Main Body: Do not immerse the main body of the appliance in water or other liquids.
- Removable Parts: Wash the water tank, drip tray, measuring spoon, filter holder, filter, and cup-holder tray under running water with a mild detergent after each use. Rinse thoroughly with water and leave to dry completely.
- Steam Tube: After using the steam function, the tube must be cleaned immediately with a cloth. Release steam to prevent possible blockages inside the tube. If the steam tube becomes clogged, use a needle to unblock it.
- Filter Holder: To clean the filter holder, rotate it to the left to detach it. Empty all coffee residues. Clean it with water and a cloth; do not wash it in the dishwasher.
- Water Tank: Remove the water tank from the machine. Thoroughly wash the tank and its lid under running water with a mild detergent, then rinse with water. Leave until completely dry.
- Storage: Dry all components thoroughly before storing the appliance or using it again.
Troubleshooting:
The manual provides solutions for common issues:
- Water leaks from the bottom: Check and clean the drip tray. If the issue persists, the coffee maker may be malfunctioning and requires contact with an authorized service facility.
- Water leaks from the outer side of the filter: Remove any coffee powder from the filter edge.
- Acid (vinegar) taste in coffee: Clean the coffee maker multiple times as described in the "before first use" section to remove mineral deposits.
- Coffee maker not working: Ensure the power cord is correctly plugged into a wall outlet. If it still doesn't work, contact an authorized service facility.
- Steam cannot froth: Ensure the steam ready indicator is illuminated before attempting to froth. Use a high and narrow cup, and use whole milk.
This appliance is designed for ease of use and maintenance, ensuring a satisfying coffee experience with proper care.