EasyManua.ls Logo

LOBSTER Elite liberty - User Manual

LOBSTER Elite liberty
10 pages
Print Icon
To Next Page IconTo Next Page
Loading...
owners manual
elite liberty
play more. win more.
®
TM
®
Question and Answer IconNeed help?

Do you have a question about the LOBSTER Elite liberty and is the answer not in the manual?

Summary

Safety Warnings

General Injury Prevention Guidelines

Essential safety precautions to avoid injury, including keeping clear of the ball path and not inserting body parts.

Machine Setup and Handling

Machine Assembly

Instructions for detaching and reattaching the hopper and noting wire deflectors.

Handle Operation

Steps for raising and folding the machine's handle for operation and transport.

Control Panel Functions

Control Panel Overview

Detailed explanation of the Power, Horizontal, Remote switches, Reset Button, Feed/Speed/Spin controls, and indicators.

Charging and Battery Management

Charging Procedures

Steps for charging the battery using standard or premium chargers, including LED status indicators.

Operating the Ball Machine

Court Placement and Initial Setup

Positioning the machine on court and initial steps for turning on, setting feed/speed, and loading balls.

Advanced Features and Care

Elite Remote Control Usage

Instructions for activating and using the optional remote control for feed and sweep functions.

Limited Warranty Information

Warranty Coverage and Period

Details on the 2-year warranty period for the product, battery, and server wheels.

Overview

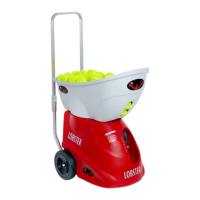
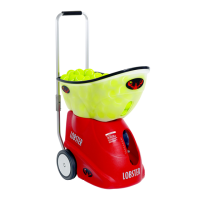
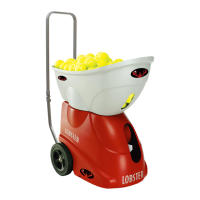
The document is an owner's manual for the "elite™ liberty" tennis ball machine by Lobster Sports.

Function Description:

The Lobster elite™ liberty is a tennis ball machine designed for tennis practice. It is intended for use in a dedicated tennis facility, with players standing on the opposite side of a tennis net at a minimum of 35 feet away from the machine. The machine is designed to throw tennis balls only. It features adjustable feed intervals, ball speed, and spin, as well as horizontal oscillation to vary shot placement.

Important Technical Specifications:

  • Weight: Approximately 35 pounds.
  • Battery: 9 amp rechargeable battery.
  • Standard Charger: Charges a depleted battery in 18-22 hours.
  • Premium Charger (optional): Charges a depleted battery in 3 hours and can extend run time by 2-4 hours when connected during play.
  • Feed Interval: Adjustable from 2-12 seconds.
  • Speed: Adjustable from 10-80 mph.
  • Spin: Adjustable for under spin and top spin.
  • Oscillation: Random horizontal oscillation.
  • Warranty: 2-year limited warranty on the machine (excluding battery and server wheels, which have a 6-month warranty). Chargers, accessories, demonstration models, and reconditioned machines have a 1-year warranty. Extended warranties are available.

Usage Features:

  • Machine Assembly: The hopper detaches for transport and reattaches by pushing it onto case knobs. Wire deflectors should not be removed.
  • Handle Operation: The handle can be lifted until lock buttons click into place. To fold, press hinge lock buttons and push the top section forward. The handle is for pushing or pulling, not for pulling up and down stairs.
  • Transporting: For vehicle transport, invert the hopper to cover the machine and fold the handle. Molded handholds on the underside are used for lifting.
  • Court Placement: Align the white line marker on the bottom of the machine with the baseline at the center mark for optimal position and sweep range. Moving the machine closer to the net narrows the sweep, while moving it back widens it. Horizontal sweep can be used to reposition without lifting.
  • Initial Set Up:
    • Turn on the machine using the POWER switch.
    • Set FEED to 12 seconds and SPEED to 10 mph.
    • Place 3-4 balls in the hopper to confirm trajectory and speed. Adjust as needed.
    • Turn FEED off, load the hopper, then turn FEED on to play.
    • Turning FEED off (instead of POWER off) conserves battery.
  • Control Panel:
    • A. Power Switch: Turns the machine on/off.
    • B. Horizontal Switch: Turns random horizontal oscillation on/off.
    • C. Remote Switch: Activates the optional elite remote control.
    • D. Reset Button: Pops out during malfunction. Turn off machine, push button in, and power up. Contact Customer Service if issues persist.
    • E. Feed Indicator: LED lights when the feed motor turns.
    • F. Feed Knob: Adjusts feed interval (2-12 seconds). Turn counter-clockwise to turn feed off.
    • G. Speed Knob: Adjusts ball speed (10-80 mph).
    • H. Spin Knob: Controls the amount of spin on the ball.
    • I. Status Indicator: LED lights indicate battery level and/or machine status.
    • J. Elevation Crank: Located on the side of the red case. Pull out and turn clockwise to raise ball trajectory, counter-clockwise to lower. An indicator on the front helps identify preferred settings.
    • K. Charger Port: Located on the red case to the left of the control panel. Slide the black cover to expose the jack.
  • Battery Level Indication (on control panel LED when in use):
    • Green SOLID & Red OFF: FULL CHARGE
    • Green FLASHING & Red OFF: 2/3 CHARGE
    • Green OFF & Red FLASHING: 1/3 CHARGE
    • Green OFF & Red SOLID: DEPLETED
  • Ball Consistency: The machine performs best with pressureless tennis balls, such as Tretorn Micro X balls, to ensure consistent throws. Mixing new and old balls can lead to inconsistencies. Wet balls should never be used.
  • Optional Accessories:
    • Elite Remote Control: Allows turning feed and/or sweep on/off from the court.
    • External AC Power Pack: Provides continuous, uninterrupted use, allowing the machine to run off AC power while still having battery as an option.
    • External Battery Pack: Provides an additional 4-8 hours of court time.

Maintenance Features:

  • Charging Instructions:
    • Charge the machine until fully charged before first use and after each use for optimal battery life.
    • Chargers use trickle charge technology to prevent overcharging.
    • The LED on the charger indicates charging status: blinking orange/red for very depleted, solid green for fully charged.
    • Never let the machine go uncharged for more than one month.
    • Before storing, fully charge the battery and recharge monthly to prevent battery life reduction.
  • Battery Life: The typical battery life is 3 years with proper charging. Replacement batteries and video tutorials are available on the Lobster Sports website and YouTube channel.
  • Cleaning:
    • Always turn off power before cleaning.
    • The exterior can be wiped with a mild detergent.
    • The interior can be vacuumed to remove tennis ball fuzz.
    • Remove debris from balls before refilling the hopper to keep the inside clean.
  • Storage:
    • Store indoors in a clean, dry location.
    • Avoid exposure to rain, snow, and excessive heat (e.g., in a closed vehicle reaching 180°F), as these can damage electronics and battery.
    • The elite storage cover (optional accessory) is recommended to protect the machine from elements, dust, and moisture.
  • Warranty Activation: Register the machine within 30 days of purchase by emailing or mailing the completed form (found on the last page of the manual) to Lobster Sports. Extended warranties must be activated within 60 days of purchase.
  • Customer Service: Contact Lobster Sports at 800.526.4041 (8:00 am - 4:30 pm PST, M-F) or customerservice@lobstersports.com. Provide the machine's serial number (found on a white sticker on the metal platform underside) when contacting.
  • Shipping Damage: Contact Customer Service immediately for replacements if damage occurs during shipping. Save the original shipping box and packing inserts for potential returns.

LOBSTER Elite liberty Specifications

General IconGeneral
BrandLOBSTER
ModelElite liberty
CategorySports & Outdoors
LanguageEnglish

Related product manuals