Models 375 (Including Series One), 375/1, 375/2 & 375/4 Section 2
Ludlum Measurements, Inc. Page 2-3 May 2017
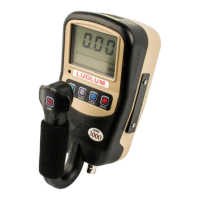
Check the detector dead time correction by pressing down on the DEAD
TIME
button. The dead time correction will be displayed as long as the
button is pressed. The dead time correction is in units of microseconds*.
The dead time correction can be set from 0.1 microseconds to 9999 micro-
seconds*.
* Model 375 Series One: In the special case of the Model 375 Series One,
make note of the following changes resulting from firmware modification:
With the RANGE dipswitch in the left position, two decimal places will
be displayed.
With the
RANGE dipswitch in the right position, no decimal place will be
displayed.
Calibration constant will be displayed in cps per unit, instead of cpm per
unit.
Dead Time Correction will display in 10
ths
of microseconds (i.e. 0.50
µsec instead of 5 µsec).
Setting Alarm Points
The LOW ALARM and HIGH ALARM points can only be changed while the
instrument is in calibration mode. Switch the top dipswitch CAL MODE
(behind the calibration cover) to the right to place the instrument into
calibration mode.
Changing alarm points is done by holding down the corresponding
parameter key and pressing the up or down arrow buttons. Alarm points can
be set in the range of 0.1 to 9999*. When an alarm point is changed, the
instrument will sound an audible beep to confirm the saving of the
parameter, and will then return to displaying the current radiation level.
Note:
Once the alarm point(s) is set, it is important to remember to
switch the CAL MODE switch back to the left. This action
protects the parameters from inadvertent changes.
 Loading...