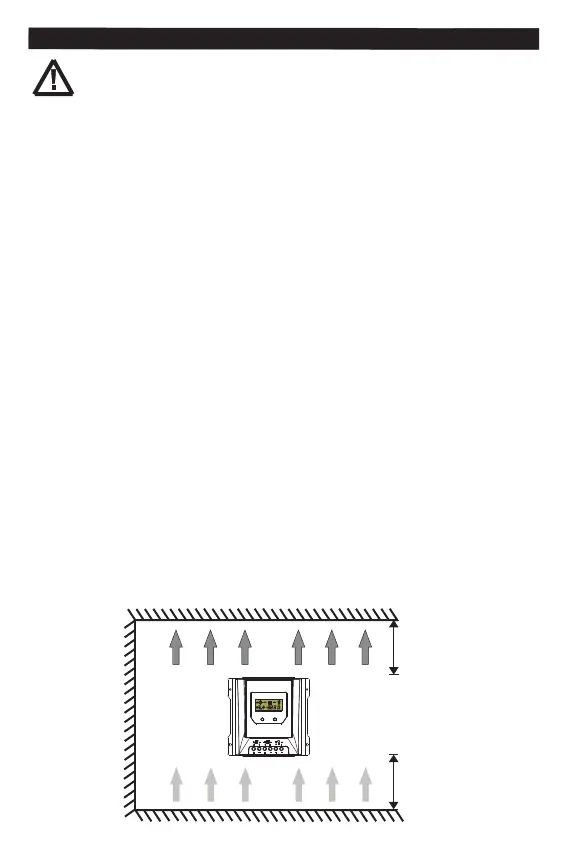
>15CM
>15CM
COOL AIR
WARM AIR
MEN U
OK
5, Installation
5.1 Installation Notes
Batteries can produce flammable gases. Avoid making sparks, using fire or any naked flame. Make
sure that the battery room is ventilated.
Avoid touching or short circuiting wires or terminals. Be aware that the voltages on special terminals
or wires can be as much as twice the battery voltage. Use isolated tools, stand on dry ground, and keep
your hands dry.
Prevent water from entering the internal controller, outdoor installation should avoid direct sunlight
and rain penetration.
⑴The solar charge controller may only be used in PV systems in accordance with this user manual and
the specifications of other modules manufacturers. No energy source other than a solar generator may
be connected to the solar charge controller.
⑵Before wiring installation and adjustment of controller, Always disconnect the solar modules and
insurance or circuit breaker of battery terminal.
⑶Only to comply with the range of the battery charge controller.
⑷Batteries store a large amount of energy, never short circuit a battery under all circumstances. We
strongly recommend connecting a fuse directly to the battery to avoid any short circuit at the battery
wiring.
⑸
⑹Uses insulated tools and avoid placing metal objects near the batteries.
⑺Be very careful when working with batteries. Wear eye protection. Have fresh water available to wash
and clean any contact with battery acid.
⑻
⑼
⑽After installation check that all connections are tight line, avoid heat accumulation caused by virtual access
danger.
CAUTION: Please read all instructions and precautions in the manual before installing!
It is recommended to remove the acrylic protective film covering the LCD screen before
installation.
5.2 Mounting Location Requirements
Do not mount the solar charge controller outdoors or in wet rooms. Do not subject the solar charge
controller to direct sunshine or other sources of heat. Protect the solar charge controller from dirt and
moisture. Mount upright on the wall on a non-flammable substrate. Maintain a minimum clearance of
15cm below and around the device to ensure unhindered air circulation. Mount the solar charge controller
as close as possible to the batteries.
Mark the position of the solar charge controller fastening holes on the wall, drill 4 holes and insert dowels,
fasten the solar charge controller to the wall with the cable openings facing downwards.
7