GB
17
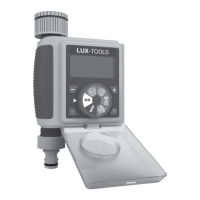
Yourunitataglance
►P.3,fig.1
1. Connection for the water tap
2. Display
3. Dial
4. Controlled connection
Scopeofdelivery
• Operating manual
• Irrigation computer
• Connector for garden hose
Usingforthefirsttime
Insertthebattery
– Pull out the battery compartment on the back of
the unit.
– Insert the batteries. Payattentiontocorrect
polarity.
– Replace the battery compartment. Makesurethe
gasketisinthecorrectposition.
Connection
– Turn off the water tap.
– Screw the coupling nut (1) manually onto the
water tap. Donotusetools.
– Turn on the water tap.
Programming
Settingtheclock
– Turn the dial to the [ ] position.
– The clock functions in 24hr mode. Press [+] but-
ton or [−] button to select the correct time (If you
press and hold the [+] or [−] buttons, the numbers
will change more rapidly.)
Settingthestarttime
– Turn the dial to [ ].
– Press [+] or [−] button to select the desired time
to start (If you press and hold the [+] or [−] but-
tons, the numbers will change more rapidly.)
• The default start time is 5:00AM.
Settingthewateringduration
– Turn the dial to [ ].
– Press [+] or buttons, to select the desired water-
ing time (If you press and hold the [+] or [−] but-
tons, the numbers will change more rapidly.)
• The watering durations are: 5, 10, 15, 20, 25, 30,
35, 40, 45, 50, 55 seconds; and 1 minute to 360
minutes. (The default watering duration is 15 min-
utes.)
• If the [ ] is set to 0, the device will not operate.
Settingthewateringfrequency
– Turn the dial to [ ].
– Press [+] or [−] buttons to select the desired fre-
quency.
– The watering frequency range is from 10 secs to
7 days. The default watering frequency is 1 day.
WateringFrequencyChart
10 SECS, 30 SECS, 1 MINS, 3 MINS, 5 MINS,
1 HRS, 2 HRS, 4 HRS, 12 HRS, 1 DAYS, 2 DAYS,
3 DAYS, 4 DAYS, 5 DAYS, 6 DAYS, 7 DAYS
– Once you have set all of the above, turn the dial
to [ON]. The timer will run as per your set times.
Settingaraindelay(Setupwhenrainingto
temporarilydelaywatering)
– Turn the dial to [ON].
– Press [ ] button once to see the
words [DELAY].
– Press [ ] button again to select the number of
days you would like to delay watering. (eg. 24, 48,
72 Hrs)
• If no additional settings are made in 5 seconds,
the timer will save the current setting and exit to
the home screen (clock)
• The screen will then flash between the clock and
the rain delay time (in hours).
– Turn the dial to [OFF] or [ON], or set the rain
delay time to [0],if you would like turn off the rain
delay function.
RainDelayTimeChart
0 HRS, 24 HRS, 48 HRS, 72 HRS
– [ ]: Press this button to activate manual watering
mode.
HandyHints
• The LCD screen shows the countdown time until
the next watering. If you turn the dial from [ON] to
any other position, the watering will stop immedi-
ately.
• When you turn the dial to [ON] and press [ ] but-
ton, the timer will shift to manual mode and water-
ing will begin immediately.
• In manual mode, when you press [ ] button
again, or turn the dial to any position except [ON],
then watering will stop immediately.
• In manual mode, if the rain delay time is set, the
timer will not display the rain delay time.
• Default manual watering time is 30 minutes, the
setting range is 0 to 240 minutes.
• [OFF]: When you turn the dial to [OFF], the timer
will turn off.
• Minimum working voltage is 2.4 V. When the bat-
tery is lower than 2.4 V, the low battery sign will
flash on the screen, and timer will stop working.
• To protect your timer from the weather ensure the
front panel of the timer is covered with the cover
provided once your timer is set.
Cleaningandmaintenance
Cleaning
– Wipe the outside of the unit with a damp cloth.
– Regularly clean the filter sieve in the water hose
connection (1) using a brush.
Note:The actual appearance of your prod-
uct may differ from the illustrations.
Note:We recommend programming the unit
before you connect it to a water tap.
Note:When the new batteries are inserted,
the default clock time is 12:00 PM.
Note:the timer will not run when the [ ] you
set is greater than [ ].