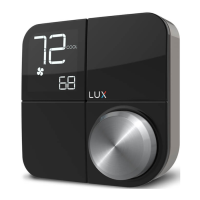
Installation Settings Guide
In this guide we will describe the advanced instal-
lation settings that you can access from KONO
Smart’s main menu. We recommend that an HVAC
service professional uses these settings to fine-tune
your thermostat’s performance for your home.
You can access the installation settings by going
to the main menu and selecting the gear icon. You
will see “IS” on the screen and will be prompted
to select “yes” or “no”. Select “yes” to access the
installation settings.
There are three ways to exit the settings:
1. Continue through the remaining settings until you
pass setting 99.
2. Press and hold the knob for 3 seconds after you
confirm any changes to your settings.
3. Wait 60 seconds after you confirm any changes
to your settings.
Installation Settings Guide
System Type & Configuration
You will first see your current system type and configuration – confirm by pressing the knob
and then you will begin navigating through the available settings.
HVAC system type
F = Furnace
HP = Heat Pump
Available System
Modes
HVAC system subtype
Furnace systems:
ELEC: Electric fan. Thermostat calls fan
to run with heat
GAS: Gas fan. Thermostat does not call
fan to run with heat
BOIL: Boiler. No fan connected to
heating system
Heat Pump
o: Changeover valve = o
b: Changeover valve = B