Specifications
PLATFORM
Operating System
Niagara
4.10.1/4.9.1/4.7.110
Processor 1 GHz AM335x ARM Cortex A8
Memory 512 MB DDR3L 800 MHz, 4 GB 8-bit Embedded MMC on-
board Flash
Real-Time Clock (RTC) Battery-powered clock included to store description/setup values
including: year, month, date, hours, minutes and seconds
COMMUNICATION PORTS
2 Ethernet Ports 10/100 Mbps (RJ-45 Connector)
2 RS-485 Ports RS-485 serial port with 3-screw connector
Mini B-USB
USB Client Connector utilizes 5-pin Mini-B USB cable
Micro USB Serial shell access
Onyxx Network 3-wire (LxH LxL SHLD) high-speed differential serial signal
INPUTS & OUTPUTS
6 Universal Inputs Type-3 10 K ohm thermistors; resistance 0-100 K ohms;
0-10Vdc; 0-20 mA using a 499-ohm resistor; pulse input: up
to 500 Hz; 12 bit A/D resolution
4 Digital Outputs Form A contacts, 24 V at 0.5 A
4 Analog Outputs 0-10 Vdc
Connector Screw Size 3/32” slotted
Supported Wire Size 28-16 AWG
Housing UL94V-0
POWER
Power Input External 24 Vac/dc +10%/-10%, 50/60 Hz, minimum 18 VA/
device
CHASSIS
Construction Base: Plastic, DIN rail or screw mount Cover: Plastic
Cooling Internal air convection
Dimensions 3.46” (8.79 cm) width x 4.25” (10.8 cm) length x
2.125” (5.4 cm) depth
Mounting Flat panel and 35 mm DIN rail mounting options standard
ENVIRONMENT
Operating Temperature Range
0 – 60 °C (32 –140 °F)
Storage Temperature Range 0 – 70 °C (32 –158 °F)
Relative Humidity Range 5 – 95% RH, non-condensing
CERTIFICATIONS
Compliance Pending: FCC 47CFR Parts 15B and 18, EN 55022, EN 55011,
ICES-003, RoHS, UL 916, CSA C22.2 No. 205-17, EN 61010-1: 2010,
IEC 61010-1, 3rd edition
Revised 1/28/2021 | JENE-EG414-IG-V1.0
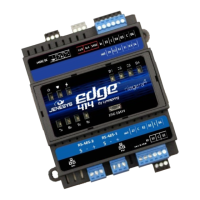
Make sure the JENEsys Edge 414 is fully up and running. The power LED should turn
on and the heartbeat LED should be flashing.
Make sure the Ethernet cable is connected firmly to the primary Ethernet port on the
JENEsys Edge 414. The LEDs on the Ethernet port will indicate if the JENEsys Edge 414 is
connected to the network. The blue LINK LED will indicate the JENEsys Edge 414 is
connected to a network and additional blue ACTIVITY LEDs will indicate the JENEsys
Edge 414 is transmitting and receiving on the network.
If you are connecting directly from your computer to the JENEsys Edge 414 ensure your
computer’s network settings are set so that your computer’s IP address is anything
other than the device, in the same subnet.
Close and re-open the browser to make sure that the browser did not cache the
previous page.
Statement of Conditions
In the interest of improving internal design, operational function, and/or operability,
Lynxspring reserves the right to make changes to the product described in this
document without notice. Lynxspring does not assume any liability that may occur due to
the use or application of the product(s) or circuit layout(s) described herein.
Technical Support
Thank you for selecting Lynxspring products. Please contact our Support Team with any
questions about installing or setting up your new JENEsys Edge 414 (JENE-EG414).
support@lynxspring.com | toll free: 877-649-5969
Proper Disposal
This product contains a lithium battery.
The U.S. Environmental Protection Agency (EPA) does not regulate the disposal of
batteries in small quantities; large quantities are regulated under the Universal rules of
Hazardous Waste regulations (40 CFR PART 273). Lithium batteries are not currently
being collected by manufacturers for recycling. While there are no federal regulations for
disposal of lithium batteries, individual states can establish their own guidelines for
battery disposal and should be contacted for any local disposal guidelines.
The shipment of live or discharged lithium batteries is governed by the Department of
Transportation (DOT) in their Code of Federal Regulations (49 CFR), paragraph
173.185(j). Remember that before any type of disposal the batteries should be
discharged completely. Tape the contacts with electrical tape and package so as to
prevent contacts accidentally coming together at any time.
©2021 Lynxspring, Inc. All Rights Reserved.
NOTICE: All information contained herein is, and remains the property of Lynxspring, Incorporated.
The intellectual and technical concepts contained herein are proprietary to Lynxspring, Incorporated and may
be covered by U.S. and Foreign Patents, patents in process, and are protected by trade secret or copyright
law. Dissemination of this information or reproduction of this material is strictly forbidden unless prior written
permission is obtained from Lynxspring Incorporated.
Lynxspring
®
, JENEsys
®
, JENEsys Edge®, Onyxx
®
and Helixx
®
are registered trademarks of Lynxspring, Inc.
Niagara Framework
®
is a registered trademark of Tridium, Inc.
The information and/or specifications published here are current as of the date of publication of this
document. Lynxspring, Inc. reserves the right to change or modify specifications without prior notice. The latest
product specifications can be found by contacting our corporate headquarters in Lee’s Summit, Missouri.
Products or features contained herein are covered by one or more United States or foreign patents.
Other brand and product names are trademarks or registered trademarks of their respective holders.
This document may be copied by parties who are authorized to distribute Lynxspring products in connection
with distribution of those products, subject to the contracts that authorize such distribution. It may not
otherwise, in whole or in part, be copied, photocopied, reproduced, translated, or reduced to any electronic
medium or machine-readable form without prior written consent from Lynxspring, Inc. Complete
Confidentiality, Trademark, Copyright and Patent notifications can be found at:
http://resources.lynxspring.com.
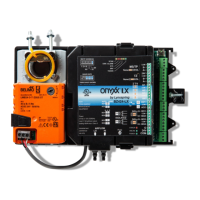
Connecting Onyxx Networks (Onyxx XM 34IO to JENEsys Edge 414)
Step 1: Unplug 3-position screw terminal connector (gray) from port marked LxH, Lx
L and
SHLD on the JENEsys Edge 414.
Step 2: Insert a wire between LxH terminal (far left terminal) on the 3-position screw
t
erminal connector of each device and tighten down the screw.
Step 3: Insert a wire between LxL terminal (center terminal) on the 3-position screw
terminal connector of each device and tighten down the screw.
Step 4: Insert the shield wire between SHLD terminal (far right terminal) on the
3-position screw terminal to connect of each device a
nd tighten the screw.
Step 5: If the Onyxx XM 34IO is located at the end of the network, Lynxspring recommends
installing a
120-ohm end-of-line resistor on the LxH and LxL terminals.
Step 6: Plug 3-position screw terminal connector back into the port marked LxH, LxL and
SHLD on the JENEsys Edge 414 and Onyxx XM 34IO as needed.
Troubleshooting
If you are unable to make a platform connection to the JENEsys Edge 414:
Corporate Headquarters
2900 NE Independence Ave
Lees Summit, MO 64064
P: 816-347-3500 | F: 816-347-0780
This symbol was placed in accordance with the European Union Directive
2002/96 on the Waste Electric and Electronic Equipment (the WEEE Directive). If
disposed of within the European Union, this product should be treated and
recycled in accordance with the laws of your jurisdiction implementing the
WEEE Directive.
 Loading...